1. Introduction
Hello! We are a writer team from Definer Inc.
Serverless computing has revolutionized the way developers build and deploy applications, allowing them to focus on writing code without managing underlying infrastructure. In this tutorial, we will explore how to quickly create a simple serverless API using AWS (Amazon Web Services) in just 5 minutes. The purpose of this tutorial is to showcase the simplicity and power of serverless architecture in AWS, enabling developers to deploy APIs with minimal effort.
Serverless APIs are lightweight, scalable, and cost-efficient, making them ideal for various use cases like microservices, web applications, and mobile backends. AWS provides a range of serverless services, including AWS Lambda for running code without provisioning servers, and Amazon API Gateway for creating and managing APIs.
In this issue, you are wondering how to build a simple serverless API using AWS.
Let's take a look at the actual screens and resources to explain in detail.
2. Purpose/Use Cases
The purpose of "AWS Simple Serverless" is to introduce developers to the world of serverless computing on AWS. This tutorial aims to showcase the simplicity, flexibility, and power of AWS serverless services in creating scalable and cost-effective applications.
With traditional server-based architectures, developers need to provision, manage, and scale servers, which can be complex and time-consuming. In contrast, serverless computing abstracts away the infrastructure management, automatically scaling resources based on demand, and charging only for actual usage.
This article will utilize the services AWS Lambda, DynamoDB, and API Gateway for the purpose of creating a simple serverless API.
This is a collection of information and practices that you can use as a reference when you want to quickly build a simple serverless API on AWS in the IT field.
3. Database Setup
In the given context, the focus is on creating a database using DynamoDB, an AWS-managed NoSQL database service. DynamoDB provides a fully managed and scalable solution for storing and retrieving structured data with high availability and low latency. Here's a more detailed explanation of the steps involved in creating the DynamoDB table and adding sample data:
(1) Creating DynamoDB Table:
To create a DynamoDB table, you first need to access the DynamoDB console in the AWS Management Console.
- In the console, click on "Create Table" to start the process of creating a new table.
- Specify the table name, in this case, "employee." DynamoDB uses the term "table" to refer to the data structure that stores your data.
- For a NoSQL database like DynamoDB, you need to define a primary key to uniquely identify each item in the table. In this example, "id" is used as the partition key. The partition key determines the physical partition in which the item is stored.
- Optionally, you can add a sort key to enable sorting of items within the same partition. However, for this example, we are only using the partition key.
- Click on "Create" to create the DynamoDB table.
(2) Adding Sample Data:
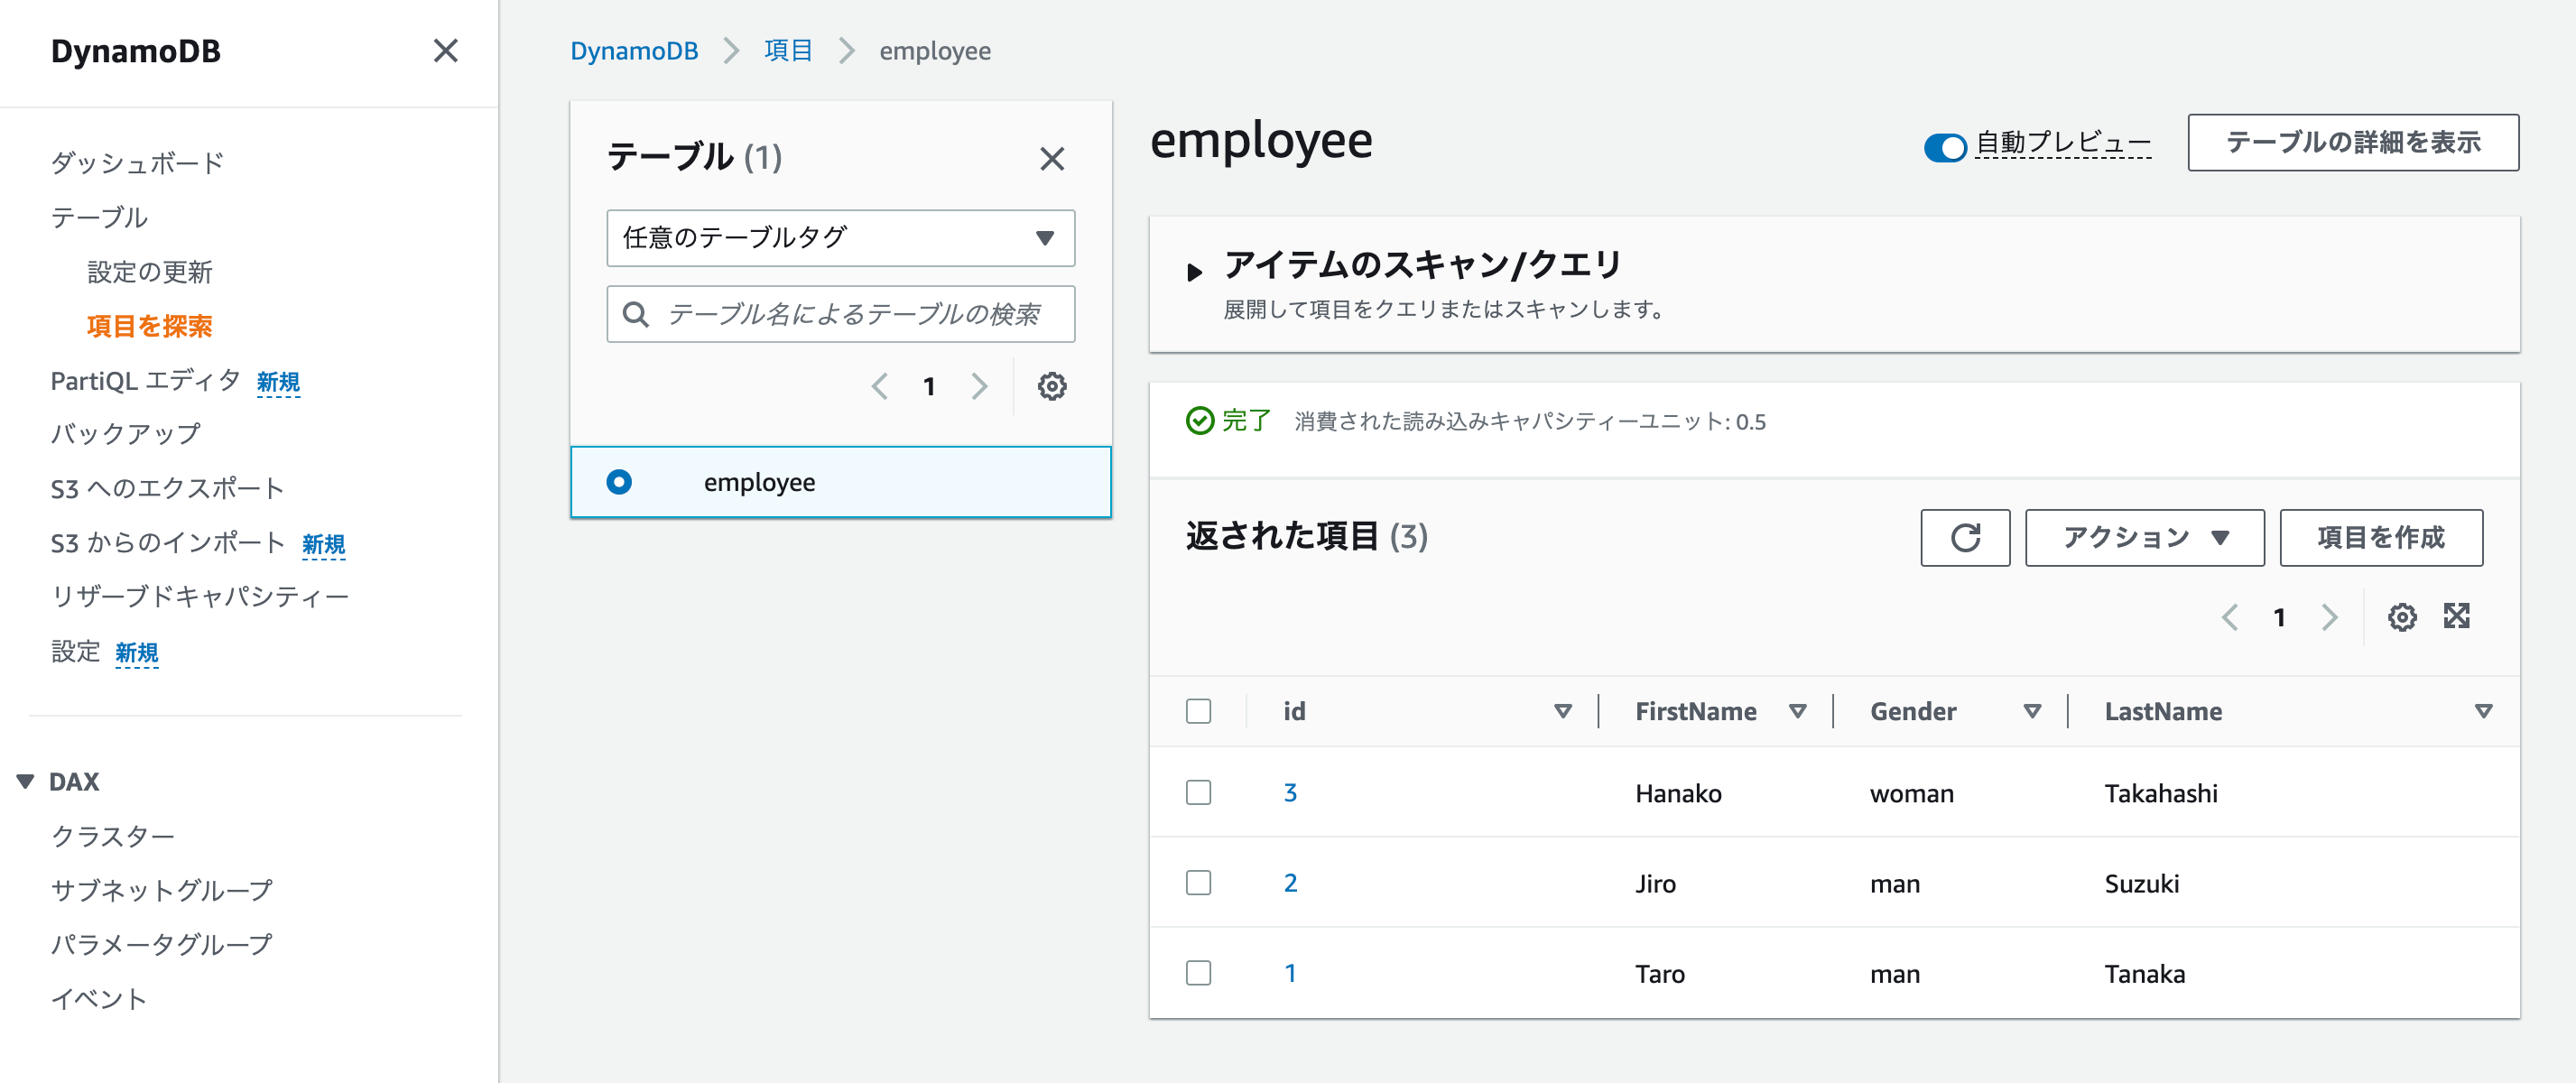
Once the table is created, you can navigate to the "Explore Items" section in the DynamoDB console.
- From the "Explore Items" section, you can start adding items and sample data to the "employee" table.
- Each item in DynamoDB is a collection of attributes. For example, an "employee" item might have attributes like "id," "name," "designation," and "department."
- Click on "Create Item" to add a new item to the table.
- In the "Create Item" dialog, you can enter the attributes and their values for the employee. For example, you might add an employee with "id" 1, "name" as "John Doe," "designation" as "Software Engineer," and "department" as "Engineering."
- You can repeat this process to add more sample data, creating multiple employee records with different "id," "name," and other attributes.
By following the above steps, you will have successfully created a DynamoDB table named "employee" and added sample data in the form of employee records. This table is now ready to be used to store and retrieve employee data in your application. DynamoDB's managed nature eliminates the need for manual database administration, allowing developers to focus on building applications rather than managing infrastructure.
4. Creating Lambda
In the next step, we will implement the application part of the serverless API using AWS Lambda. Lambda is a compute service that allows you to run code in response to events, such as API requests. In this example, we will create a Lambda function using Python 3.9 to handle API requests and interact with the DynamoDB table we created earlier.
Here's a more detailed explanation of the steps involved in creating the Lambda function and integrating it with the API Gateway:
(1) Creating Lambda Function:
- To create the Lambda function, you need to access the Lambda console in the AWS Management Console.
- Click on "Create Function" to start creating a new Lambda function.
- Choose "Author from scratch," and then provide a name for your function, such as "GetEmployeeData" or something relevant to your use case.
- For the runtime, select "Python 3.9" as the programming language for your function.
- In the function code section, you can copy and paste the Python code that will handle the API requests and interact with DynamoDB. This code will contain the logic to retrieve employee data from the DynamoDB table based on the incoming API request.
Additionally, you need to ensure that the Lambda function has permissions to access the DynamoDB table. You can achieve this by attaching an IAM role to the Lambda function that grants the necessary permissions to read from the "employee" DynamoDB table.
{
    "Version": "2012-10-17",
    "Statement": [
        {
            "Effect": "Allow",
            "Action": [
                "dynamodb:GetItem",
                "dynamodb:Scan",
                "dynamodb:Query"
            ],
            "Resource": "arn:aws:dynamodb:REGION:ACCOUNT_ID:table/employee"
        }
    ]
}
(2) API Gateway Integration:
After creating the Lambda function, you need to integrate it with Amazon API Gateway to make it accessible through API endpoints.
- In the API Gateway console, you can create a new API or use an existing one.
- Create a new resource and method (e.g., GET or POST) for the API endpoint you want to expose.
- In the method integration settings, choose "Lambda Function" as the integration type and select the Lambda function you created earlier.
You can also configure request and response mappings to transform data between API Gateway and Lambda, ensuring the expected format is passed to and received from the Lambda function.
(3) Return Format:
When integrating Lambda with API Gateway, it's essential to ensure that the Lambda function returns the response in the expected format.
For example, if you are returning data from the DynamoDB table, you might want to format the response as JSON so that it can be easily consumed by clients calling the API.
By implementing the application part using Lambda and integrating it with API Gateway, you will have created a serverless API that can interact with DynamoDB to retrieve employee data based on incoming API requests. This serverless architecture eliminates the need for managing servers and enables automatic scaling to handle varying request loads. AWS Lambda's pay-as-you-go model ensures cost efficiency, as you only pay for the compute time used during API invocations.
import json
import boto3
from boto3.dynamodb.conditions import Key,Attr

def lambda_handler(event,context):
    __TableName__ = "employee"
    Primary_Column_Name = 'id'
    Primary_Key="1"
    columns=["LastName","FirstName","Gender"]
    client = boto3.client('dynamodb')
    DB=boto3.resource('dynamodb')
    table=DB.Table(__TableName__)

    try:
        response=table.get_item(
            Key={
                Primary_Column_Name:Primary_Key
            })

        return {
            'isBase64Encoded': False,
            'statusCode': 200,
            'headers': {},
            'body': json.dumps(response["Item"])
        }
    except Exception as e:
        return {
            'isBase64Encoded': False,
            'statusCode': 400,
            'headers': {},
            'body': json.dumps(e)
        }
5. API Gateway Implementation
In the final step, we will integrate the API Gateway with the Lambda function we created earlier to make the serverless API accessible to external clients. This integration enables us to invoke the Lambda function when an HTTP request is made to the API Gateway URL.
Here's a more detailed explanation of the steps involved in integrating API Gateway and Lambda and how to confirm the access URL of the API:
(1) Integration of API Gateway and Lambda:
To integrate API Gateway with Lambda, go to the Lambda function details screen in the AWS Management Console.
- From there, navigate to "Settings" → "Triggers" → "Add Trigger."
- Select "API Gateway" as the trigger type, and then choose "REST API."
- For simplicity in this example, we set the security to "Open," meaning the API doesn't require any authentication. However, in a real-world scenario, it's essential to set up proper authentication with IAM or tokens to secure the API.
- Click "Add" to create the API Gateway integration with Lambda.
(2) Authentication Options:
AWS API Gateway provides several authentication options to secure your API and control access to its endpoints. These options include:
- Open - No authentication is required, and anyone with the API's endpoint can access it. This is suitable for public or publicly accessible APIs that don't require authentication.
- IAM (Identity and Access Management) - Uses AWS IAM roles and policies to control access to the API. Only authenticated AWS users or applications with the necessary IAM permissions can access the API.
- API Key - Requires clients to present an API key with their requests. API keys are simple tokens that identify the client and can be used to control access to the API.
- Custom Authorizer - Allows you to use custom code (usually a Lambda function) to authenticate and authorize requests. This is useful when integrating with external identity providers or implementing complex authentication workflows.
- Cognito User Pools - Integrates with Amazon Cognito User Pools, a user directory service that provides authentication and user management capabilities.
(3) Confirm the Access URL of the API Gateway:
After integrating the API Gateway with Lambda, go to the API Gateway details screen in the AWS Management Console.
- Click on the "Stage" tab, where you will find the API URL in the "Call URL" section.
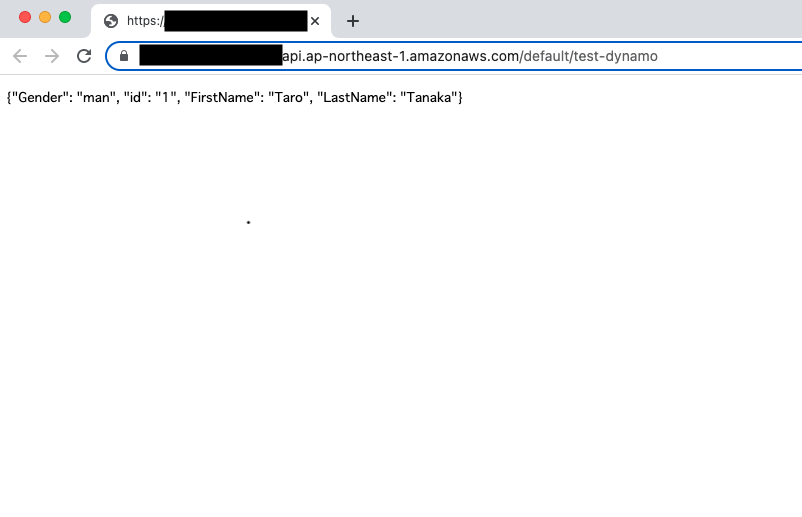
- The URL to access the API will look something like this:
## URL to access
https://xxxxxx.execute-api.ap-northeast-1.amazonaws.com/default/${LAMBDA Name}
- When making an HTTP request to this URL, the API Gateway will invoke the corresponding Lambda function, and the function will process the request and respond back to the client.
(4) Accessing the API:
You can access the serverless API by making HTTP requests to the provided API Gateway URL from various clients, such as web browsers, mobile apps, or other applications.
Since we integrated the API Gateway with the Lambda function, the API Gateway acts as the frontend to the Lambda backend. When you make an HTTP request, it gets routed to the appropriate Lambda function based on the API's configuration.
By completing the integration of API Gateway and Lambda, you have successfully created a fully functional serverless API. When you access the API Gateway URL from a browser or any HTTP client, it will trigger the associated Lambda function, which will, in turn, interact with the DynamoDB table to retrieve and return data. This integration showcases the simplicity and power of building serverless APIs using AWS services, enabling you to develop scalable and cost-efficient applications without managing infrastructure.
6. Cited/Referenced Articles
Building a simple serverless API that a beginner can do in 5 minutes [Lambda ...
AWS Event Schedule | AWS
Web novices create a serverless web application using AWS
[Event Report] JAWS-UG Container Branch Introductory Session #7: Beginners Welcome ...
Frequently Asked Questions - AWS Support | AWS
How to Create a Website] 9 Step Guide for Beginners - Business ...
7. About the proprietary solution "PrismScaler"
・PrismScaler is a web service that enables the construction of multi-cloud infrastructures such as AWS, Azure, and GCP in just three steps, without requiring development and operation.
・PrismScaler is a web service that enables multi-cloud infrastructure construction such as AWS, Azure, GCP, etc. in just 3 steps without development and operation.
・The solution is designed for a wide range of usage scenarios such as cloud infrastructure construction/cloud migration, cloud maintenance and operation, and cost optimization, and can easily realize more than several hundred high-quality general-purpose cloud infrastructures by appropriately combining IaaS and PaaS.

8. Contact us
This article provides useful introductory information free of charge. For consultation and inquiries, please contact "Definer Inc".
9. Regarding Definer
・Definer Inc. provides one-stop solutions from upstream to downstream of IT.
・We are committed to providing integrated support for advanced IT technologies such as AI and cloud IT infrastructure, from consulting to requirement definition/design development/implementation, and maintenance and operation.
・We are committed to providing integrated support for advanced IT technologies such as AI and cloud IT infrastructure, from consulting to requirement definition, design development, implementation, maintenance, and operation.
・PrismScaler is a high-quality, rapid, "auto-configuration," "auto-monitoring," "problem detection," and "configuration visualization" for multi-cloud/IT infrastructure such as AWS, Azure, and GCP.