1. Introduction
The introduction provides an overview of the article's focus, which is to provide a comprehensive guide on AWS auto scaling and load balancing for EC2 instances. It may explain the importance of these features in ensuring high availability and optimal performance for applications hosted on EC2 instances.
2. Purpose
This section states the purpose of the article, which is to educate readers about AWS auto scaling and load balancing concepts specifically for EC2 instances. It sets the reader's expectations for the content that follows.
3. What is AWS Load balancer?
An AWS (Amazon Web Services) Load Balancer is a service provided by Amazon that distributes incoming network traffic across multiple targets, such as Amazon EC2 instances, containers, IP addresses, or Lambda functions. The main purpose of a load balancer is to ensure that the workload is evenly distributed across these targets, which helps improve the availability and fault tolerance of applications.
AWS offers several types of load balancers, each designed to meet specific requirements:
- Classic Load Balancer (CLB): This is the older version of AWS load balancer. It distributes traffic at both the application and network levels. It supports Layer 4 (Transport Layer) and Layer 7 (Application Layer) load balancing.
- Application Load Balancer (ALB): This load balancer operates at the Layer 7 level and is specifically designed for routing HTTP/HTTPS traffic. It can route requests based on content, making it suitable for applications that require advanced routing features.
- Network Load Balancer (NLB): NLB operates at the Layer 4 level and is optimized for handling TCP/UDP traffic. It is particularly useful for scenarios that require high performance and low latency.
- Gateway Load Balancer: This type of load balancer is used to route traffic to a collection of virtual appliances that process network traffic, such as firewalls or intrusion detection systems.
4. What is Auto scaling in AWS?
Auto Scaling is a feature provided by Amazon Web Services (AWS) that allows you to automatically adjust the number of resources, such as Amazon EC2 instances, in your application's fleet based on changes in demand. The primary goal of Auto Scaling is to ensure that your application can handle varying levels of traffic while optimizing costs by only using the necessary resources.
Auto Scaling works by setting up rules and policies that define when and how instances should be added or removed from your application environment. When traffic increases, Auto Scaling can automatically launch new instances to handle the load. Conversely, when traffic decreases, it can terminate instances to avoid unnecessary costs.
Here's how Auto Scaling typically works:
- Define Auto Scaling Group: You create an Auto Scaling group, which is a logical grouping of instances that share similar characteristics. This group defines the baseline configuration for your instances, such as the Amazon Machine Image (AMI), instance type, security groups, and other settings.
- Set Scaling Policies: You define scaling policies that specify the conditions under which Auto Scaling should add or remove instances. These policies can be based on metrics like CPU utilization, network traffic, or custom application metrics.
- Define Scaling Triggers: Scaling triggers determine when Auto Scaling should take action based on the scaling policies. For example, if CPU utilization exceeds a certain threshold for a specified period, Auto Scaling might trigger the addition of new instances.
- Configure Scaling Limits: You can set upper and lower limits for the number of instances that can be launched or terminated, preventing excessive scaling.
- Launch Configuration: A launch configuration specifies the details of how new instances should be launched, such as the instance type, AMI, and user data scripts.
- Monitoring and Health Checks: Auto Scaling monitors the health of instances in the group. If an instance becomes unhealthy, Auto Scaling can terminate it and replace it with a new instance.
- Scaling Activities: Based on the defined policies and triggers, Auto Scaling performs scaling activities, which include launching or terminating instances as needed.
5. Creating AWS Auto Scaling and Load Balancing to EC2 instances with AWS console
This section provides a step-by-step guide on how to set up AWS auto scaling and load balancing for EC2 instances using the AWS Management Console. It covers creating auto scaling groups, defining load balancers, and integrating them with EC2 instances.
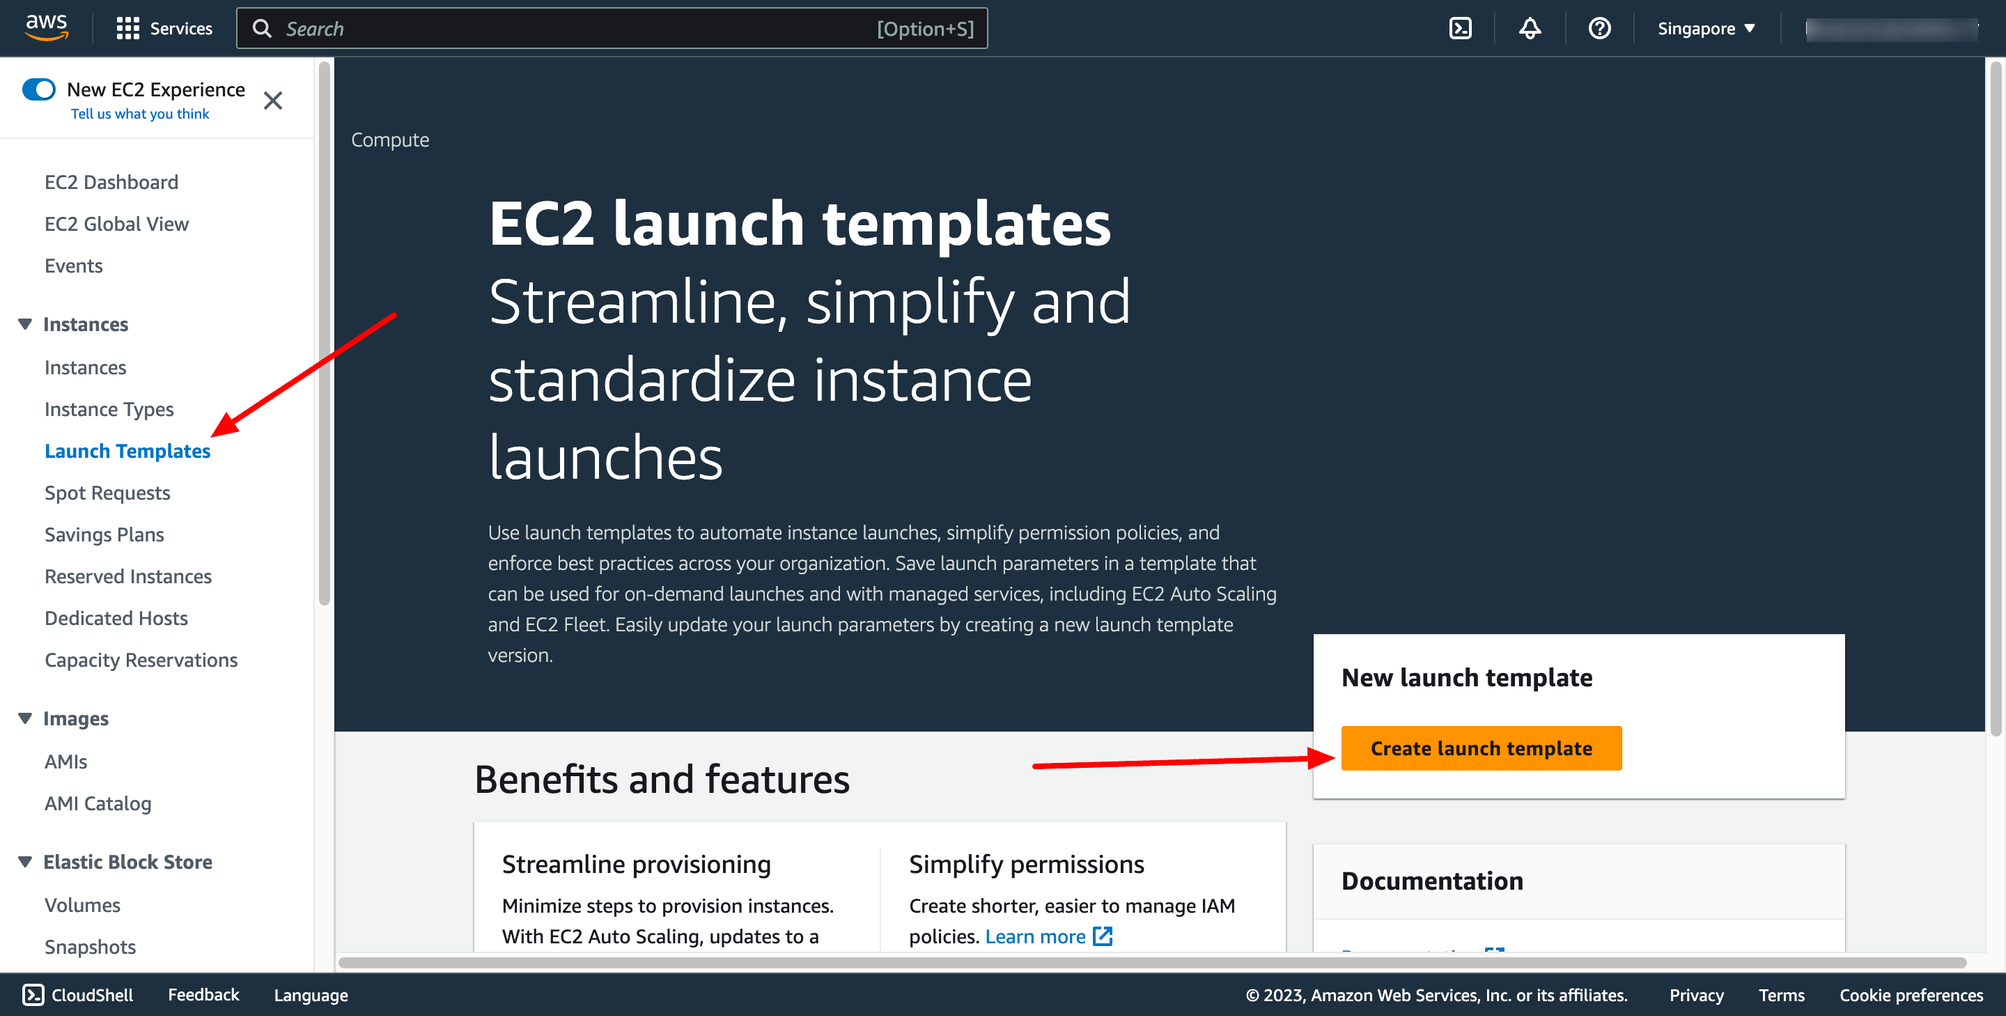
Create 1. Create Launch template
Go to EC2 service → navigate to Launch templates → click to Create launch template:
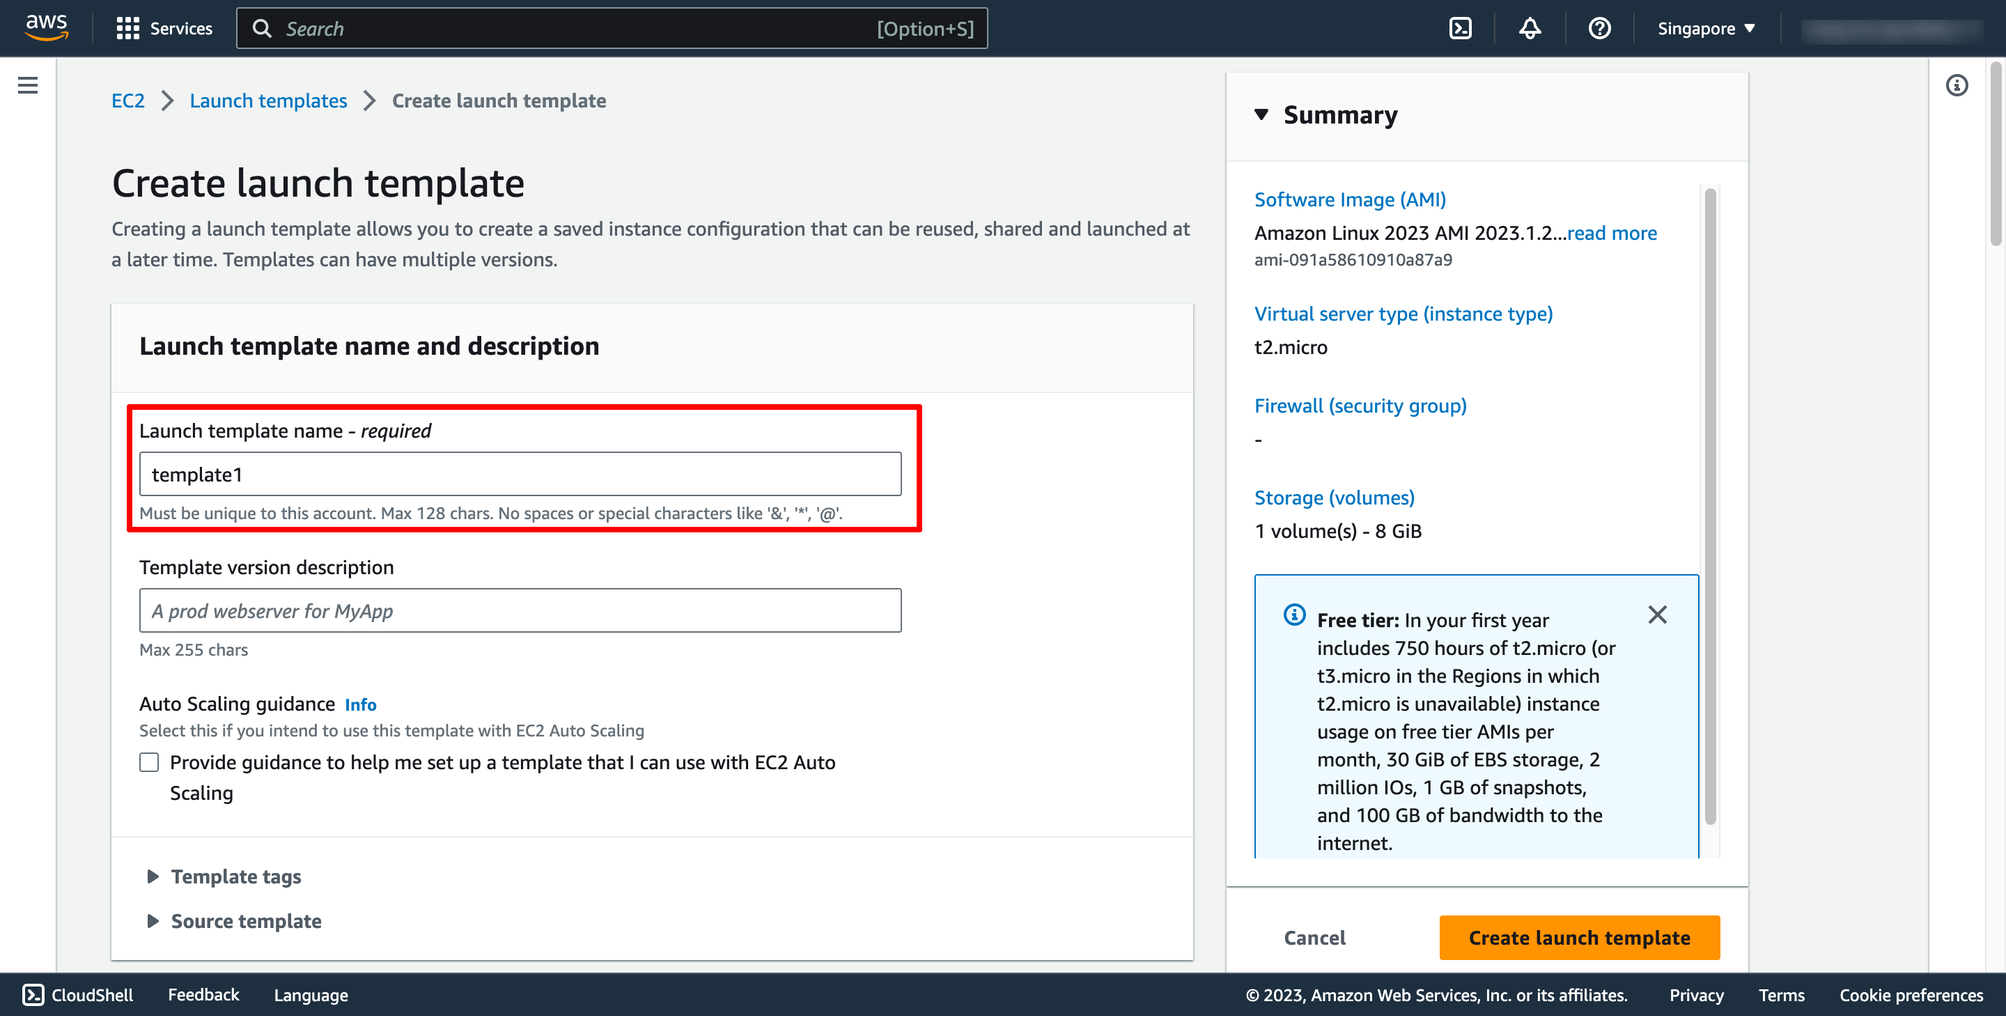
 Enter template name:
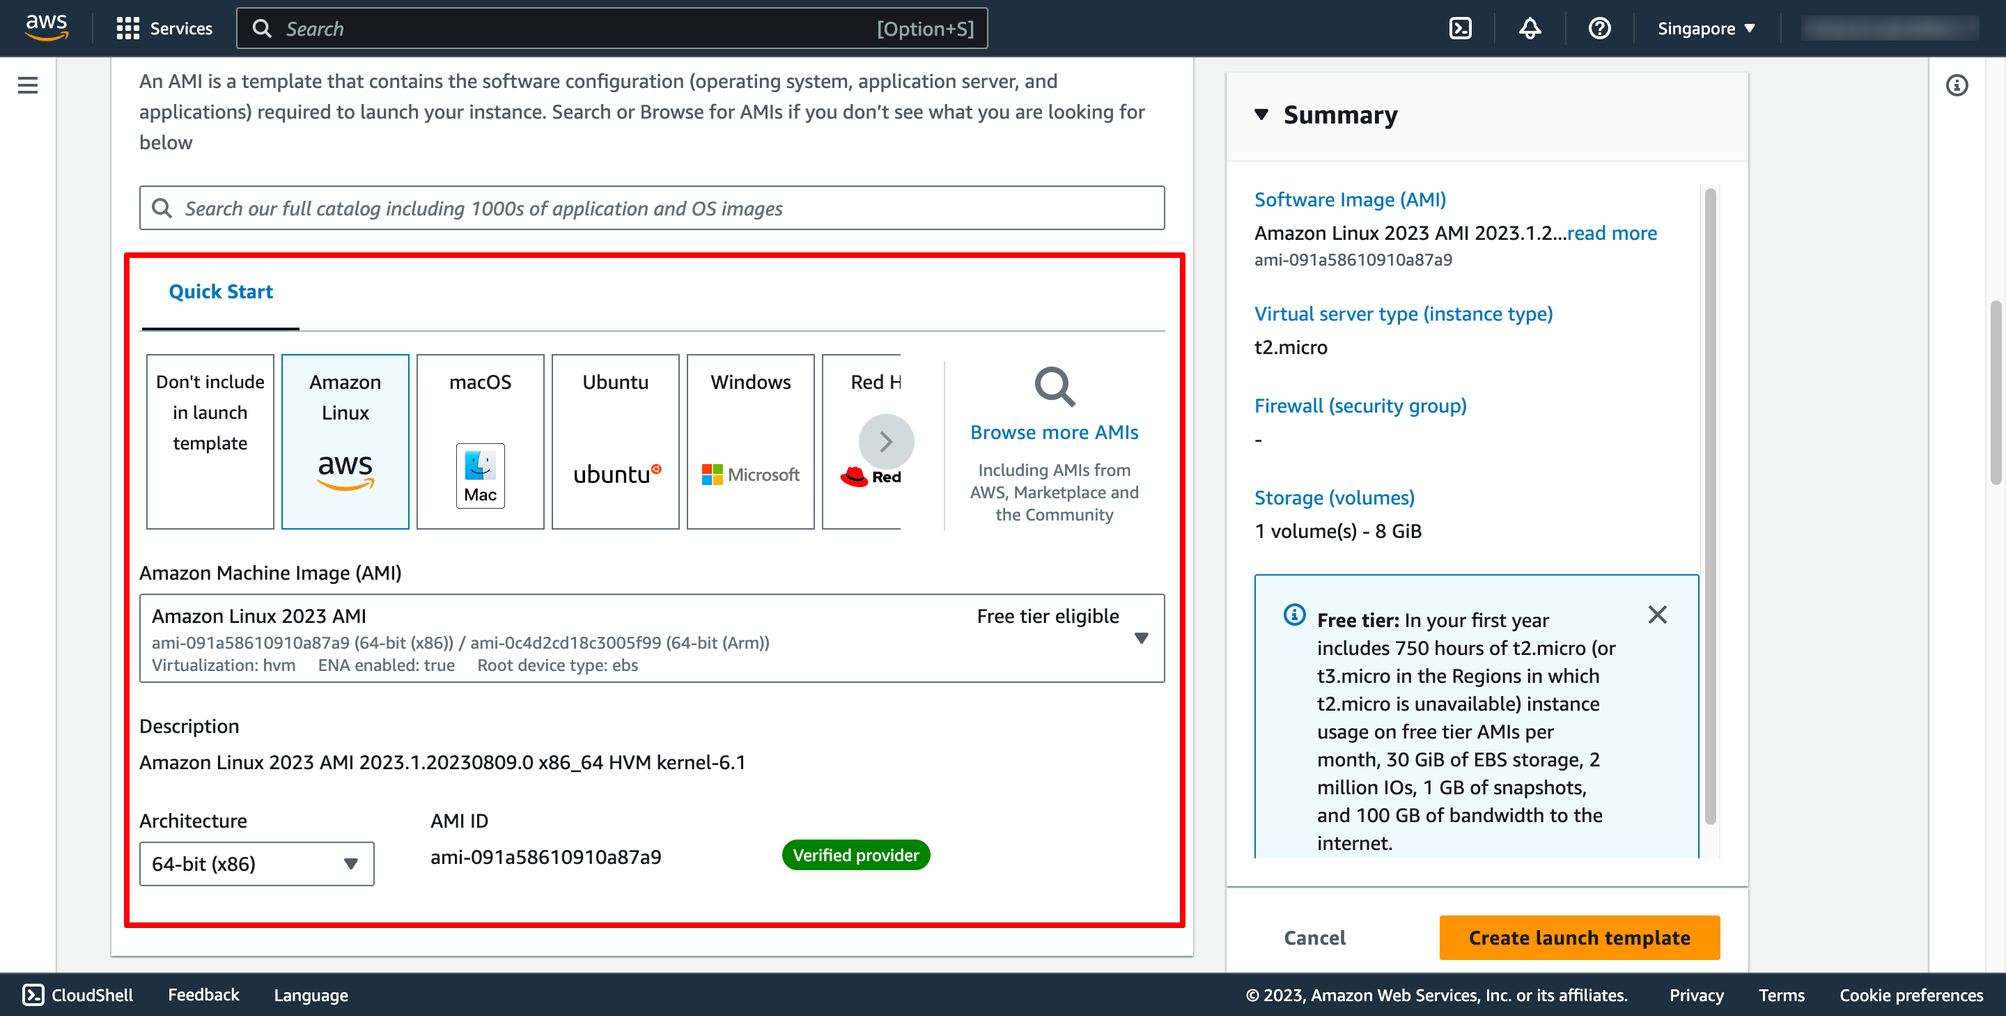
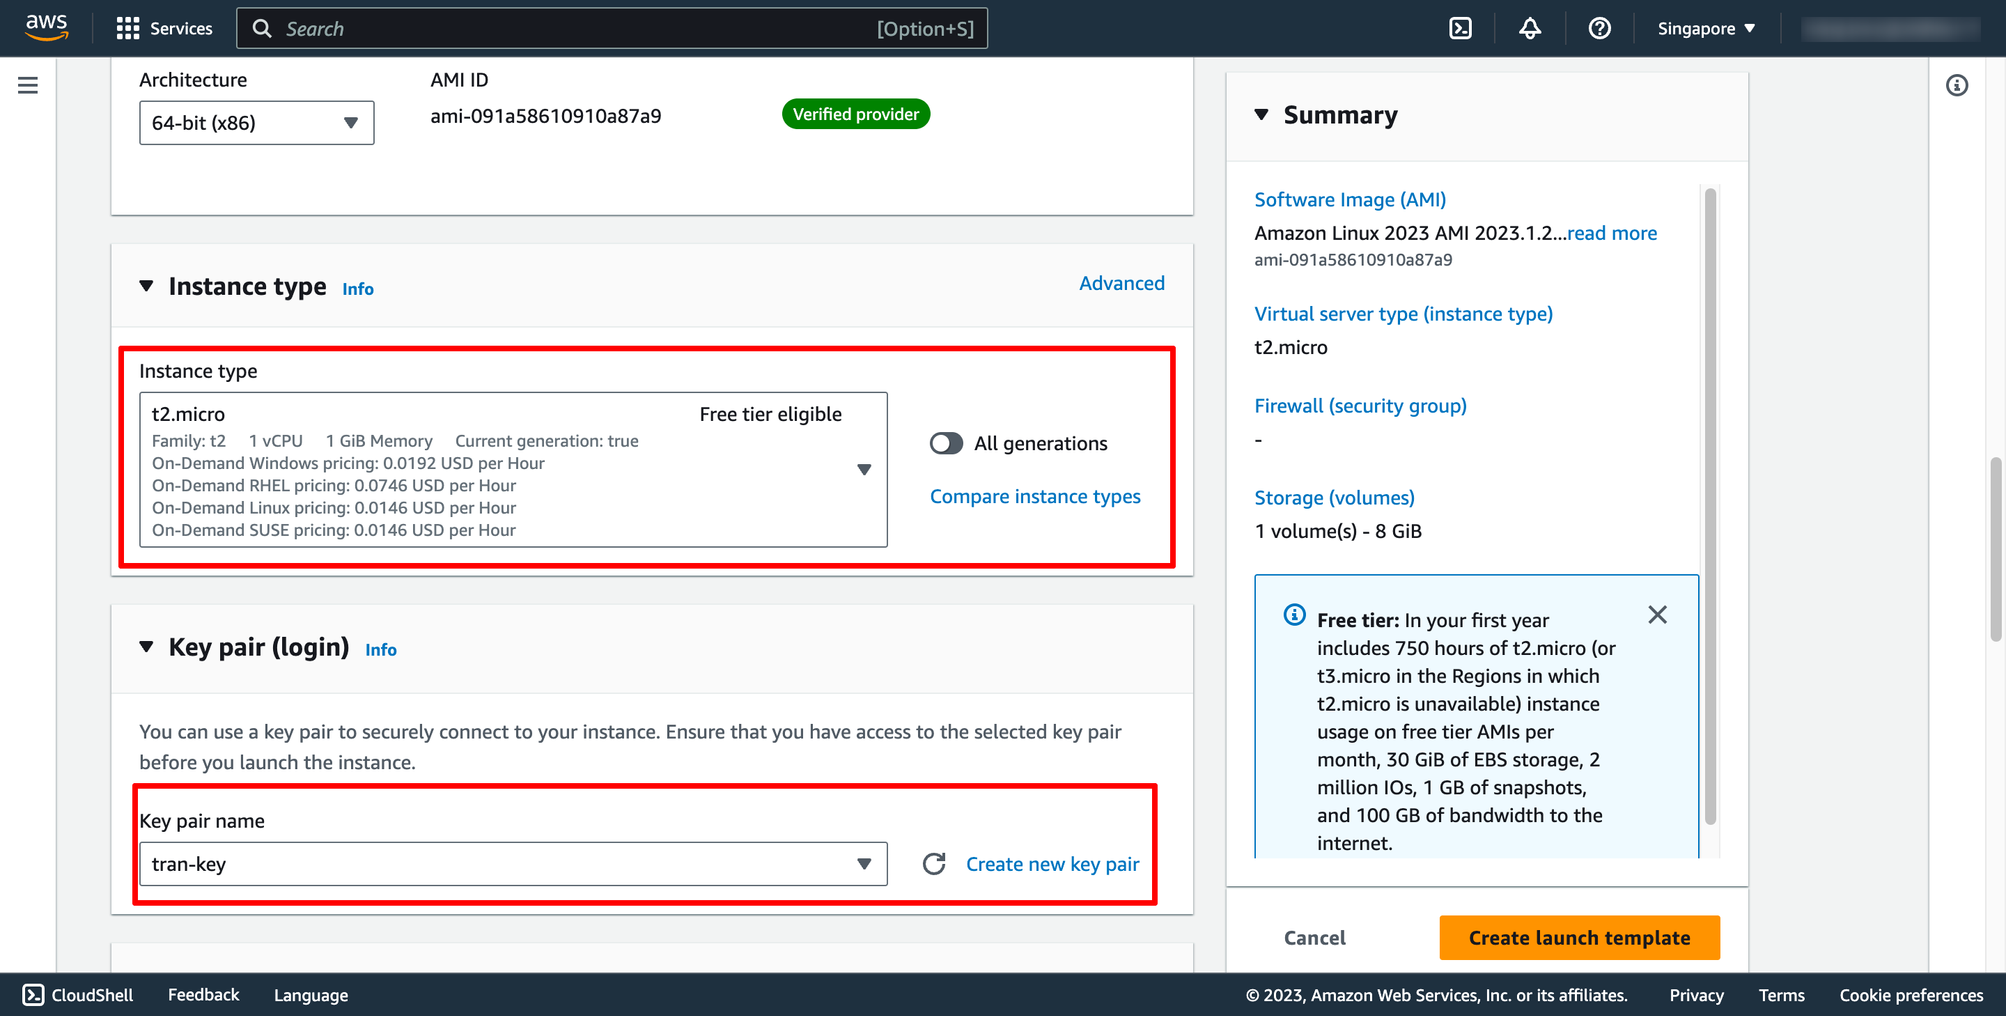
 Choose OS image, instance type and key pair for your template:
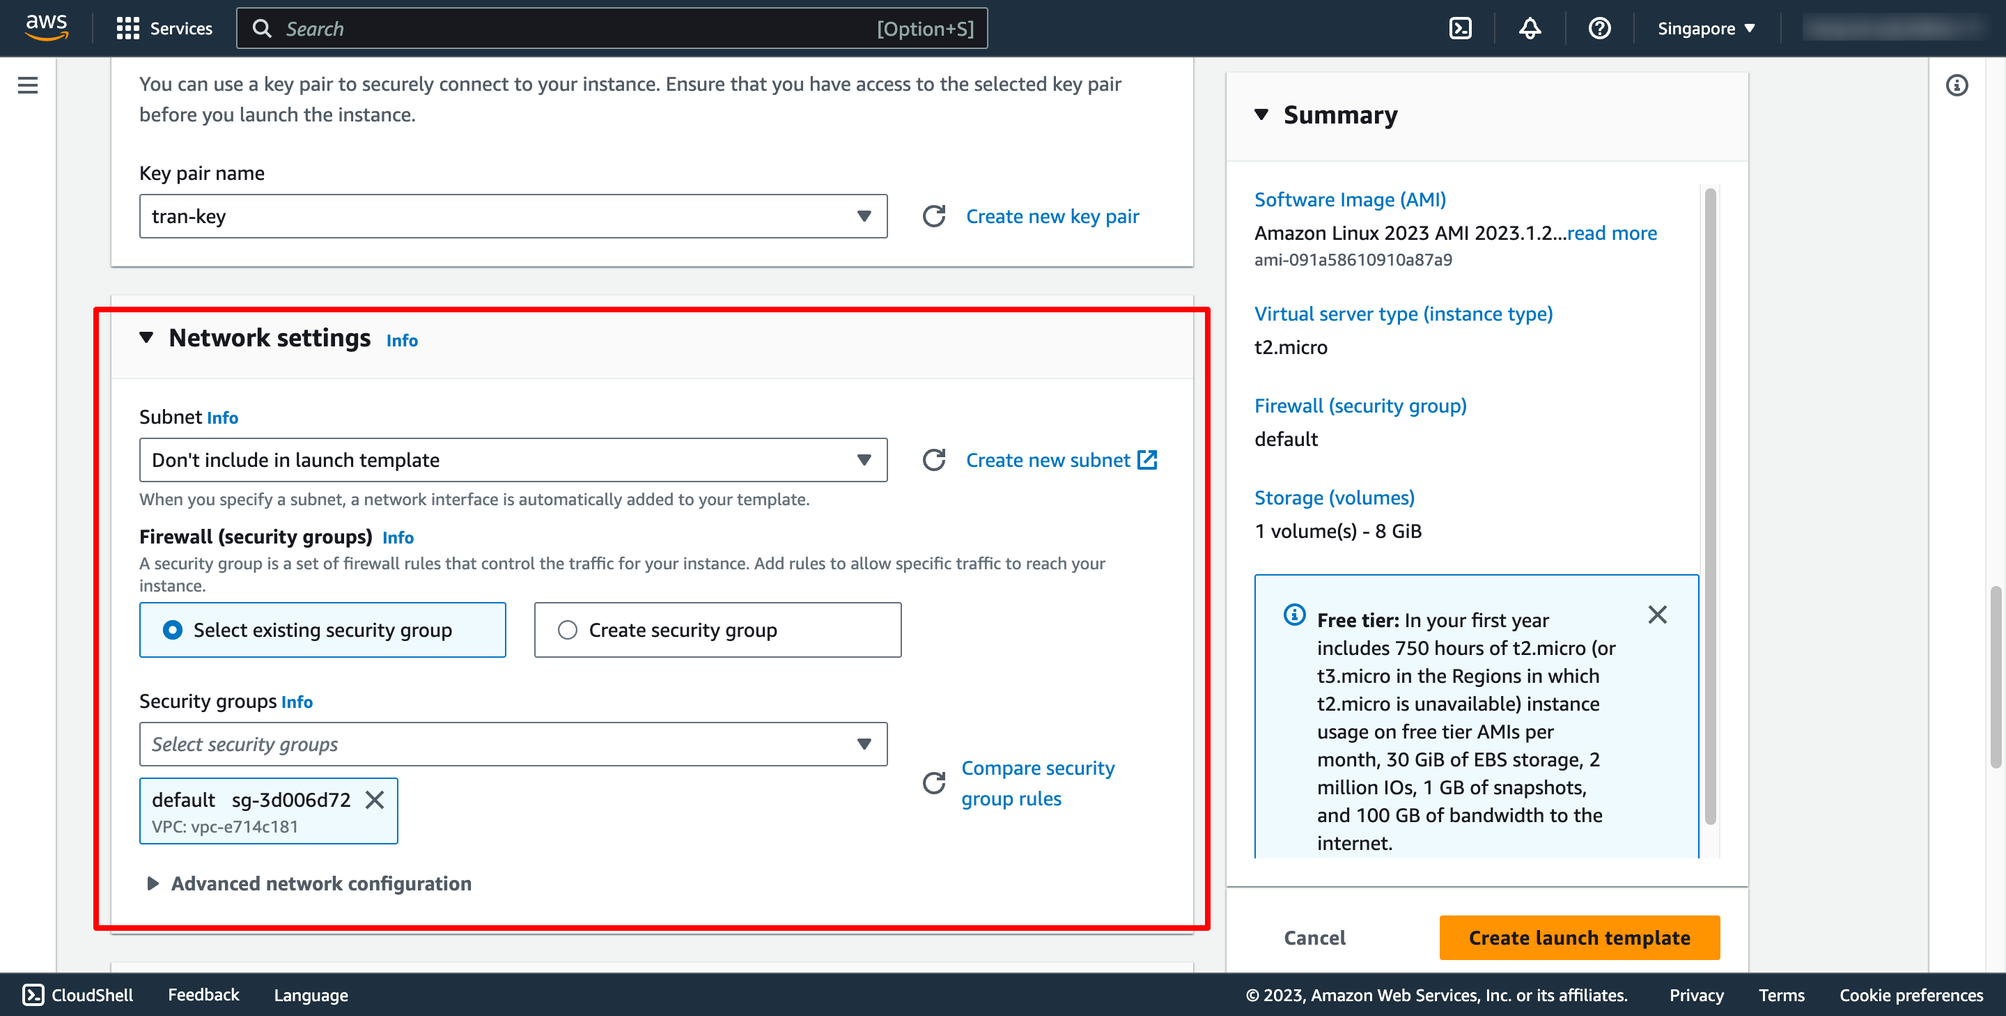
 Choose Security group and subnet:
You can select existing security group or a new one.
Choose Security group and subnet:
You can select existing security group or a new one.
 Configure EBS volume in Storage:
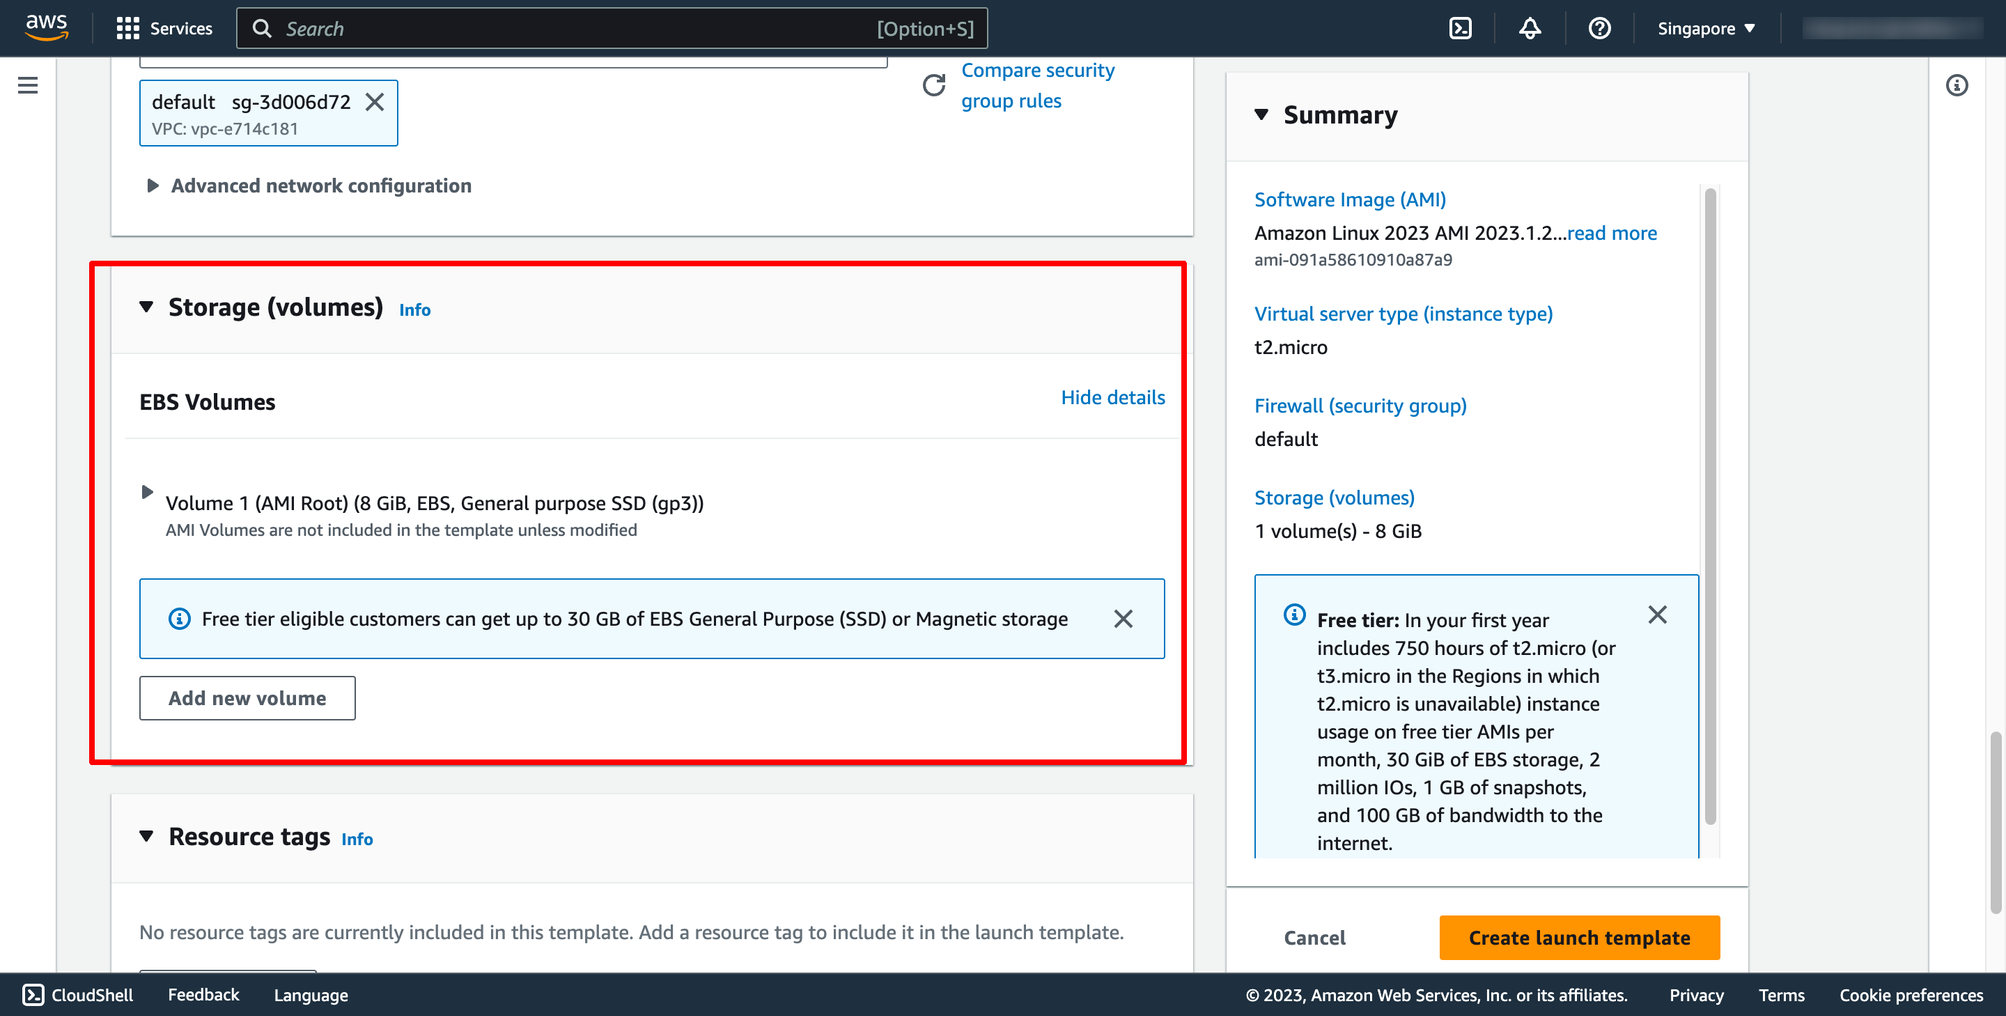 Then, you can click to Create launch template.
Step 2. Create Load balancer
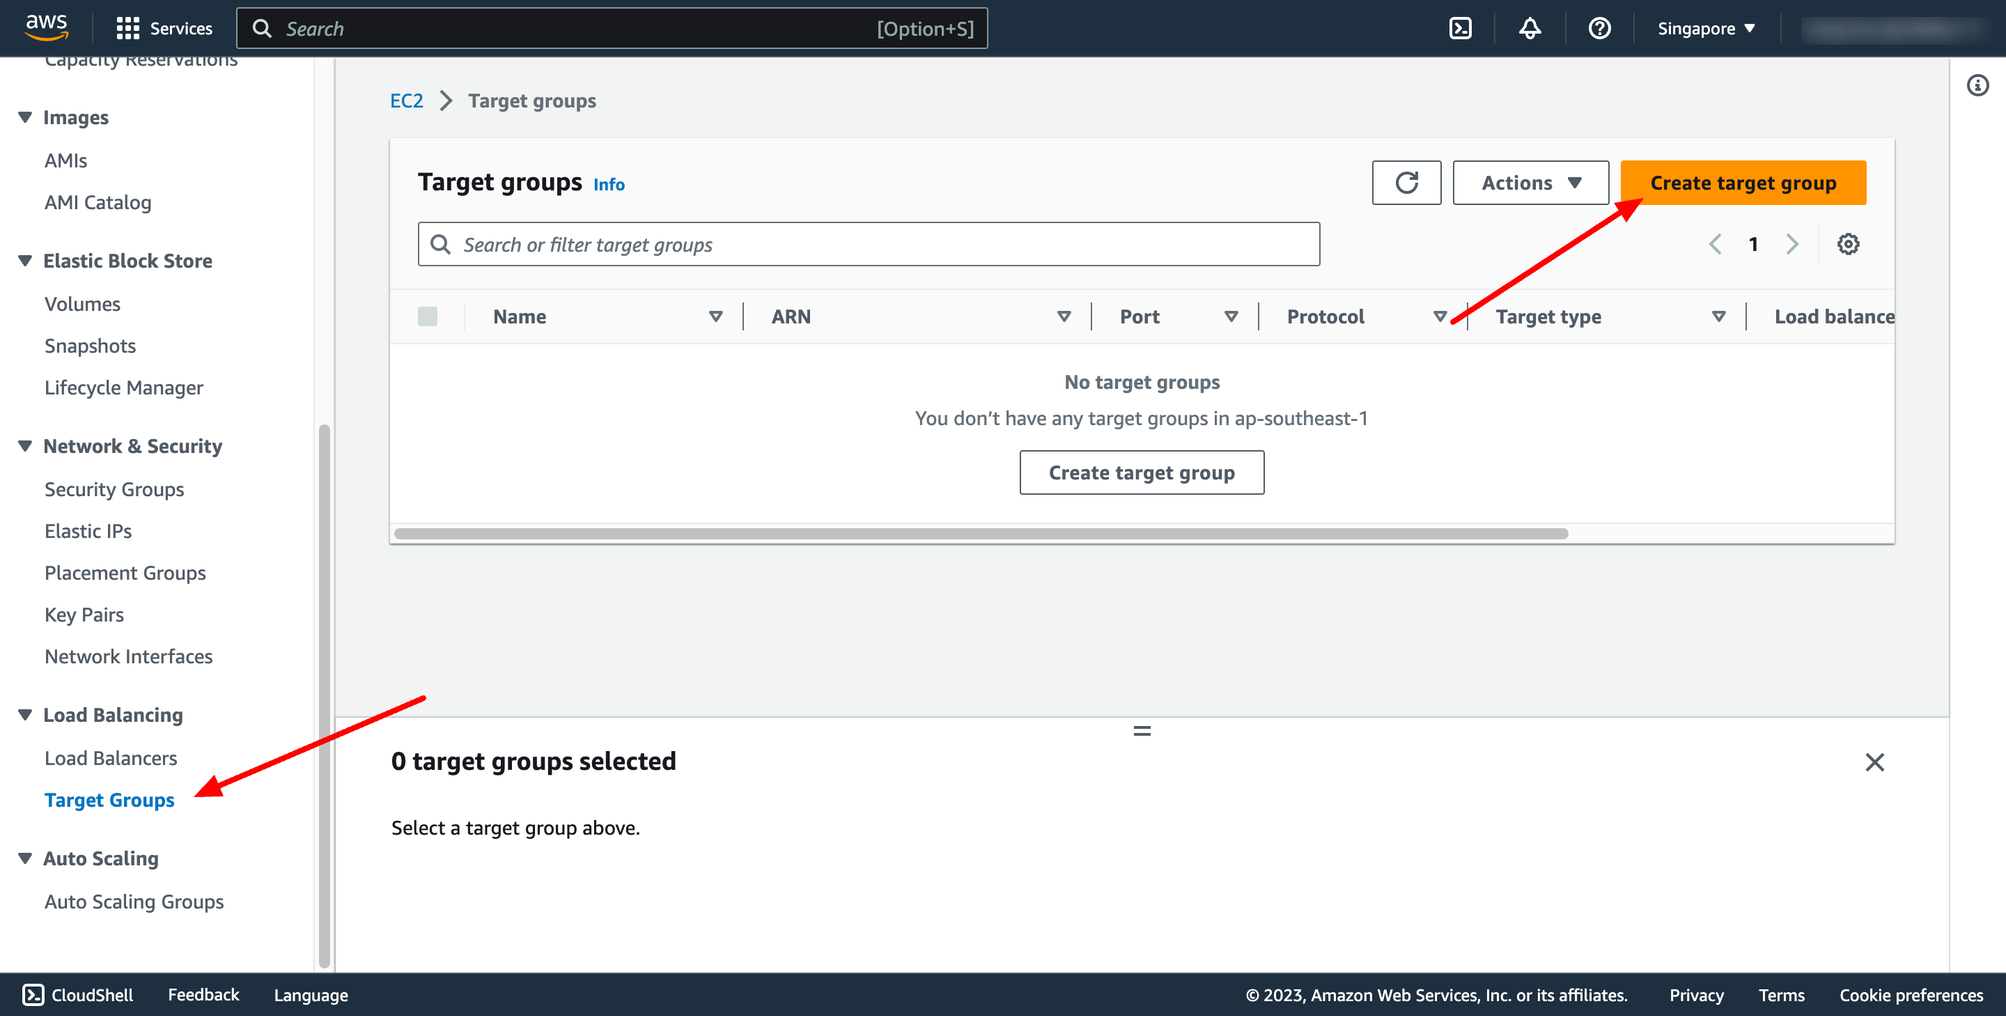
Step 2.1. Create Target group
Each target group is used to route requests to one or more registered targets. When a rule condition is met, traffic is forwarded to the corresponding target group.
Go to Load balancer feature in EC2 service → go to Target group → click to Create target group:
Then, you can click to Create launch template.
Step 2. Create Load balancer
Step 2.1. Create Target group
Each target group is used to route requests to one or more registered targets. When a rule condition is met, traffic is forwarded to the corresponding target group.
Go to Load balancer feature in EC2 service → go to Target group → click to Create target group:
 For Choose a target type,Instances to register targets by instance ID, IP addresses to register targets by IP address, or Lambda function to register a Lambda function as a target.
If your service's task definition uses the awsvpc network mode (which is required for the Fargate launch type), you must choose IP addresses as the target type This is because tasks that use the awsvpc network mode are associated with an elastic network interface, not an Amazon EC2 instance.
In this context, we choose Instances type.
You can skip the target selection, we will update later. Then, create target group.
Step 2.2. Create Application Load Balancer
Navigate to Load Balancers → click to Create load balancer:
For Choose a target type,Instances to register targets by instance ID, IP addresses to register targets by IP address, or Lambda function to register a Lambda function as a target.
If your service's task definition uses the awsvpc network mode (which is required for the Fargate launch type), you must choose IP addresses as the target type This is because tasks that use the awsvpc network mode are associated with an elastic network interface, not an Amazon EC2 instance.
In this context, we choose Instances type.
You can skip the target selection, we will update later. Then, create target group.
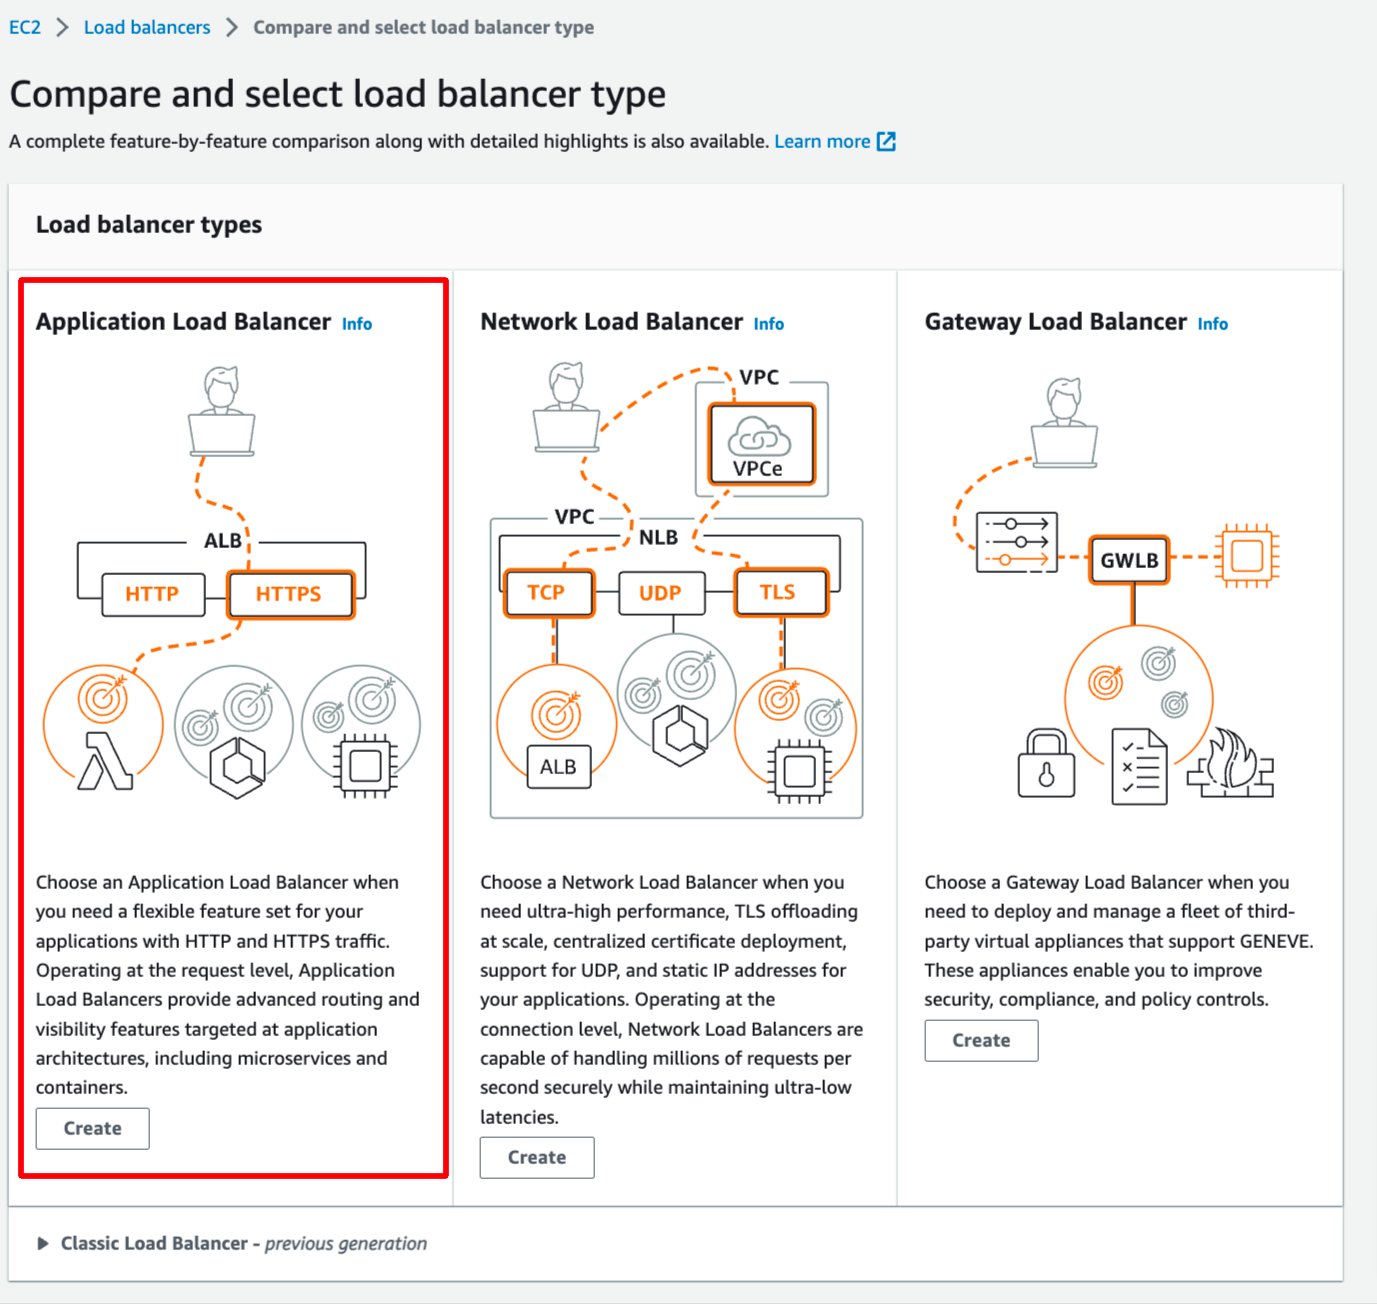
Step 2.2. Create Application Load Balancer
Navigate to Load Balancers → click to Create load balancer:
 In this blog, we use Application Load Balancer, please choose it:
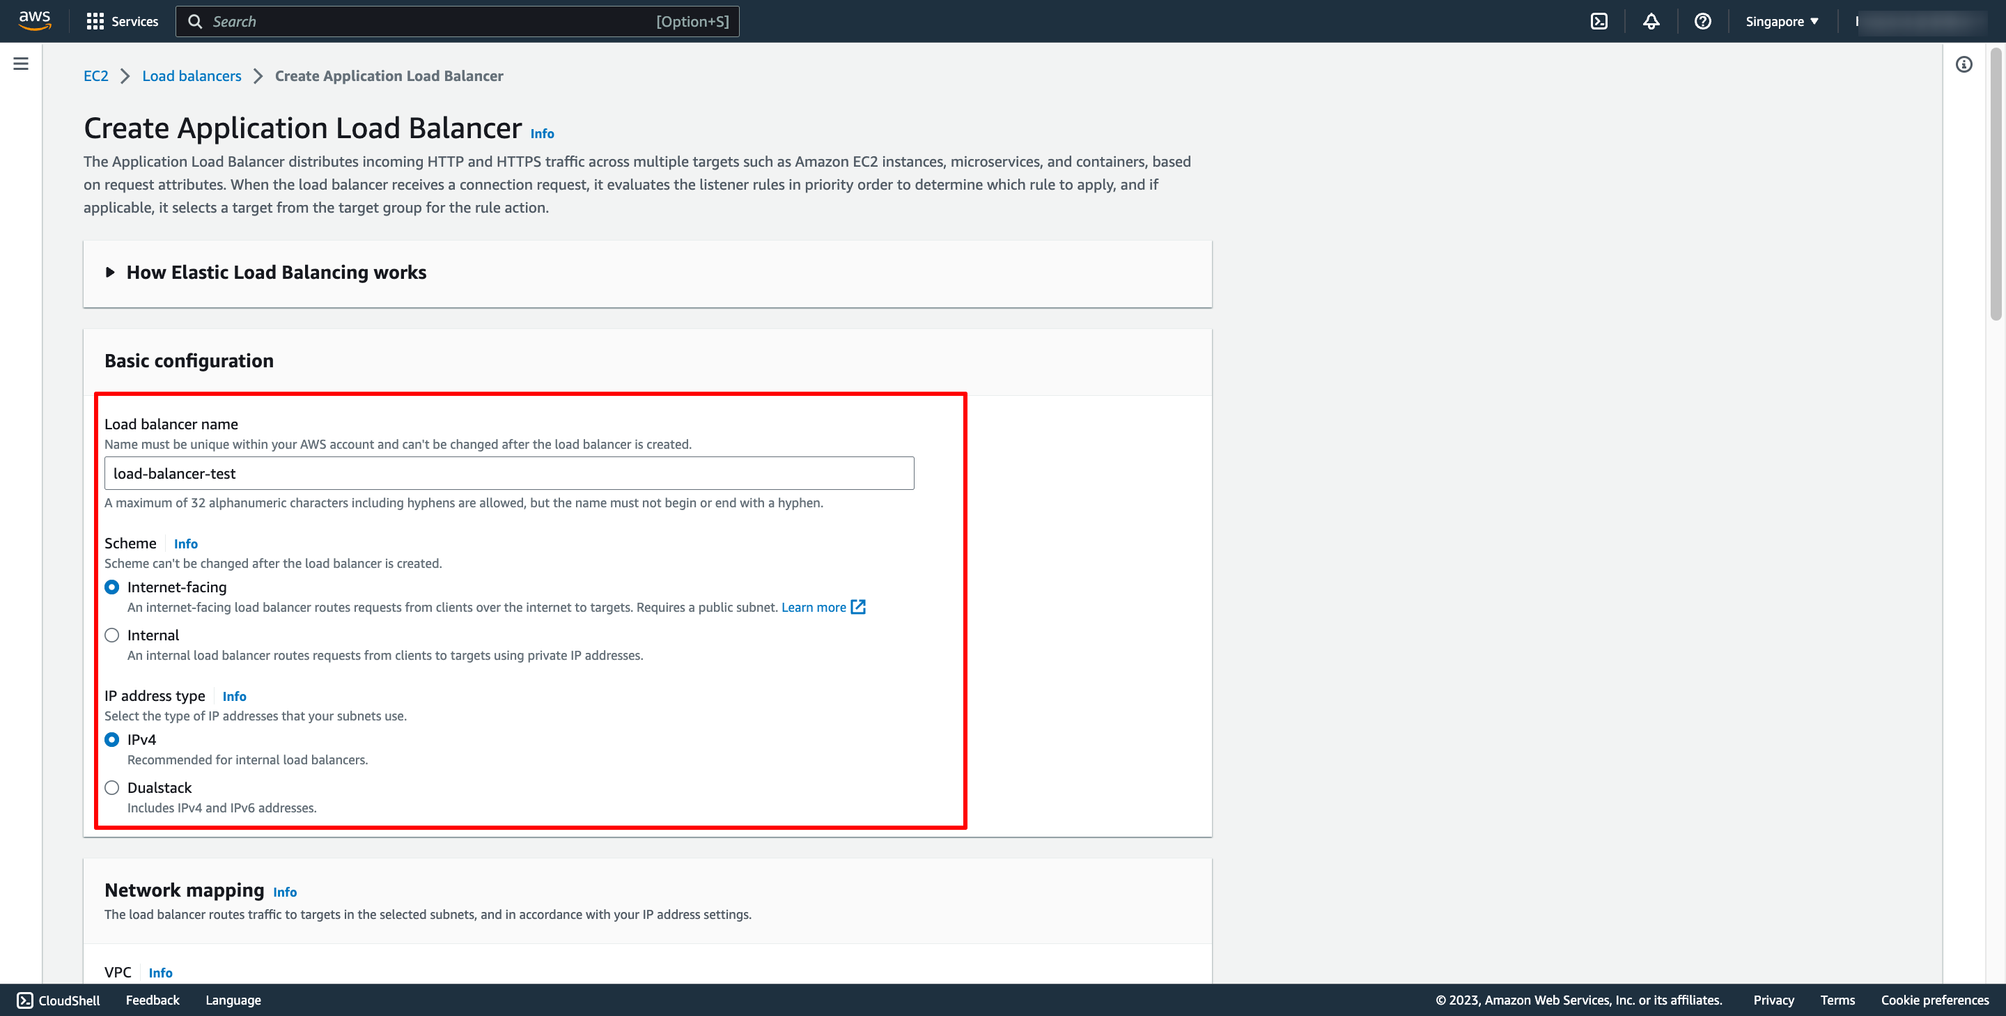
 Configure basic configuration:
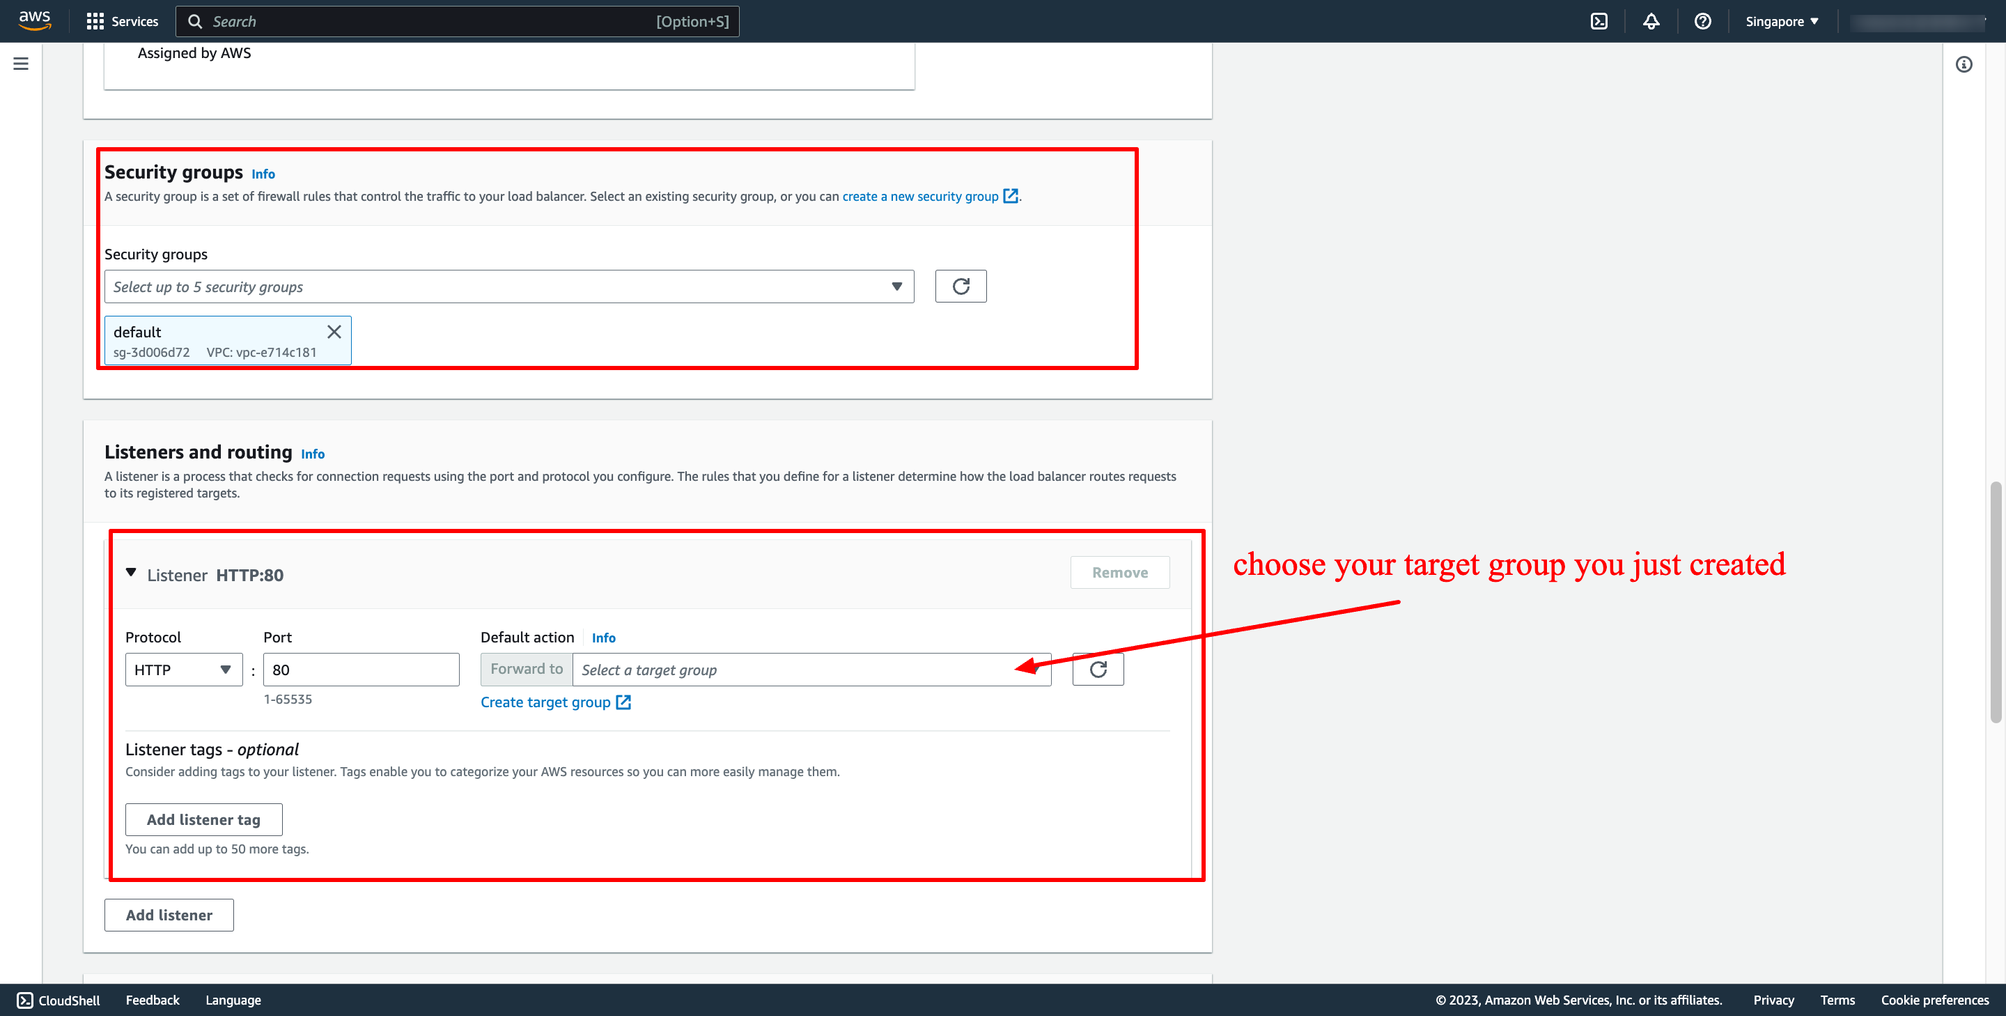
 Choose Security group and Target group:
Note: Please make sure your security group has enough rules for access from Internet like port 80 and port 443.
Choose Security group and Target group:
Note: Please make sure your security group has enough rules for access from Internet like port 80 and port 443.
 Then, create load balancer.
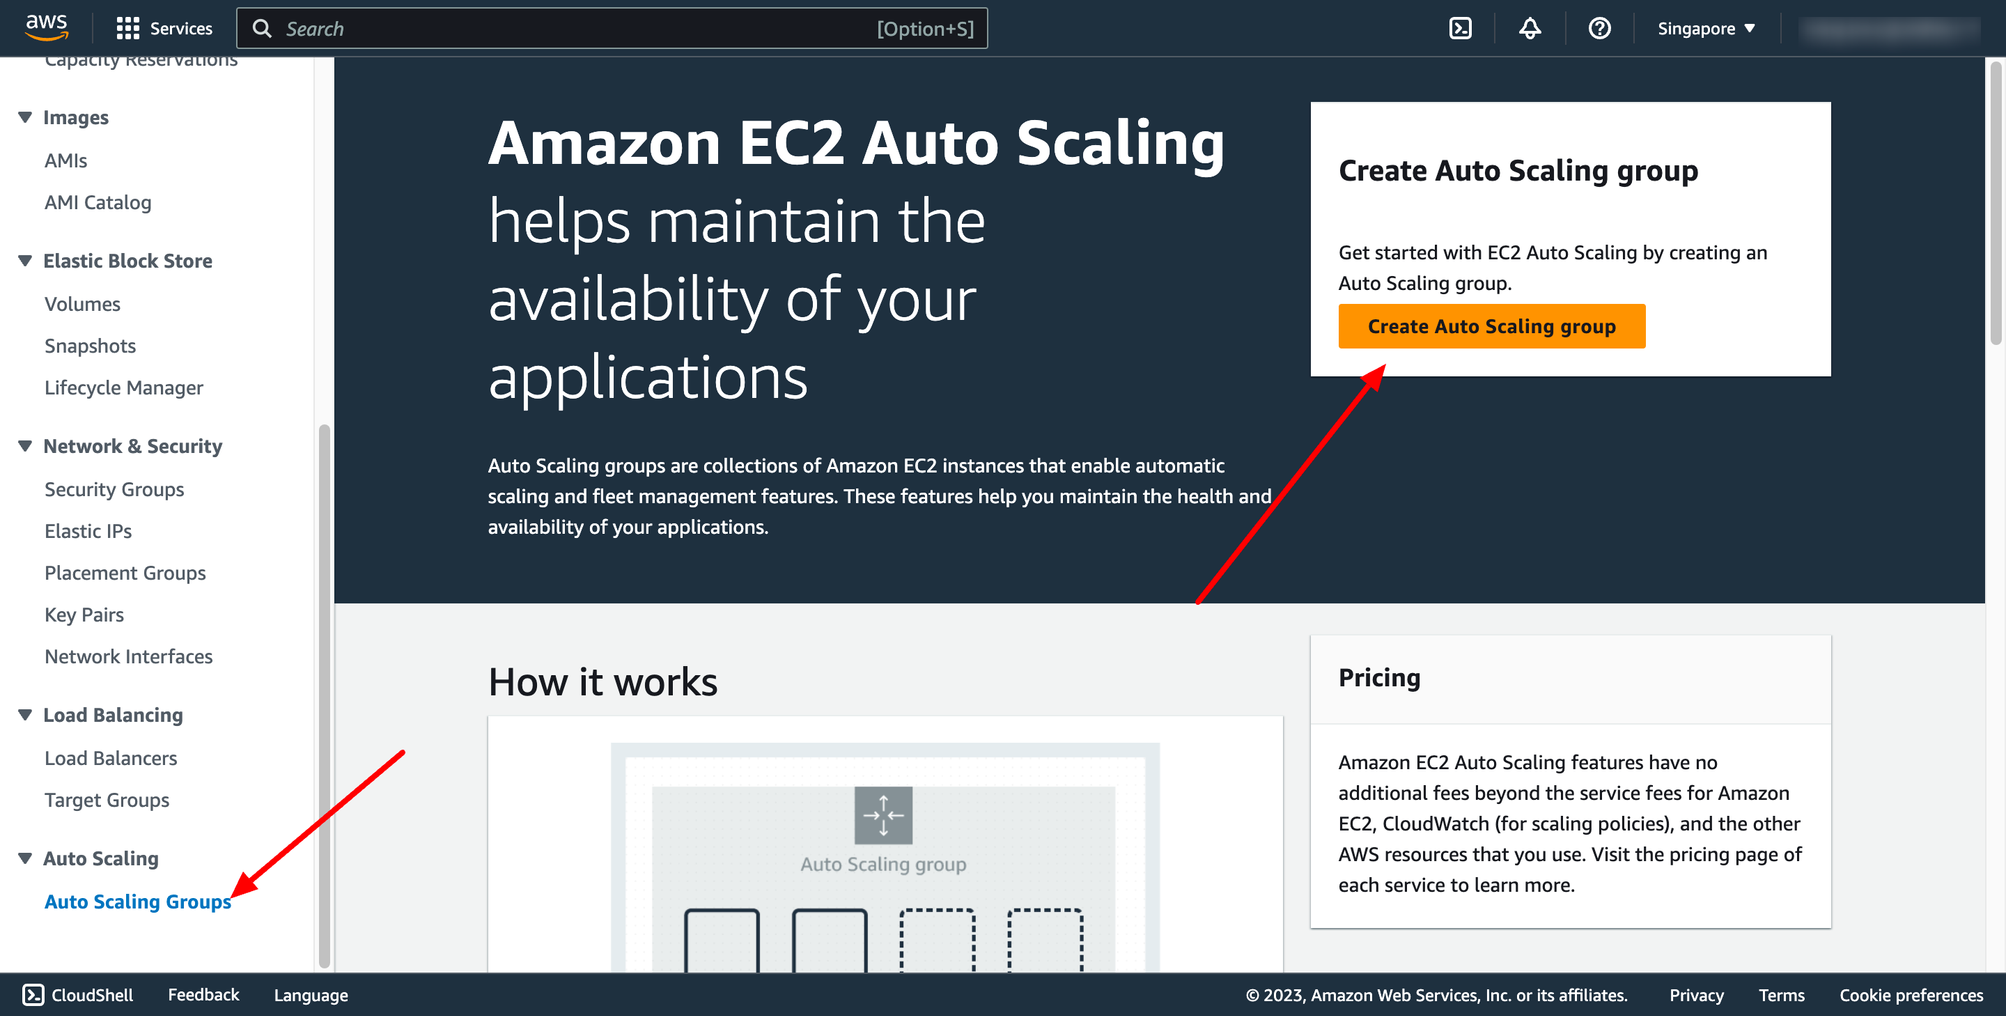
Step 3. Create auto scaling group
Navigate to Auto Scaling group → click to Create Auto Scaling group:
Then, create load balancer.
Step 3. Create auto scaling group
Navigate to Auto Scaling group → click to Create Auto Scaling group:
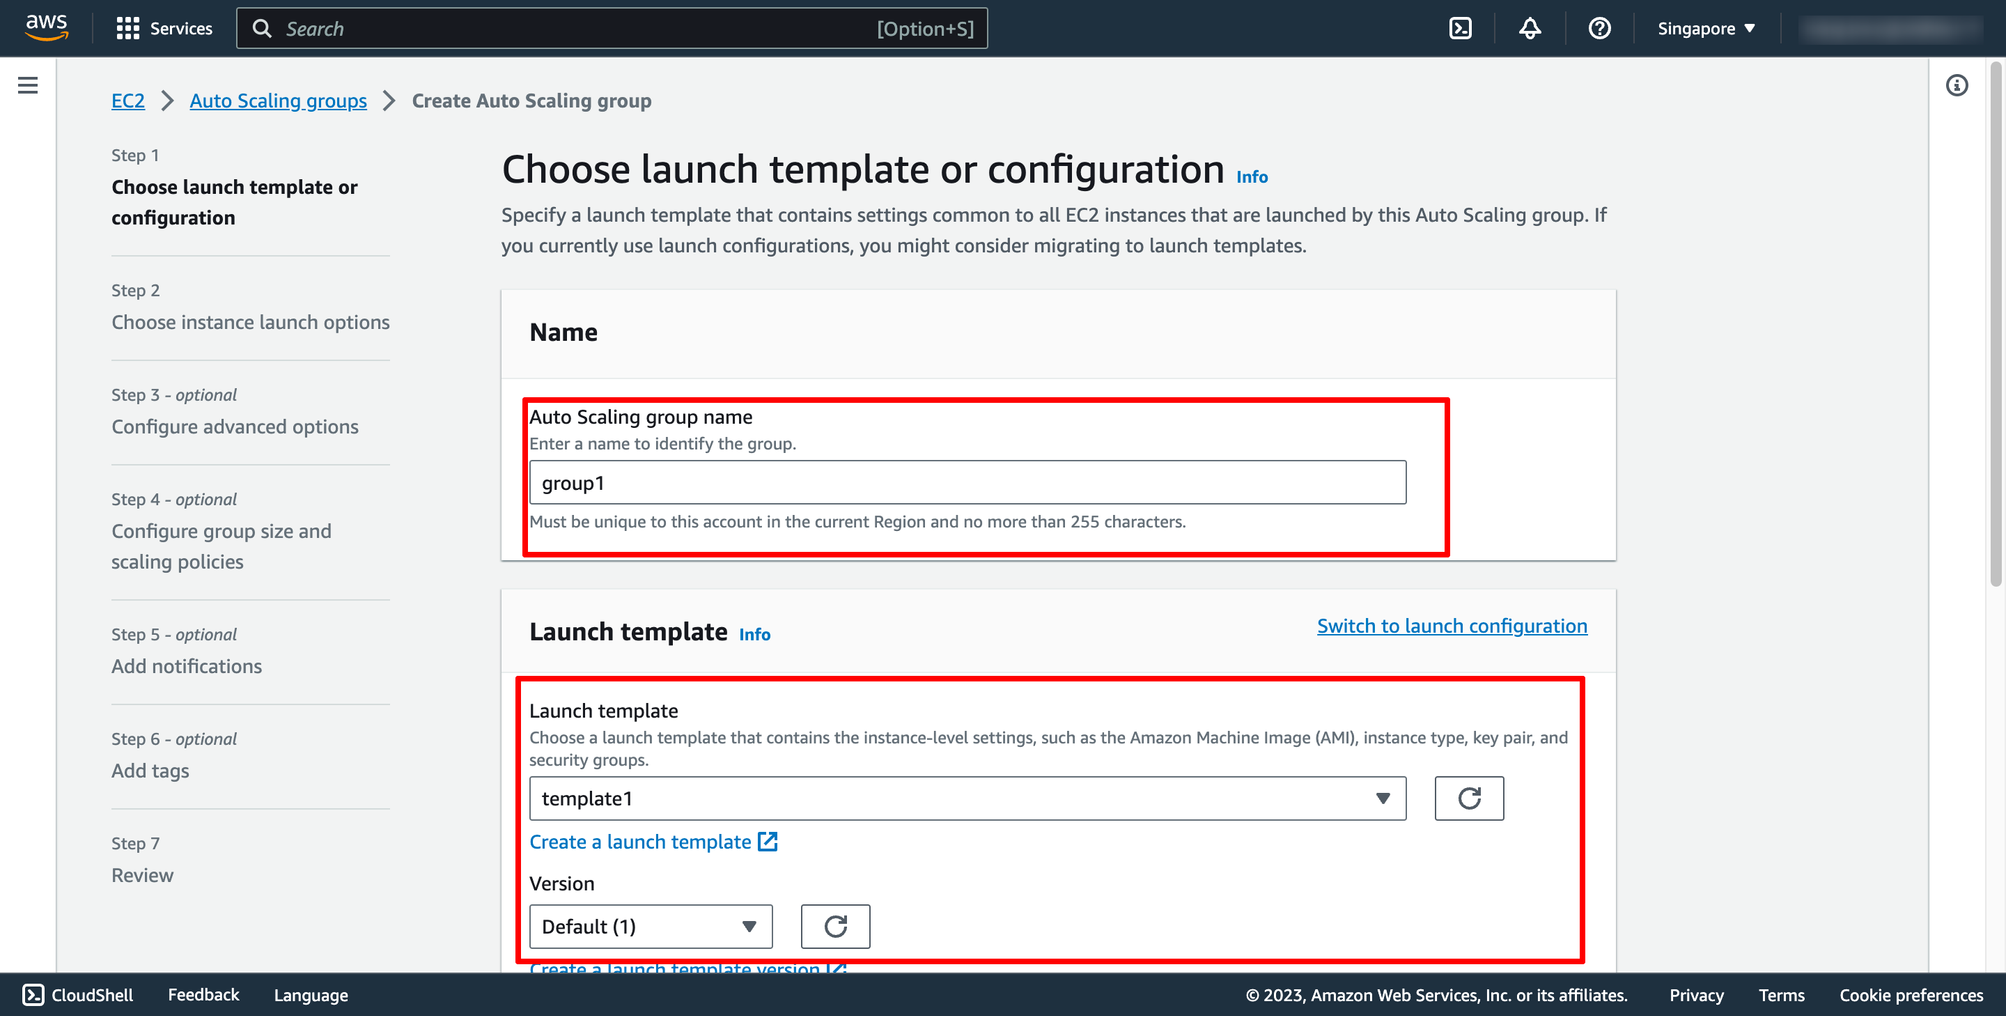
 Enter name of auto scaling group and choose the launch template you just created:
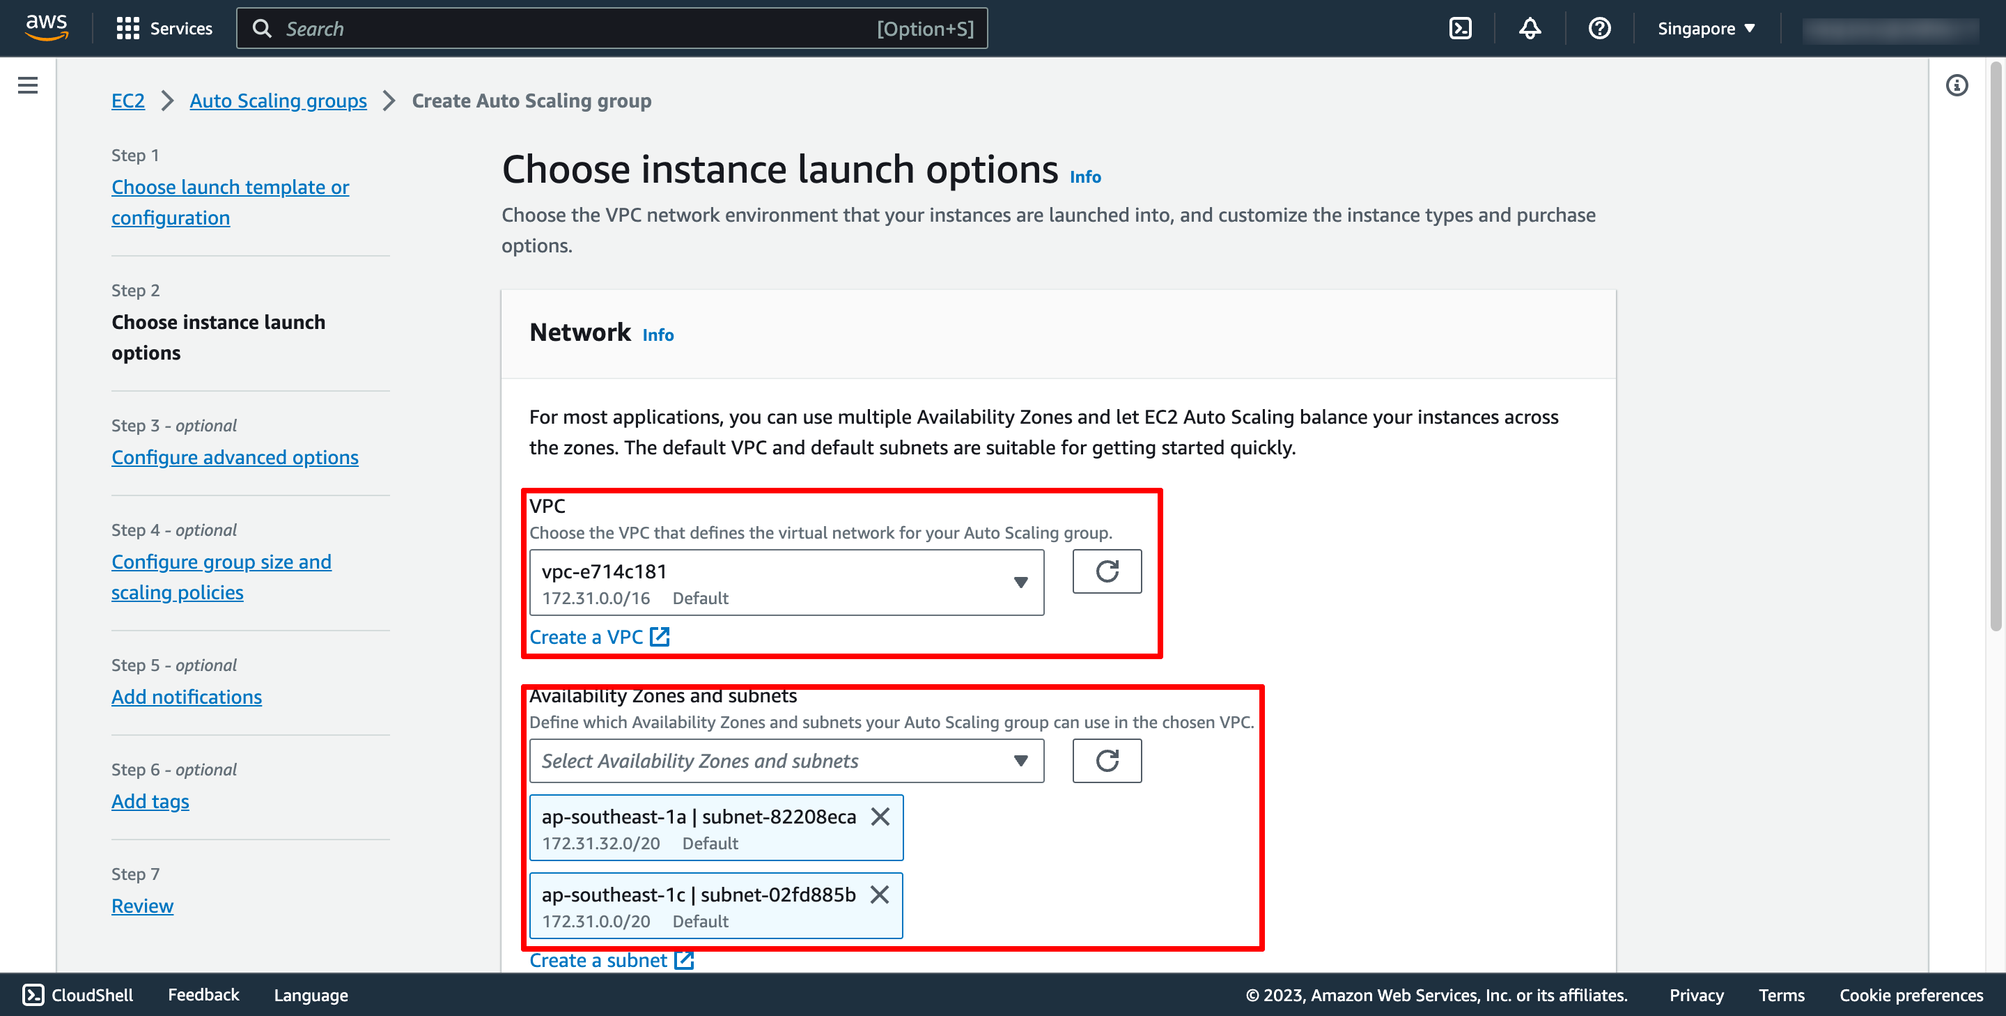
 Step 2 is choosing instance launch option, in here, you can choose the VPC and subnets:
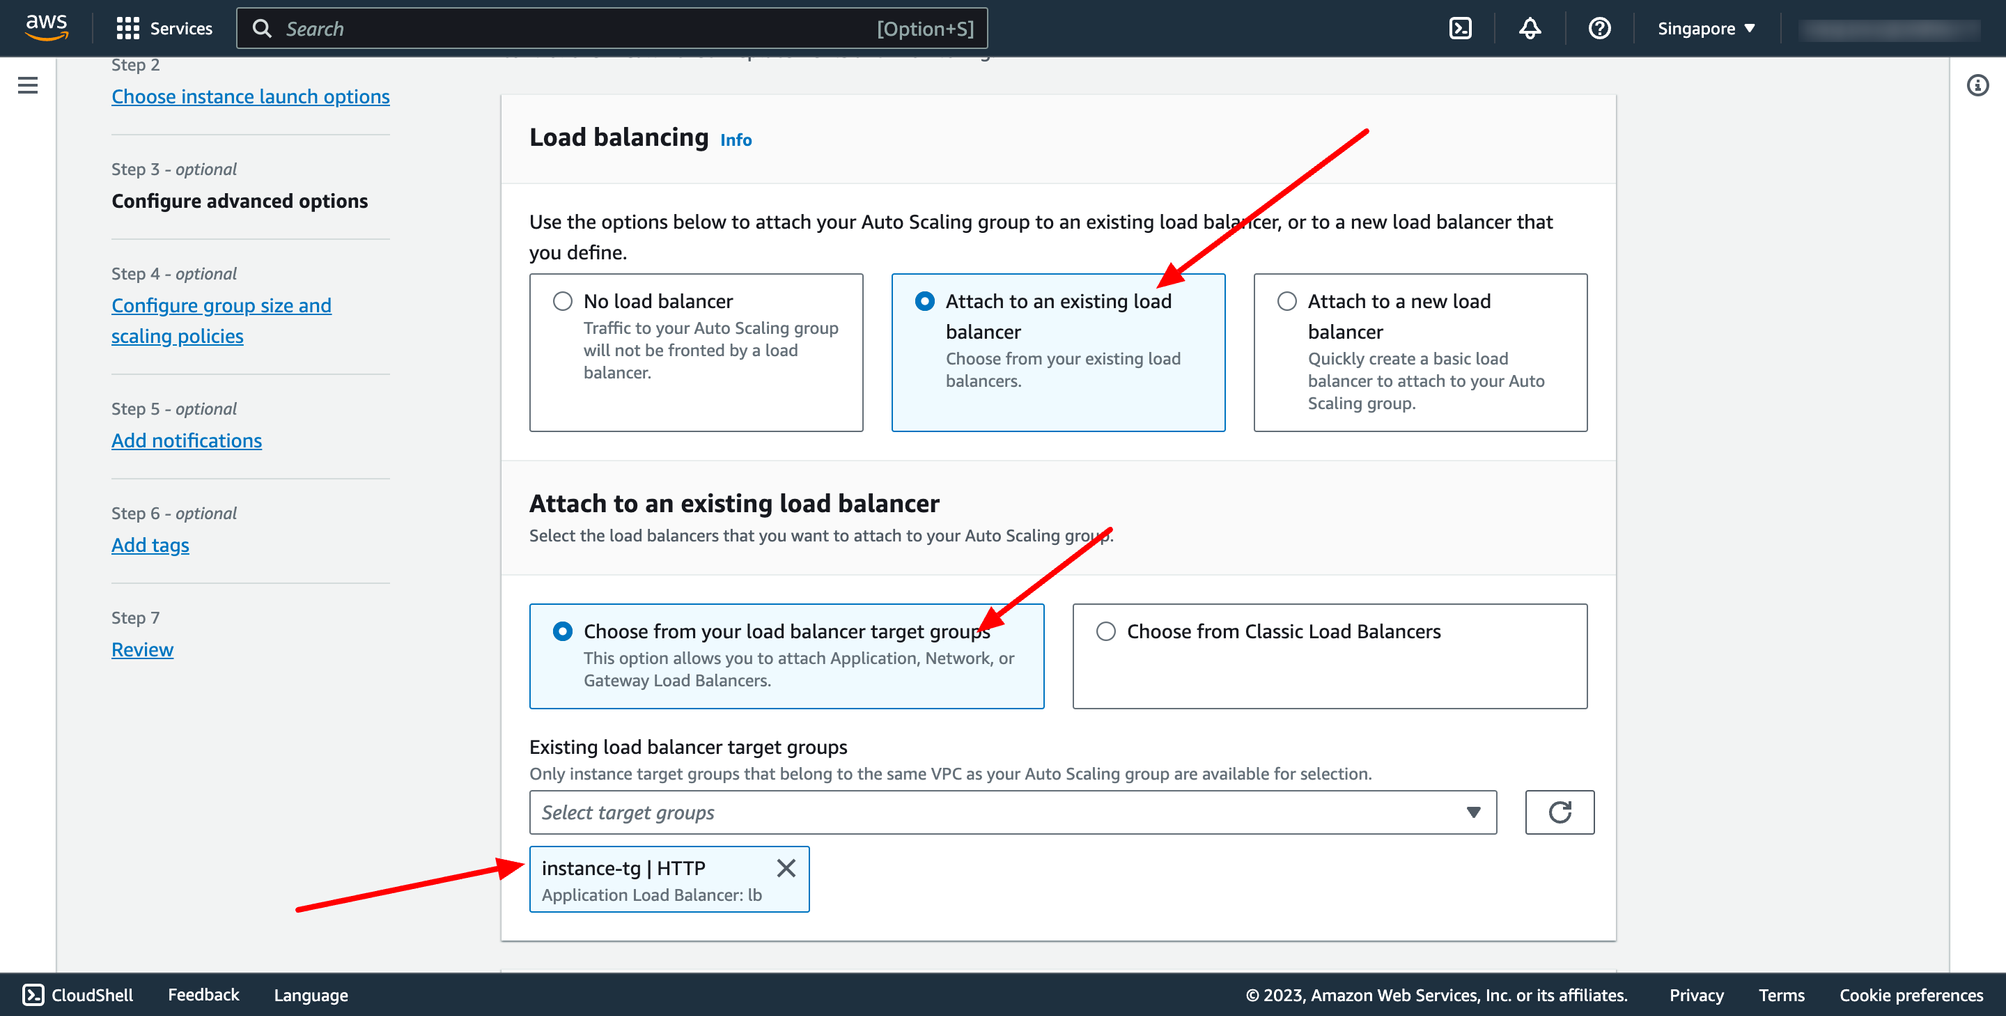
 Step 3 is configuring Load balancing, please choose the Application Load Balancer you created in the previous step.
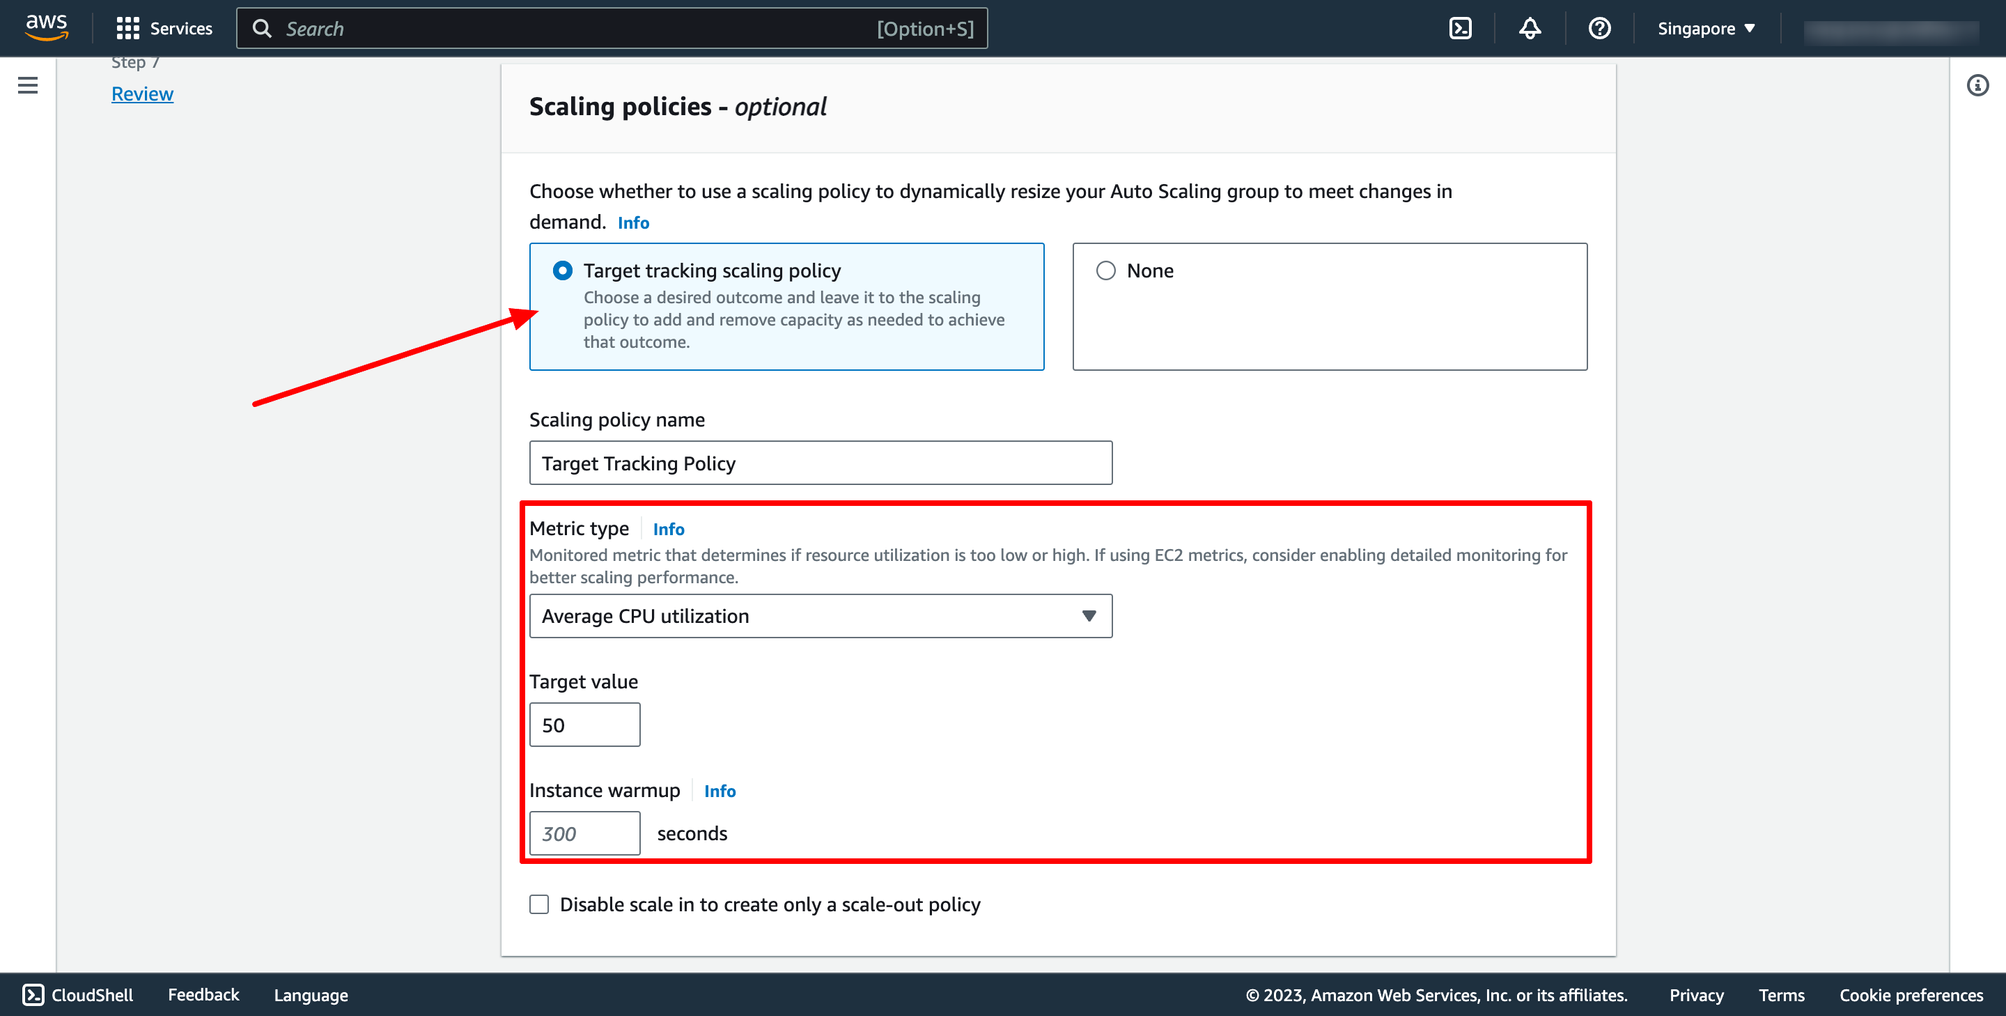
 Step 4 is configuring group size and scaling policy.
 Selection Target tracking scaling policy, and then configure your policy:
 Notification and Tags step we can skip if don’t needed.
Then review again and create Auto Scaling group.
Waiting for the Auto Scaling group creation completed. Here is the result you can see on AWS console:
Notification and Tags step we can skip if don’t needed.
Then review again and create Auto Scaling group.
Waiting for the Auto Scaling group creation completed. Here is the result you can see on AWS console:


Enter template name:
Choose OS image, instance type and key pair for your template:
Choose Security group and subnet:
You can select existing security group or a new one.
Configure EBS volume in Storage:
Then, you can click to Create launch template.
Step 2. Create Load balancer
Step 2.1. Create Target group
Each target group is used to route requests to one or more registered targets. When a rule condition is met, traffic is forwarded to the corresponding target group.
Go to Load balancer feature in EC2 service → go to Target group → click to Create target group:
For Choose a target type,Instances to register targets by instance ID, IP addresses to register targets by IP address, or Lambda function to register a Lambda function as a target.
If your service's task definition uses the awsvpc network mode (which is required for the Fargate launch type), you must choose IP addresses as the target type This is because tasks that use the awsvpc network mode are associated with an elastic network interface, not an Amazon EC2 instance.
In this context, we choose Instances type.
You can skip the target selection, we will update later. Then, create target group.
Step 2.2. Create Application Load Balancer
Navigate to Load Balancers → click to Create load balancer:
In this blog, we use Application Load Balancer, please choose it:
Configure basic configuration:
- For Scheme, choose Internet-facing or Internal.
- For IP address type, choose the IP adressing for the containers subnets.
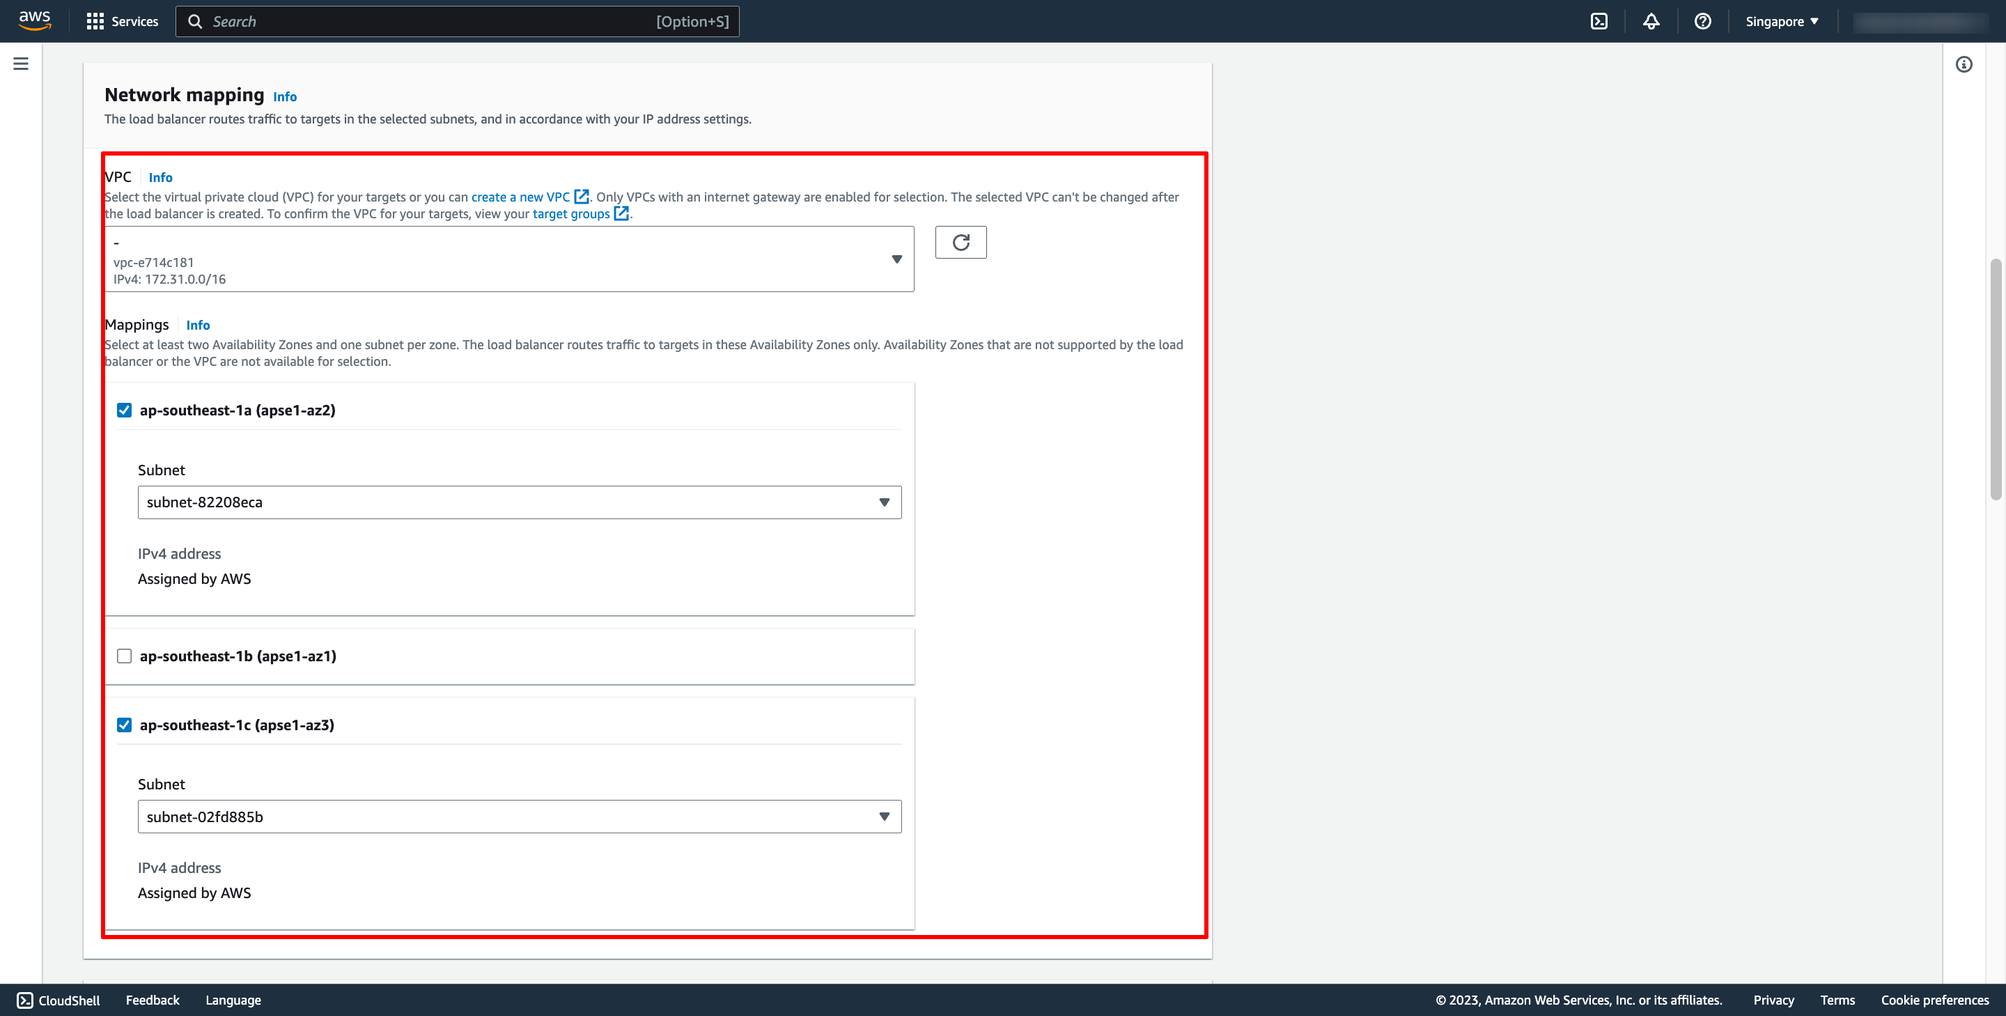
- For VPC, select the same VPC that you used for the container instances on which you intend to run your service.
- For Mappings, select the Availability Zones to use for your load balancer. If there is one subnet for that Availability Zone, it is selected. If there is more than one subnet for that Availability Zone, select one of the subnets. You can select only one subnet per Availability Zone. Your load balancer subnet configuration must include all Availability Zones that your container instances reside in.
Choose Security group and Target group:
Note: Please make sure your security group has enough rules for access from Internet like port 80 and port 443.
Then, create load balancer.
Step 3. Create auto scaling group
Navigate to Auto Scaling group → click to Create Auto Scaling group:
Enter name of auto scaling group and choose the launch template you just created:
Step 2 is choosing instance launch option, in here, you can choose the VPC and subnets:
Step 3 is configuring Load balancing, please choose the Application Load Balancer you created in the previous step.
Step 4 is configuring group size and scaling policy.
Selection Target tracking scaling policy, and then configure your policy:
Notification and Tags step we can skip if don’t needed.
Then review again and create Auto Scaling group.
Waiting for the Auto Scaling group creation completed. Here is the result you can see on AWS console:
Because our desired capacity is 2, therefore now we have 2 running EC2 instances:
After all EC2 instances are ready, you can test the load balancer by access to ALB DNS on browser.
With DevOps knowledge: 8-10 hours
Without DevOps knowledge: 4-5 days
6. Creating AWS Auto Scaling and Load Balancing to EC2 instances with Prismscaler
PrismScaler form
PrismScaler help you setup AWS Load Balancing with Auto Scaling group for EC2 instances by one clicking.
Prism Scaler provides you with an intuitive model and a concise form, you just need to fill in the necessary information and press create, now PrismScaler will automatically build a simple web application/system that moves on a container on AWS:
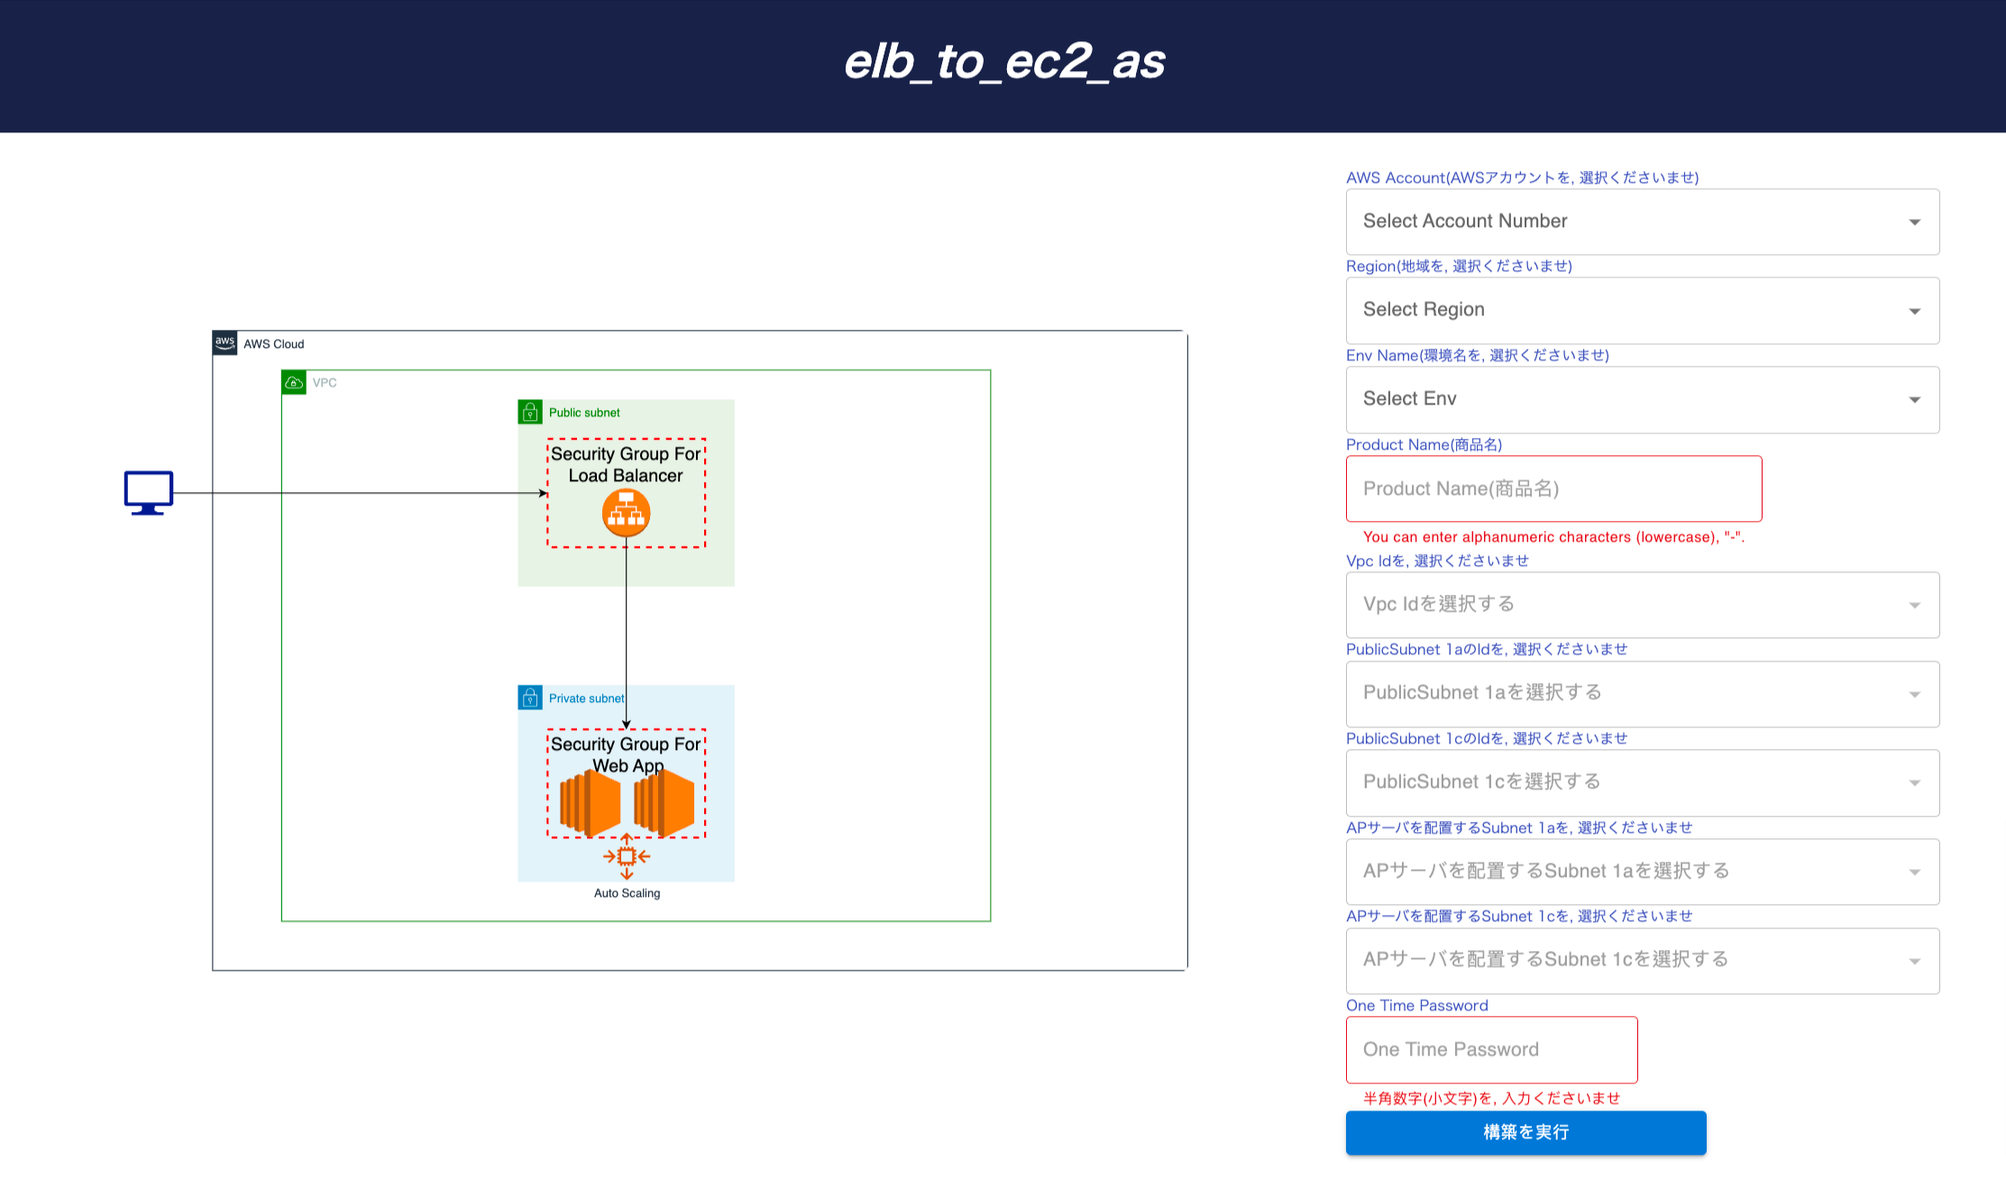 All things you have to do is choosing the suitable architecture for your business and fill all of required fields on PrismScaler form, then click to create.
Now, your system is ready on AWS.
5-15 minutes (without DevOps knowledge)
All things you have to do is choosing the suitable architecture for your business and fill all of required fields on PrismScaler form, then click to create.
Now, your system is ready on AWS.
5-15 minutes (without DevOps knowledge)
- One load balancer, public
- EC2 instance N (variable), private
- Role, SecurityGroup, cluster associated with the above
All things you have to do is choosing the suitable architecture for your business and fill all of required fields on PrismScaler form, then click to create.
Now, your system is ready on AWS.
5-15 minutes (without DevOps knowledge) 7. Reference
The reference section lists the sources or external materials used in the article, allowing readers to explore further or verify the information provided.