1. Introduction
The introduction provides an overview of the article's focus, which is to present a comprehensive guide on AWS load balancing and EC2 instance connectivity. It may briefly explain the importance of load balancing for distributing traffic and ensuring high availability and how EC2 instances can be interconnected to achieve specific use cases.
2. Purpose
This section states the purpose of the article, which is to educate readers about AWS load balancing concepts and demonstrate different methods to connect EC2 instances with each other and with a private RDS instance. It sets the reader's expectations for the content that follows.
3. What is AWS Load balancer?
Amazon Web Services (AWS) offers several types of load balancers to distribute incoming network traffic across multiple targets, such as Amazon EC2 instances, containers, or Lambda functions, to ensure high availability, fault tolerance, and scalability of your applications. AWS Load Balancers help improve the performance and availability of your applications by evenly distributing incoming traffic and automatically managing traffic routing based on various factors. As of my last knowledge update in September 2021, AWS offers the following types of load balancers:
Application Load Balancer (ALB):
- ALB operates at the application layer (Layer 7) of the OSI model and is best suited for HTTP and HTTPS traffic.
- It is capable of routing traffic based on the content of the request, such as the URL or headers.
- ALB supports features like path-based routing, host-based routing, and content-based routing.
- It is a great choice for modern web applications and microservices architectures.
- NLB operates at the transport layer (Layer 4) and is designed for handling TCP and UDP traffic.
- It is ideal for applications that require high performance and low latency.
- NLB provides a static IP address for the load balancer, making it suitable for applications that rely on a fixed IP.
- Classic Load Balancer is the predecessor to ALB and NLB.
- It provides basic load balancing capabilities for both HTTP/HTTPS and TCP/UDP traffic.
- While still available, AWS encourages users to migrate to ALB or NLB for more advanced features and better performance.
4. Creating AWS Load Balancing to EC2 instances with AWS console
In this context, we will create an application load balancer that connect to a EC2 instance in private subnet. In the private subnet, we have two EC2 instances (assuming one for front-end application, one for back-end application), our ALB will connect to the front-end instance and back-end instance can be accessed from front-end instance. Beside that, the back-end instance can access to a private RDS instance. In advance concept, two EC2 instance can auto scaling.
Assuming we already have a RDS instance before. Therefore, in this blog, we won’t show you how to create a RDS instance, we just focus on EC2 instance and Load Balancer.
Step 1. Create EC2 instances
We will create two EC2 instances: web and app.
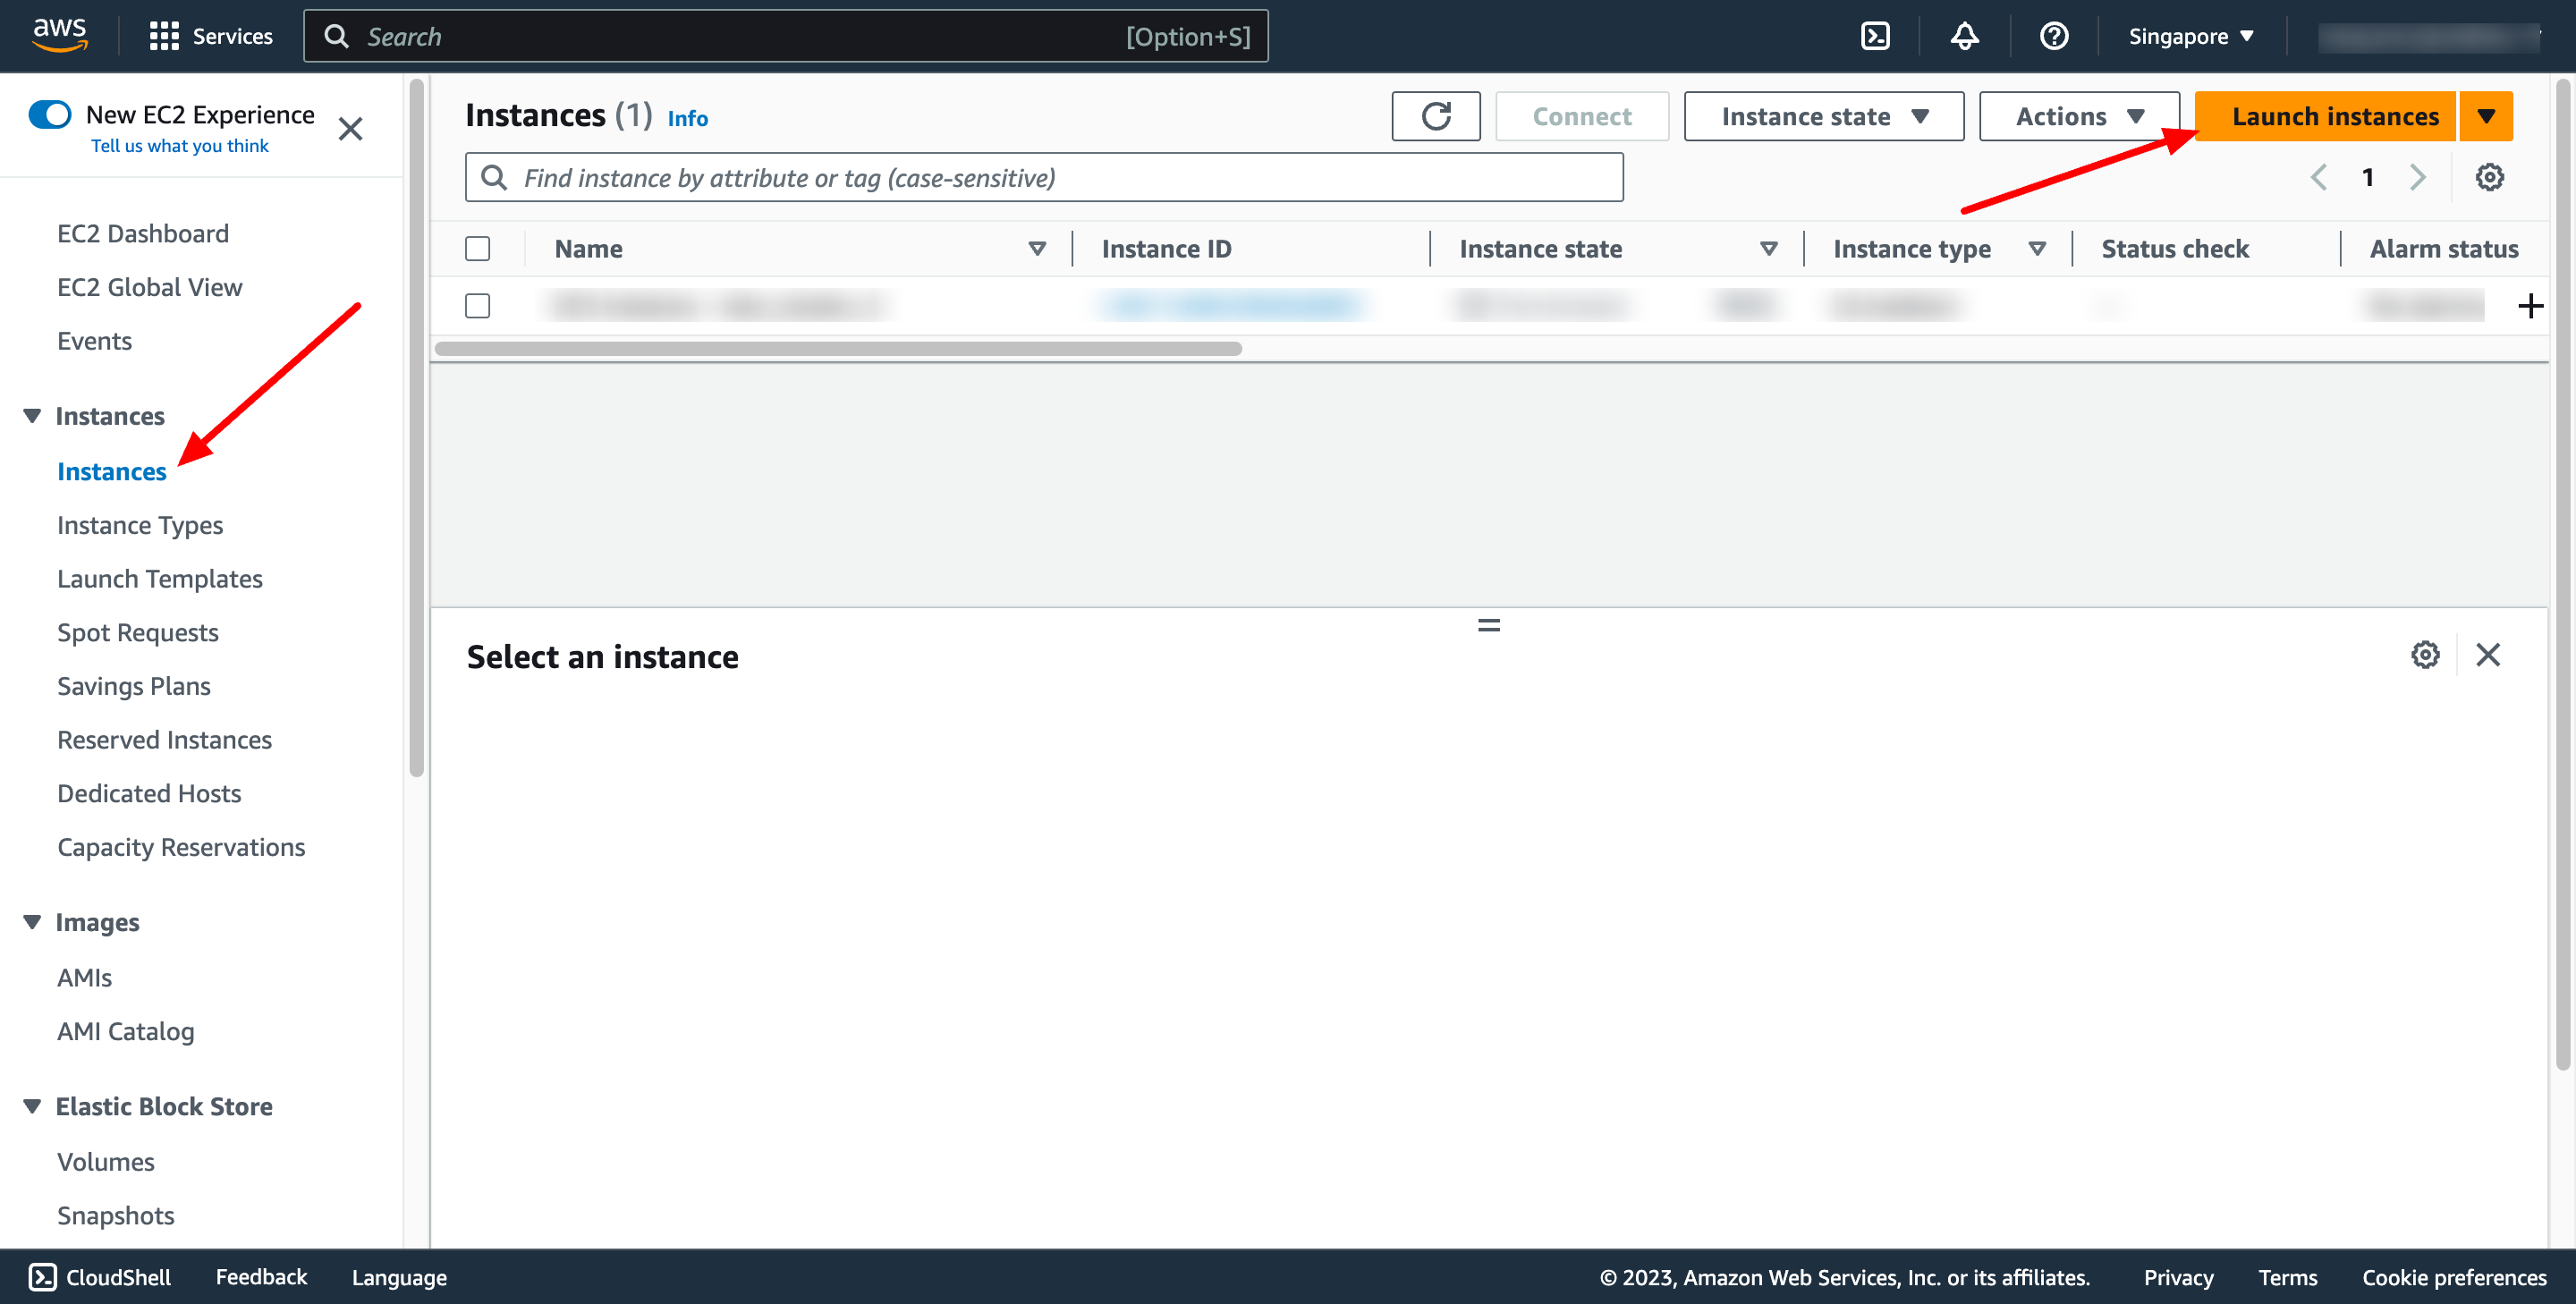
Go to EC2 service dashboard → go to “Instances” → Click to “Launch instances”:
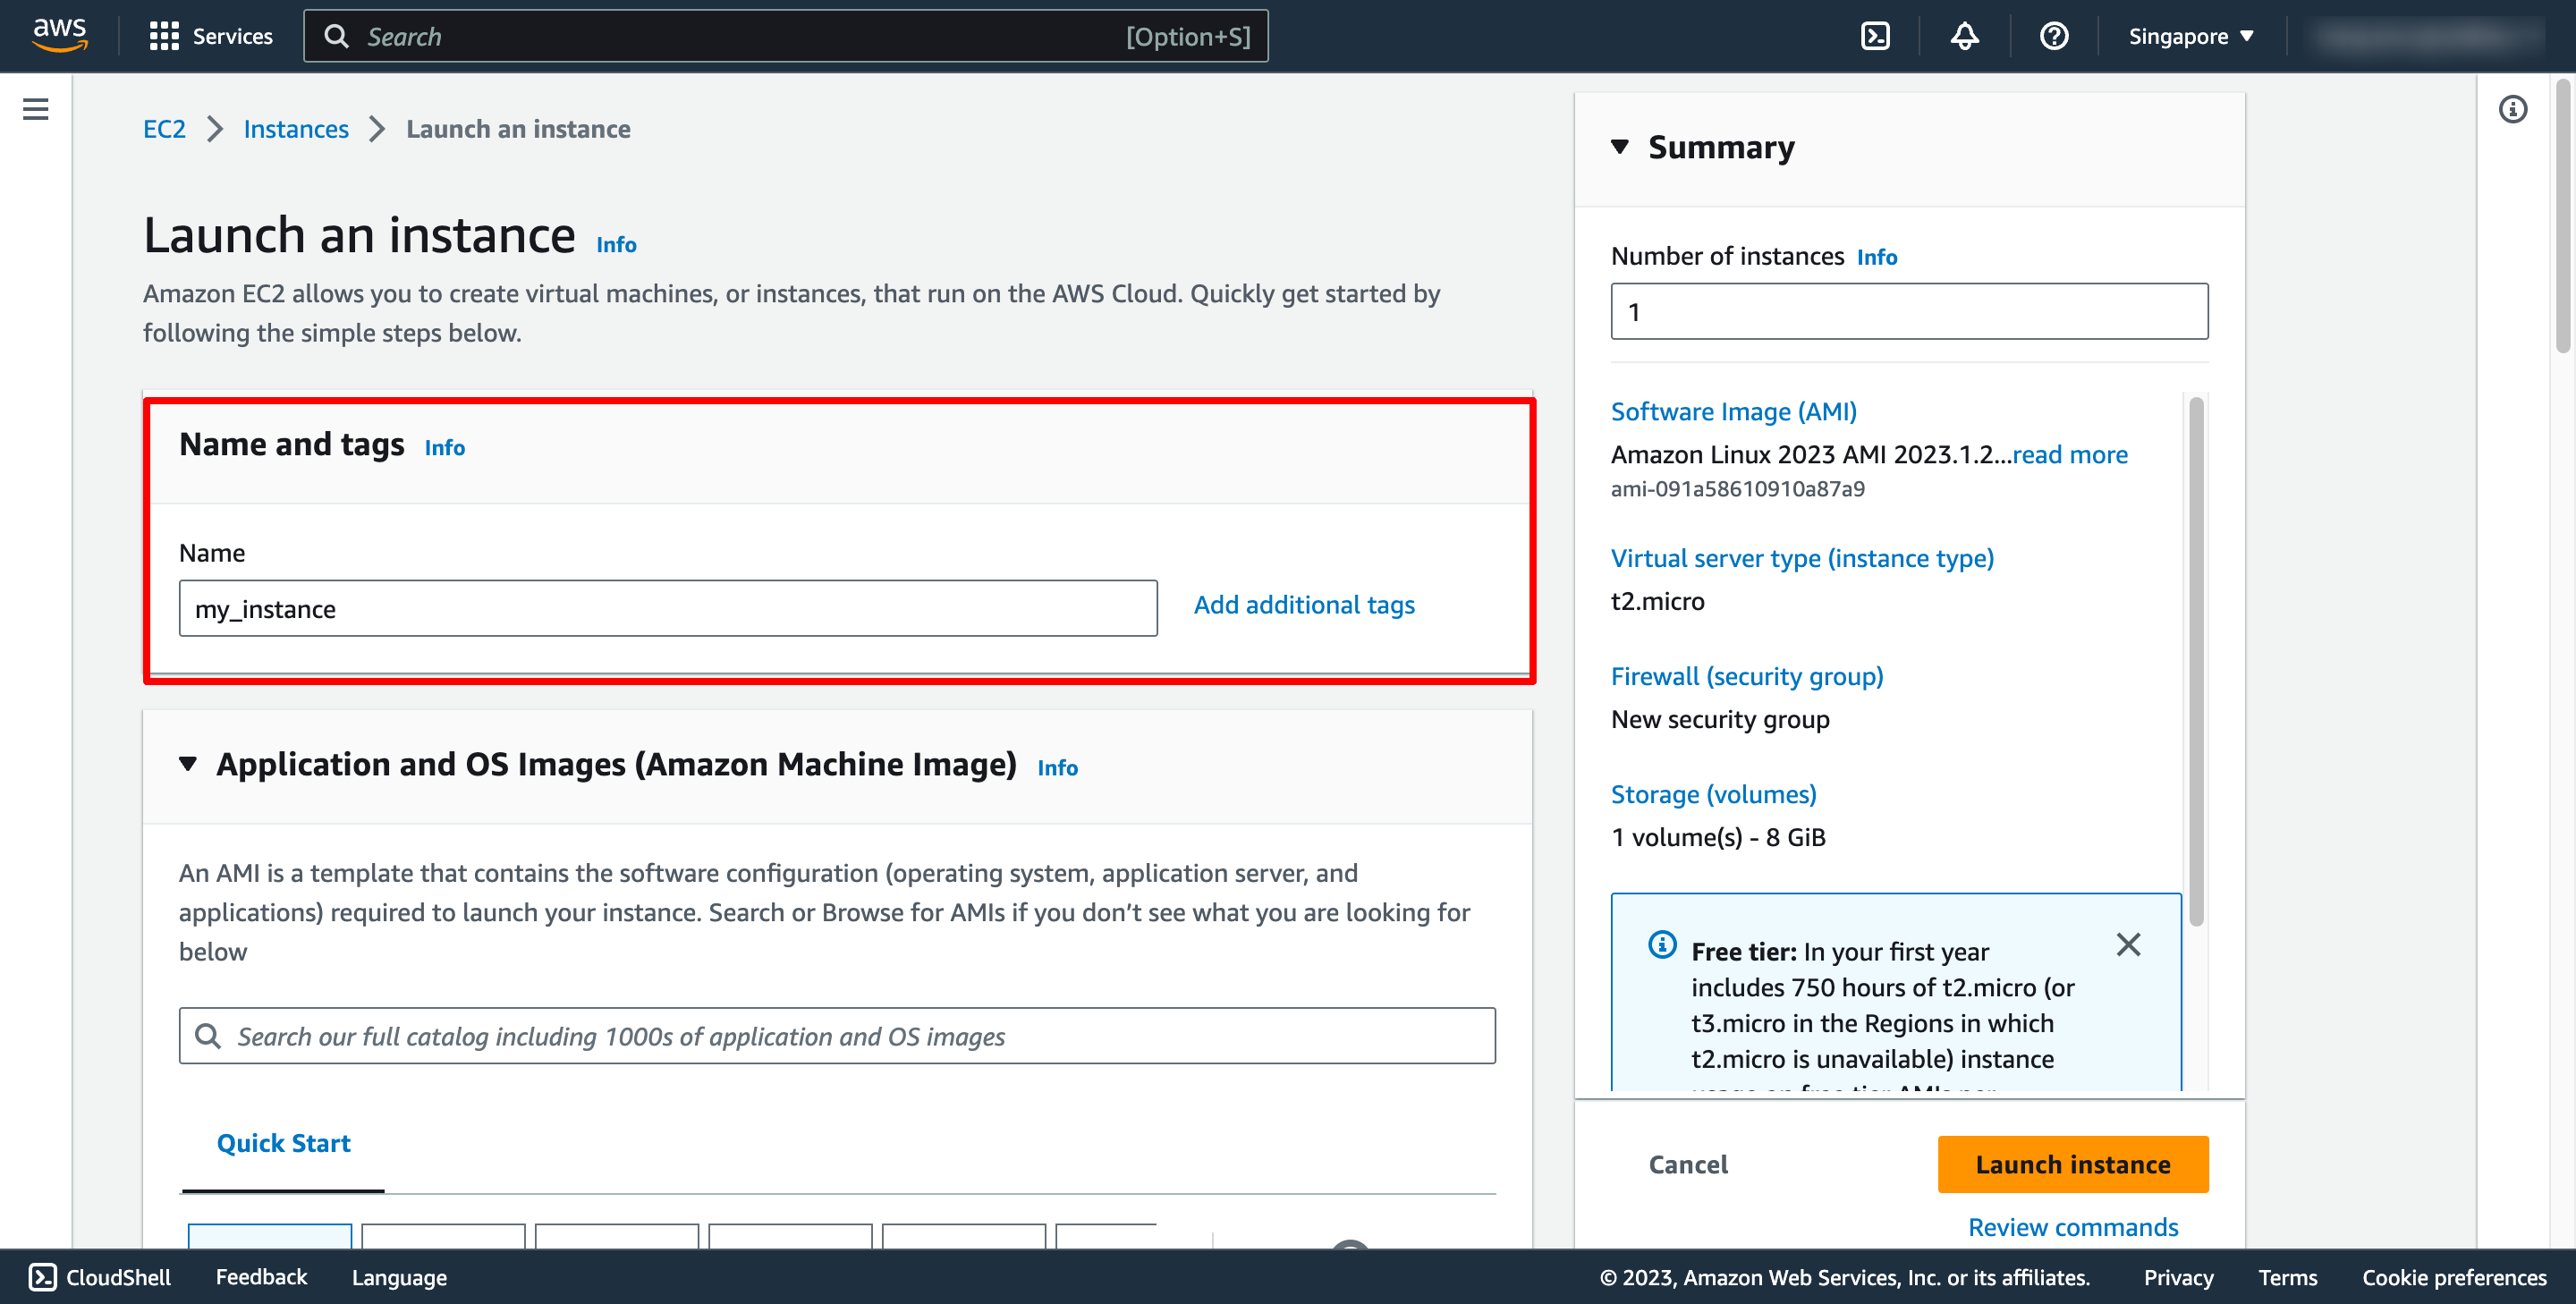
 Enter instance name:
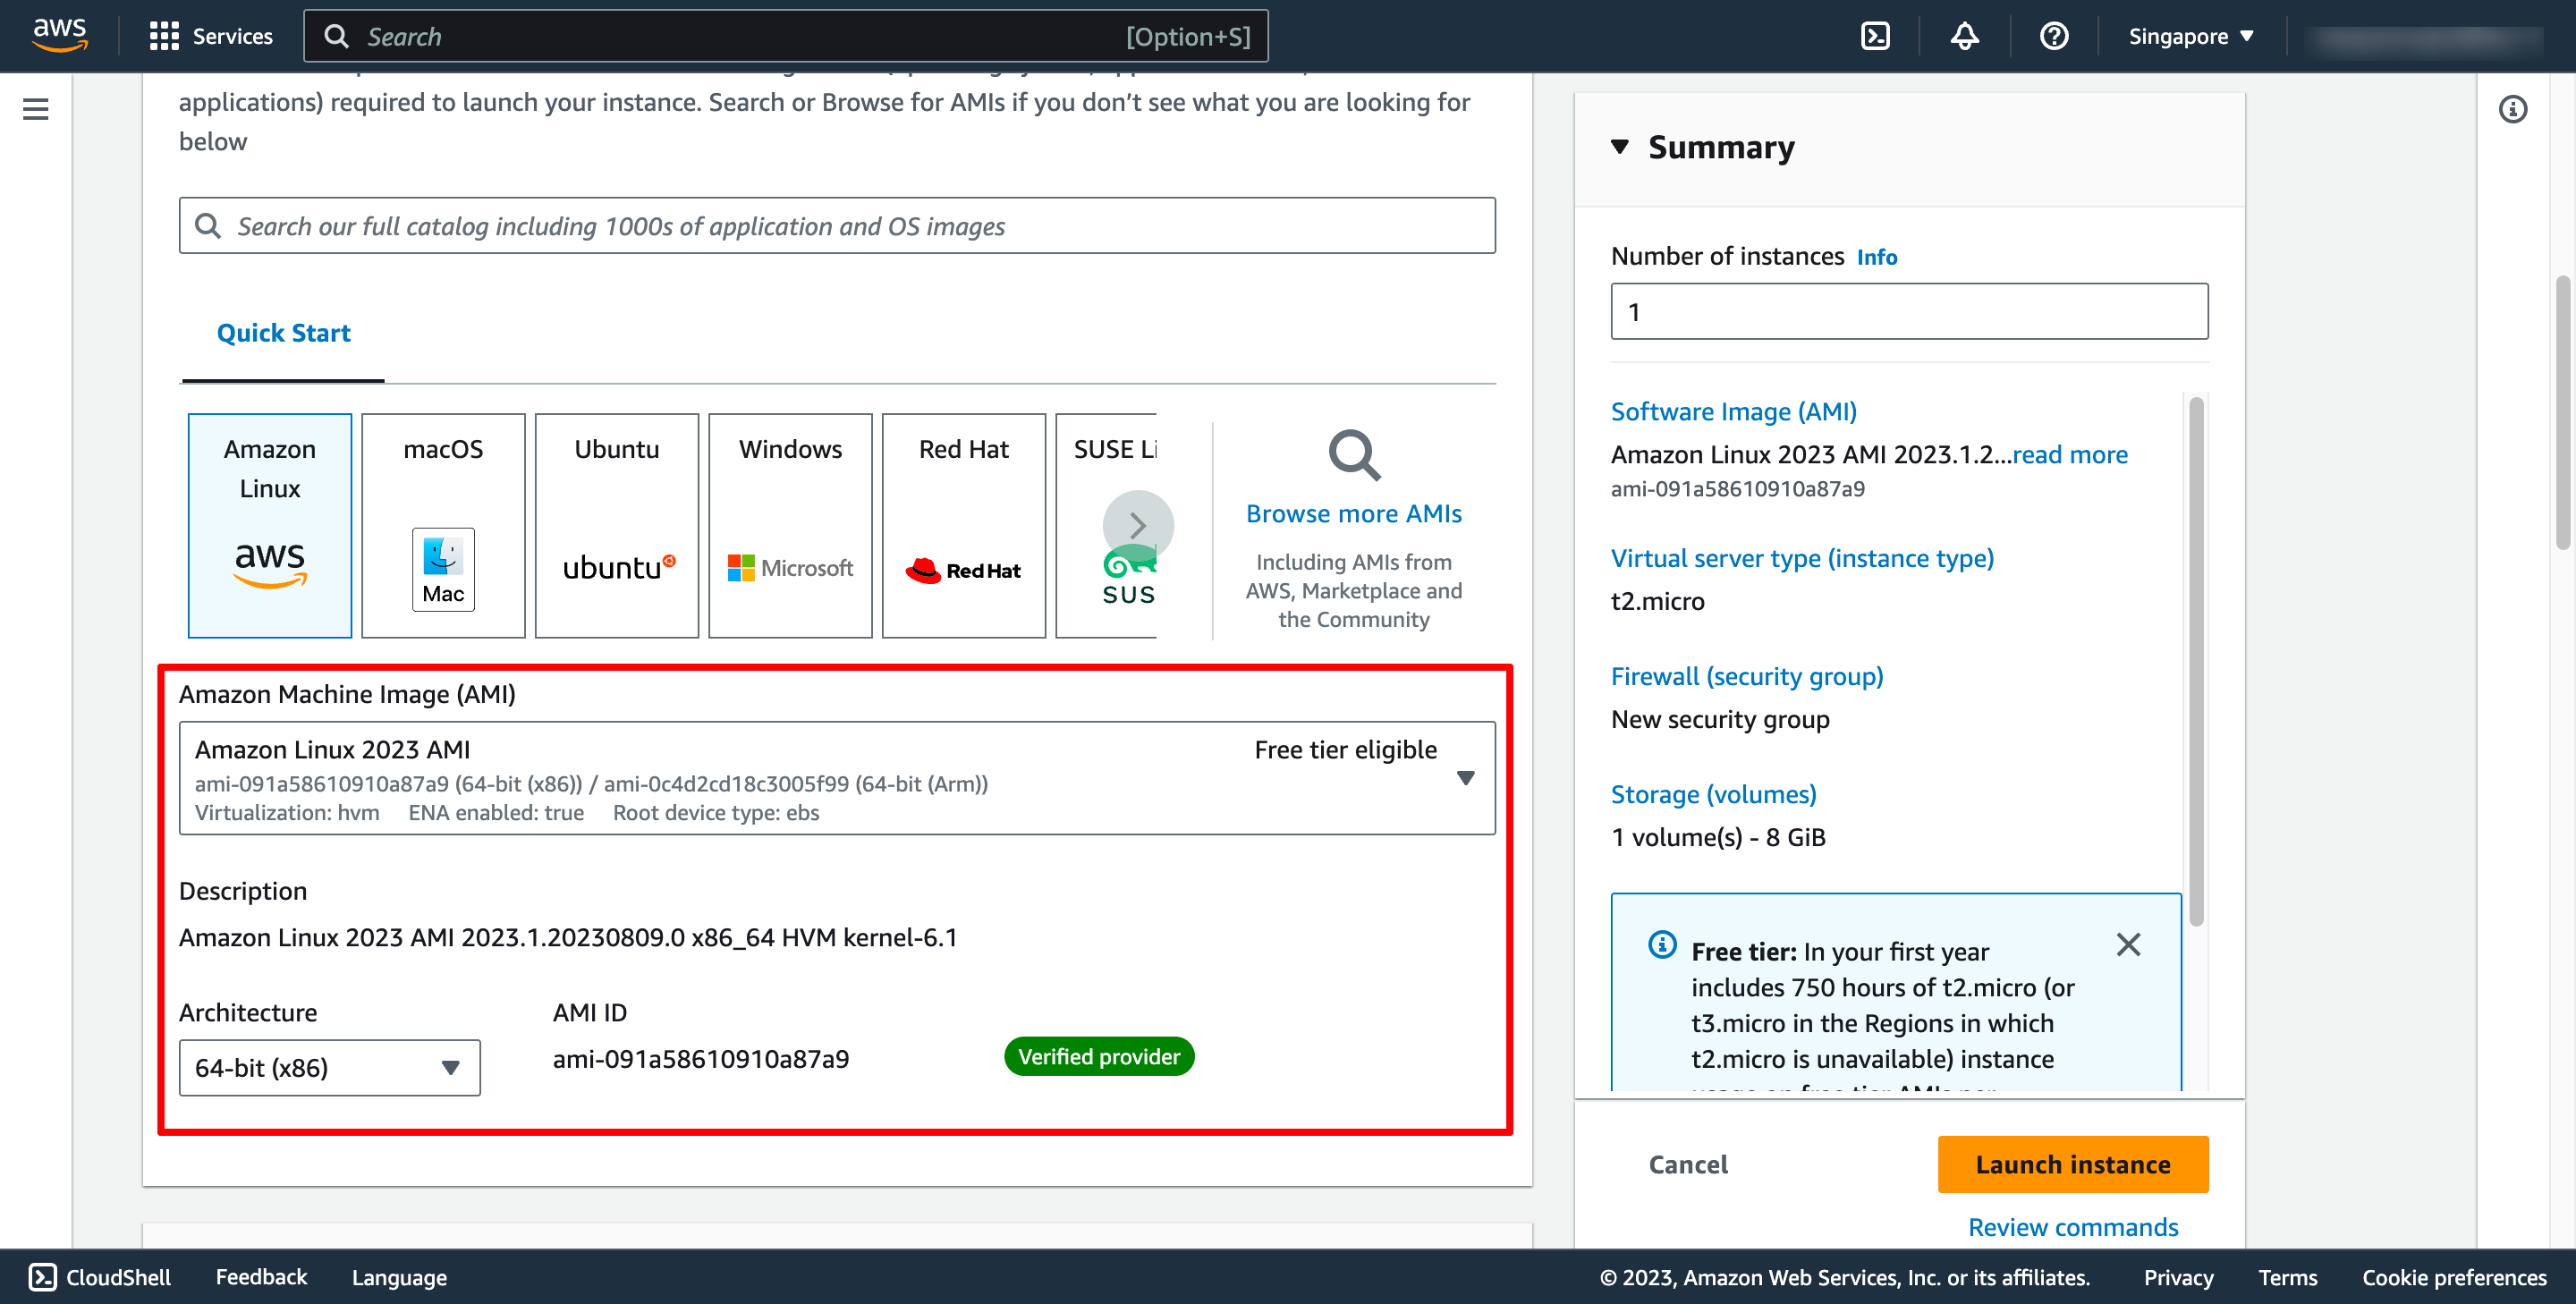
 Choose OS image (AMI) for you instance:
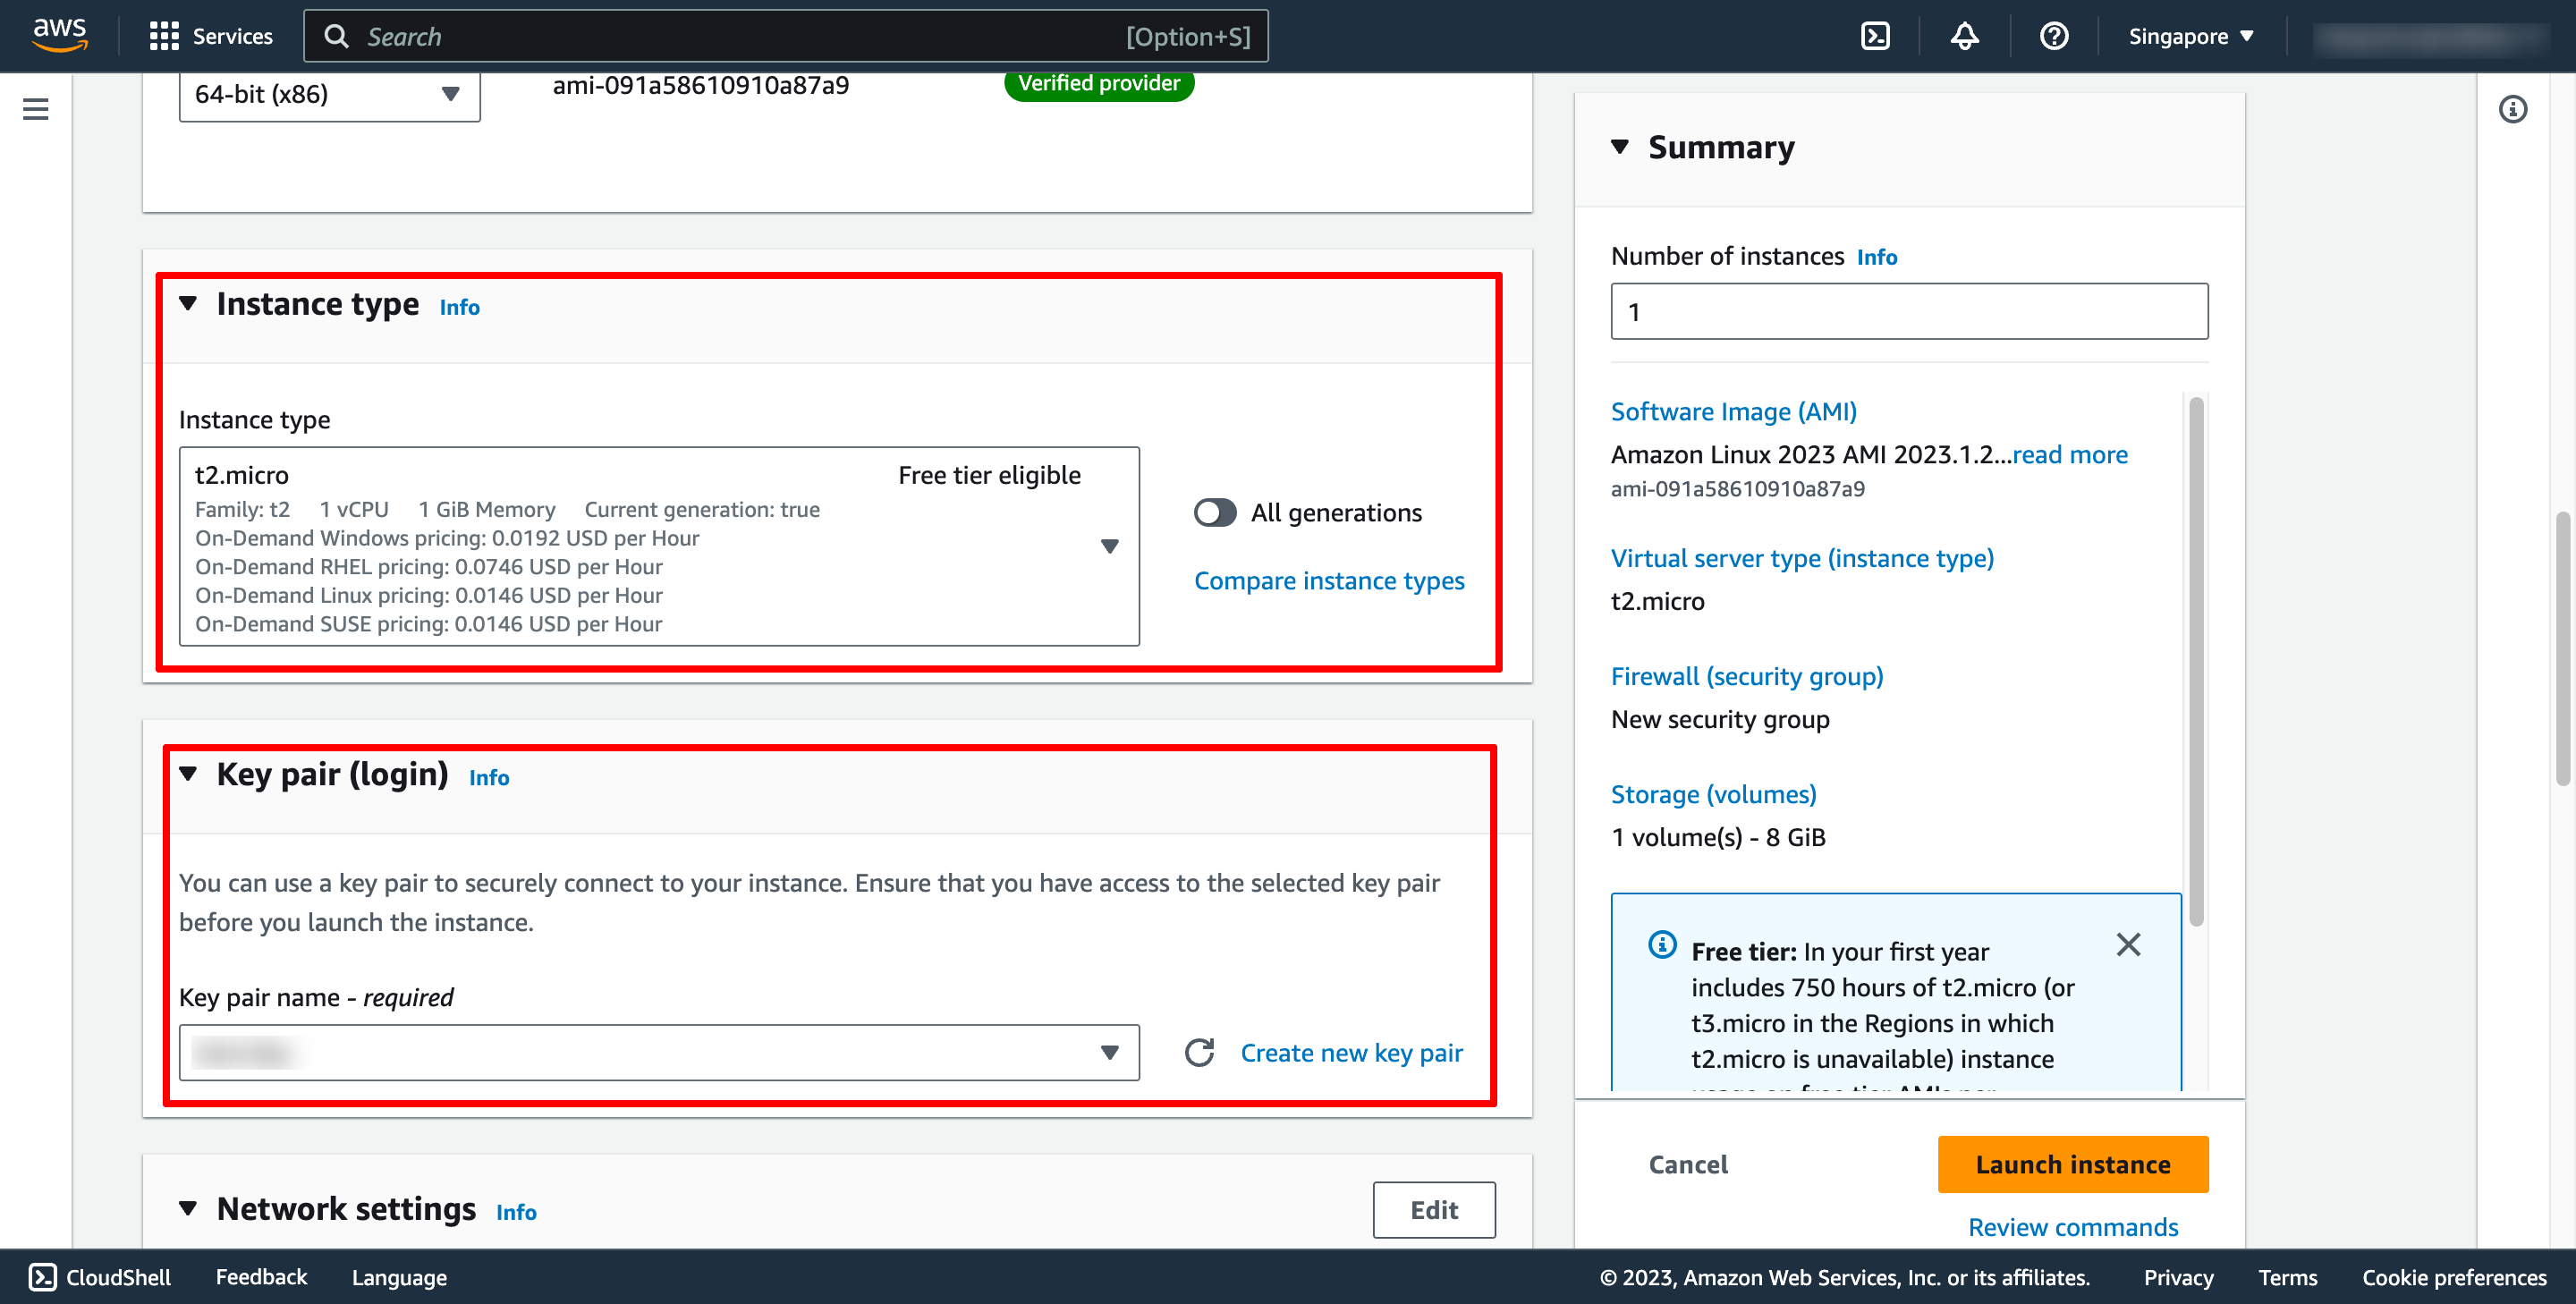
 Choose instance type and key pair:
Key pair is used to login to instance via SSH.
Choose instance type and key pair:
Key pair is used to login to instance via SSH.
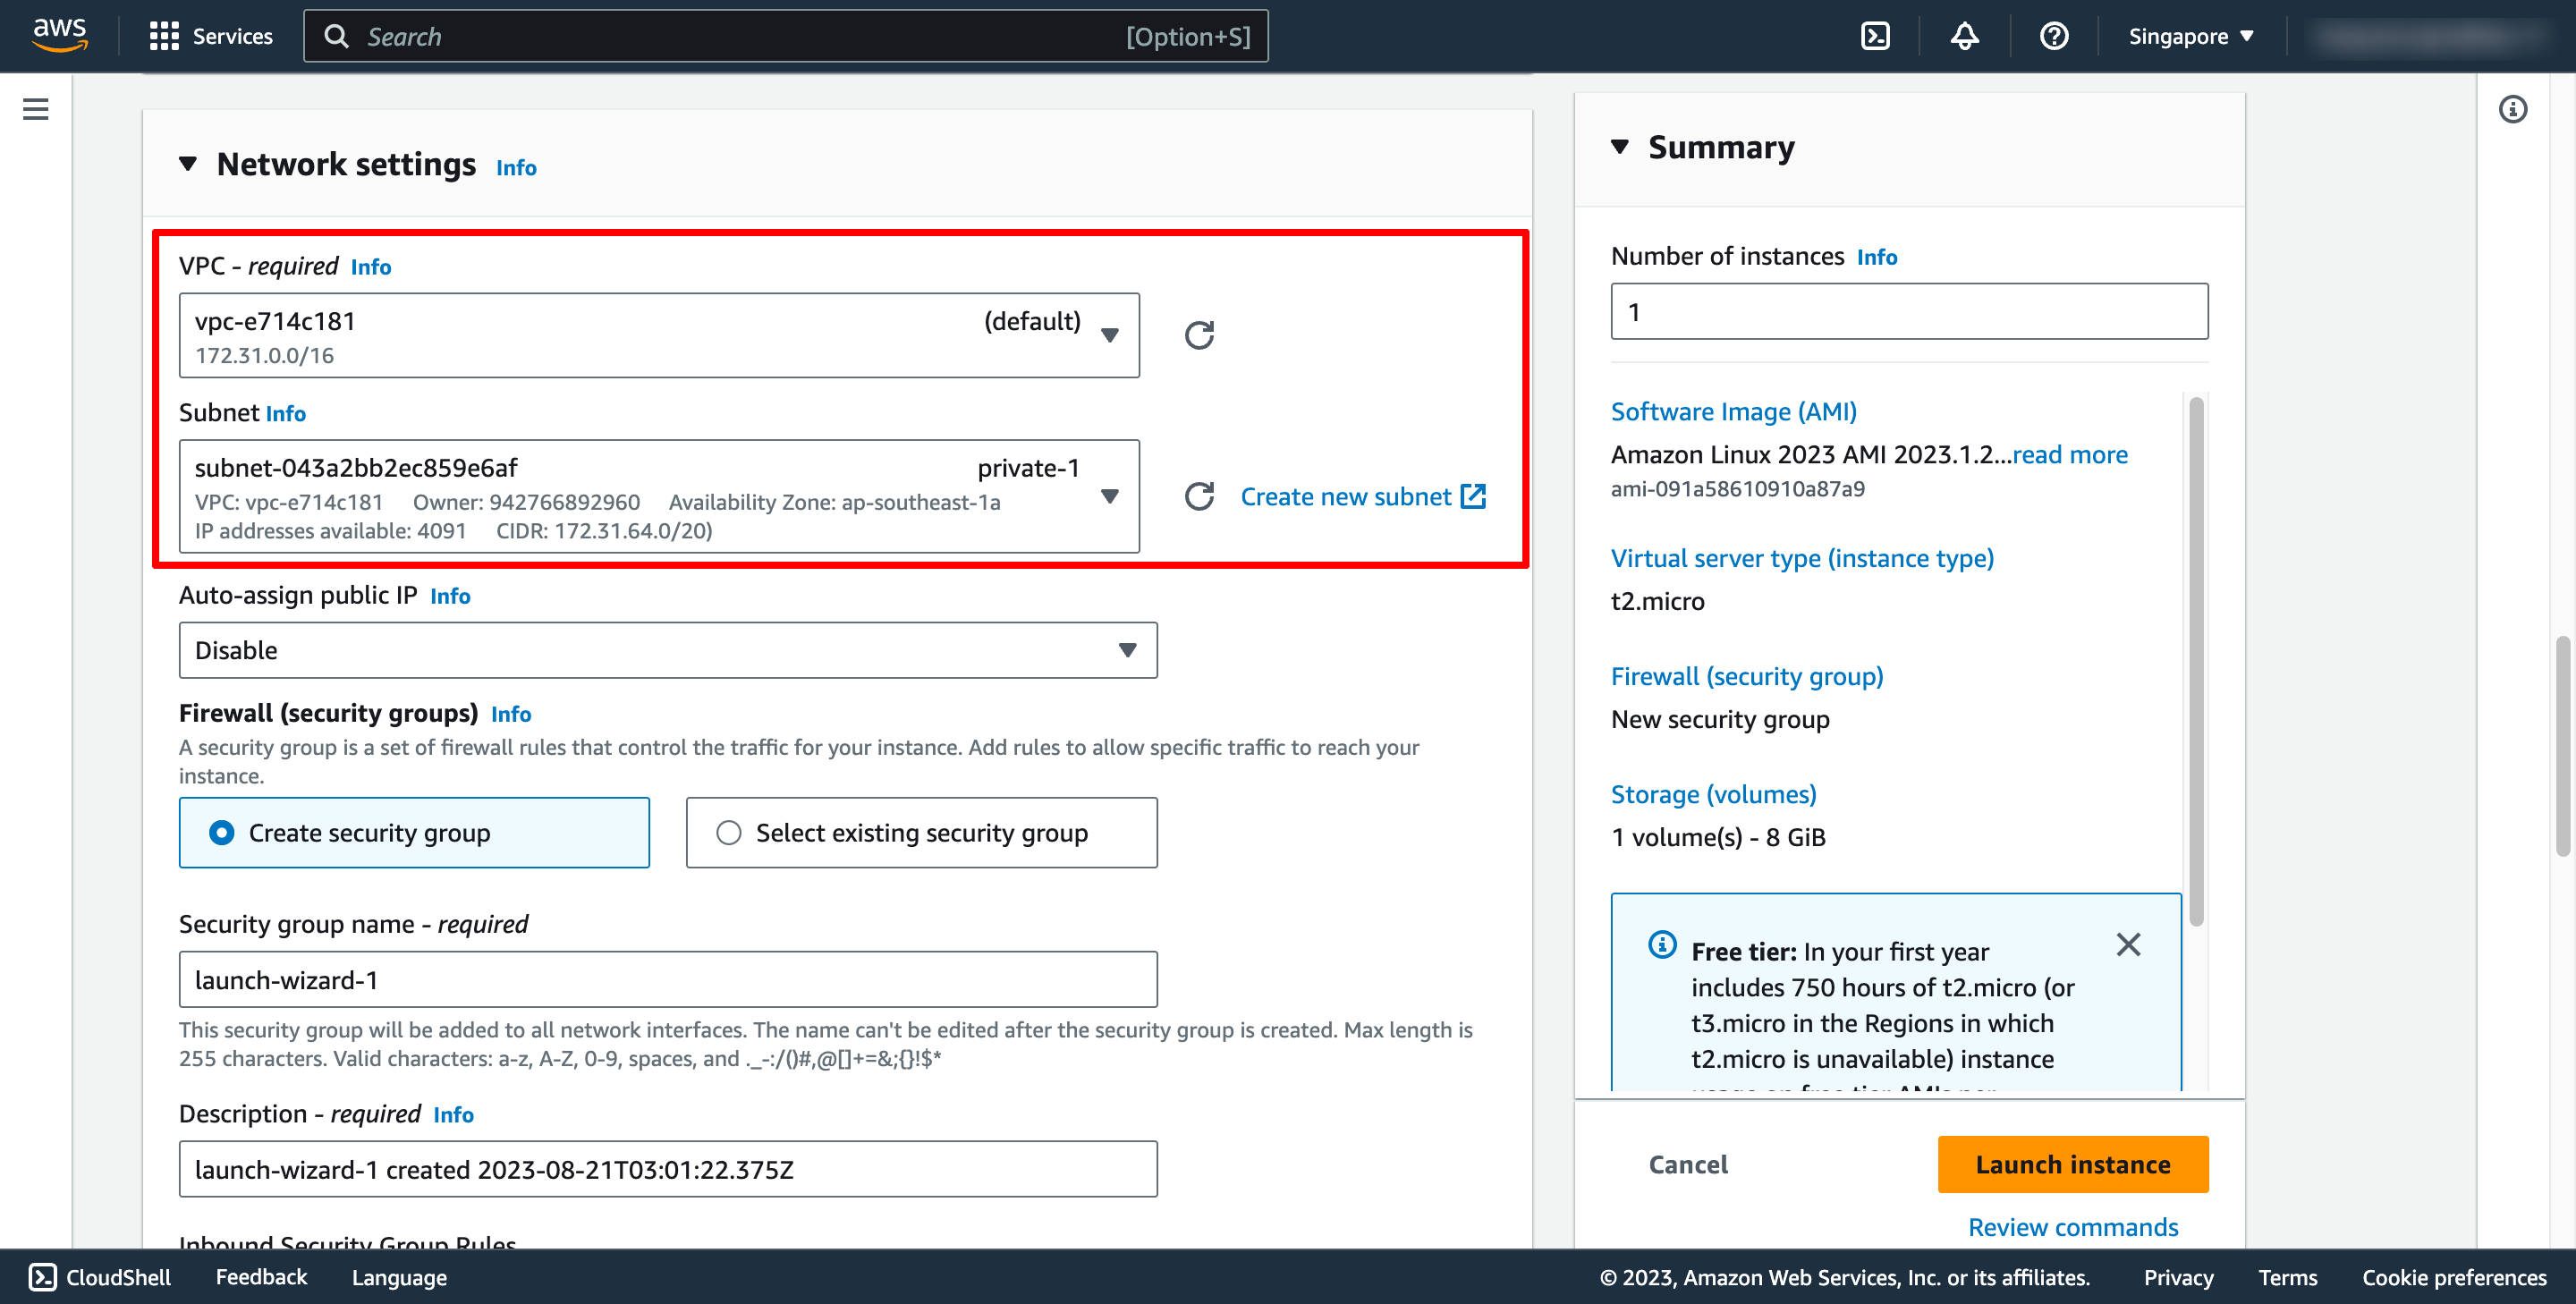
 In Network setting, you can choose the VPC and subnet you want to place your instance there:
 You also can choose or create new Security group. In this case, please choose Create security group, you don’t need to add the rules for security group now, we will do that later.
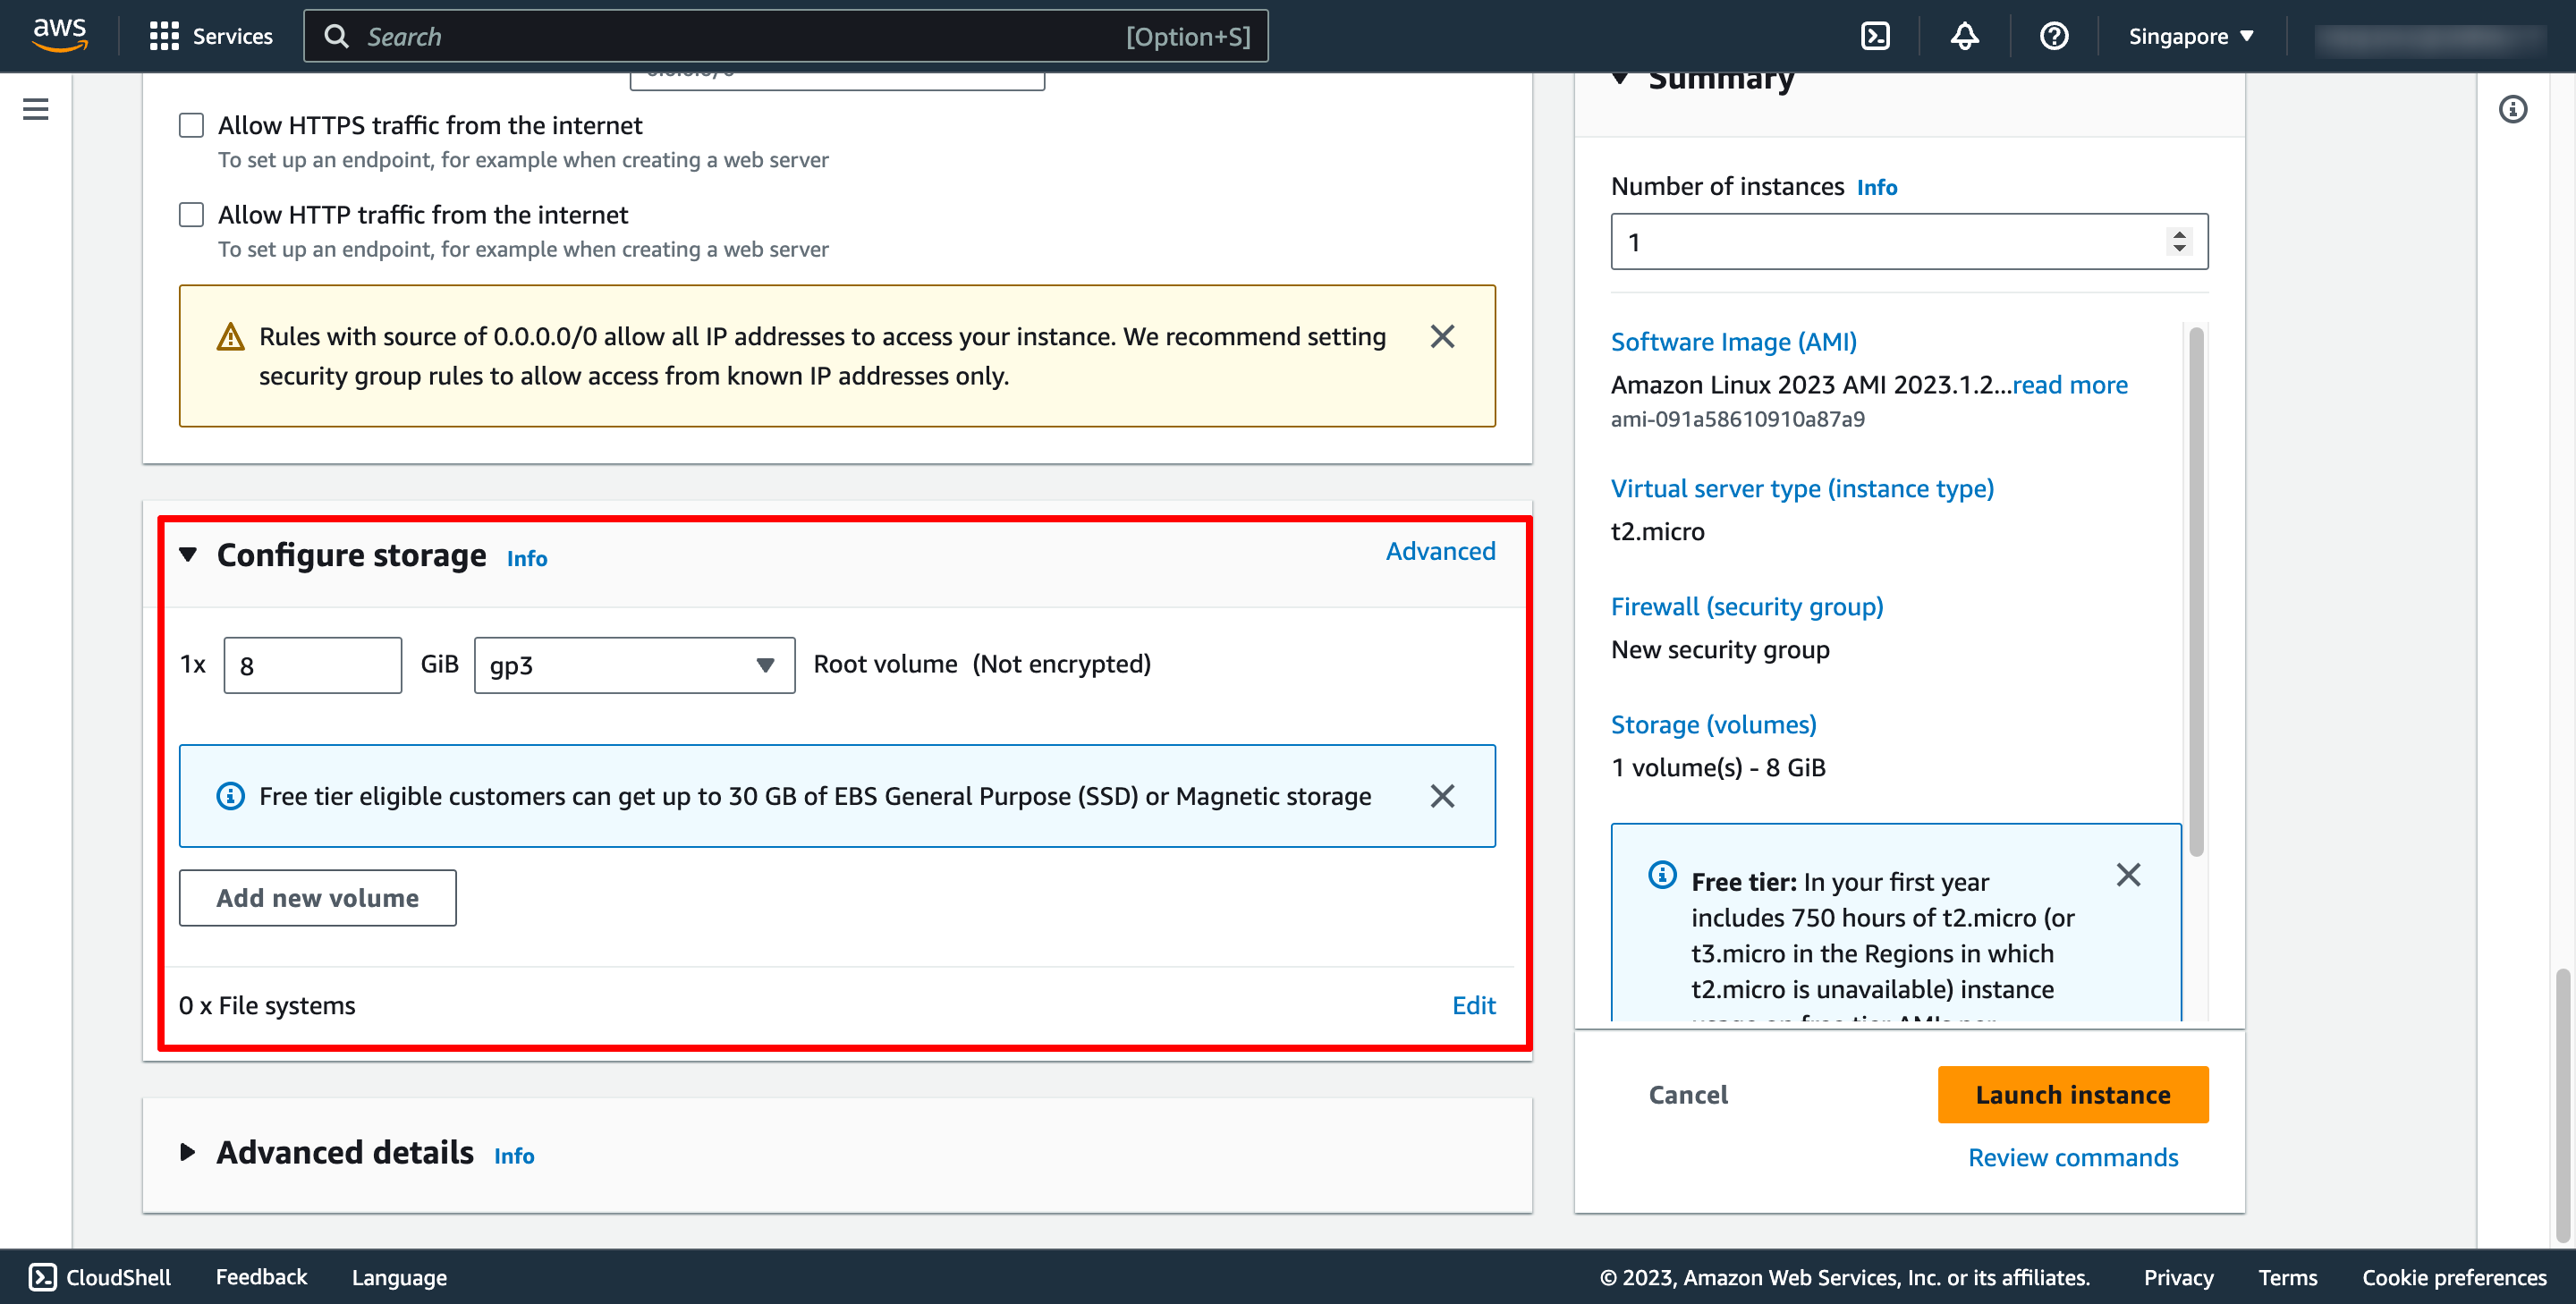
The AMI you selected includes one or more volumes of storage, including the root device volume. On the Add Storage page, you can specify additional volumes to attach to the instance by choosing Add New Volume:
You also can choose or create new Security group. In this case, please choose Create security group, you don’t need to add the rules for security group now, we will do that later.
The AMI you selected includes one or more volumes of storage, including the root device volume. On the Add Storage page, you can specify additional volumes to attach to the instance by choosing Add New Volume:
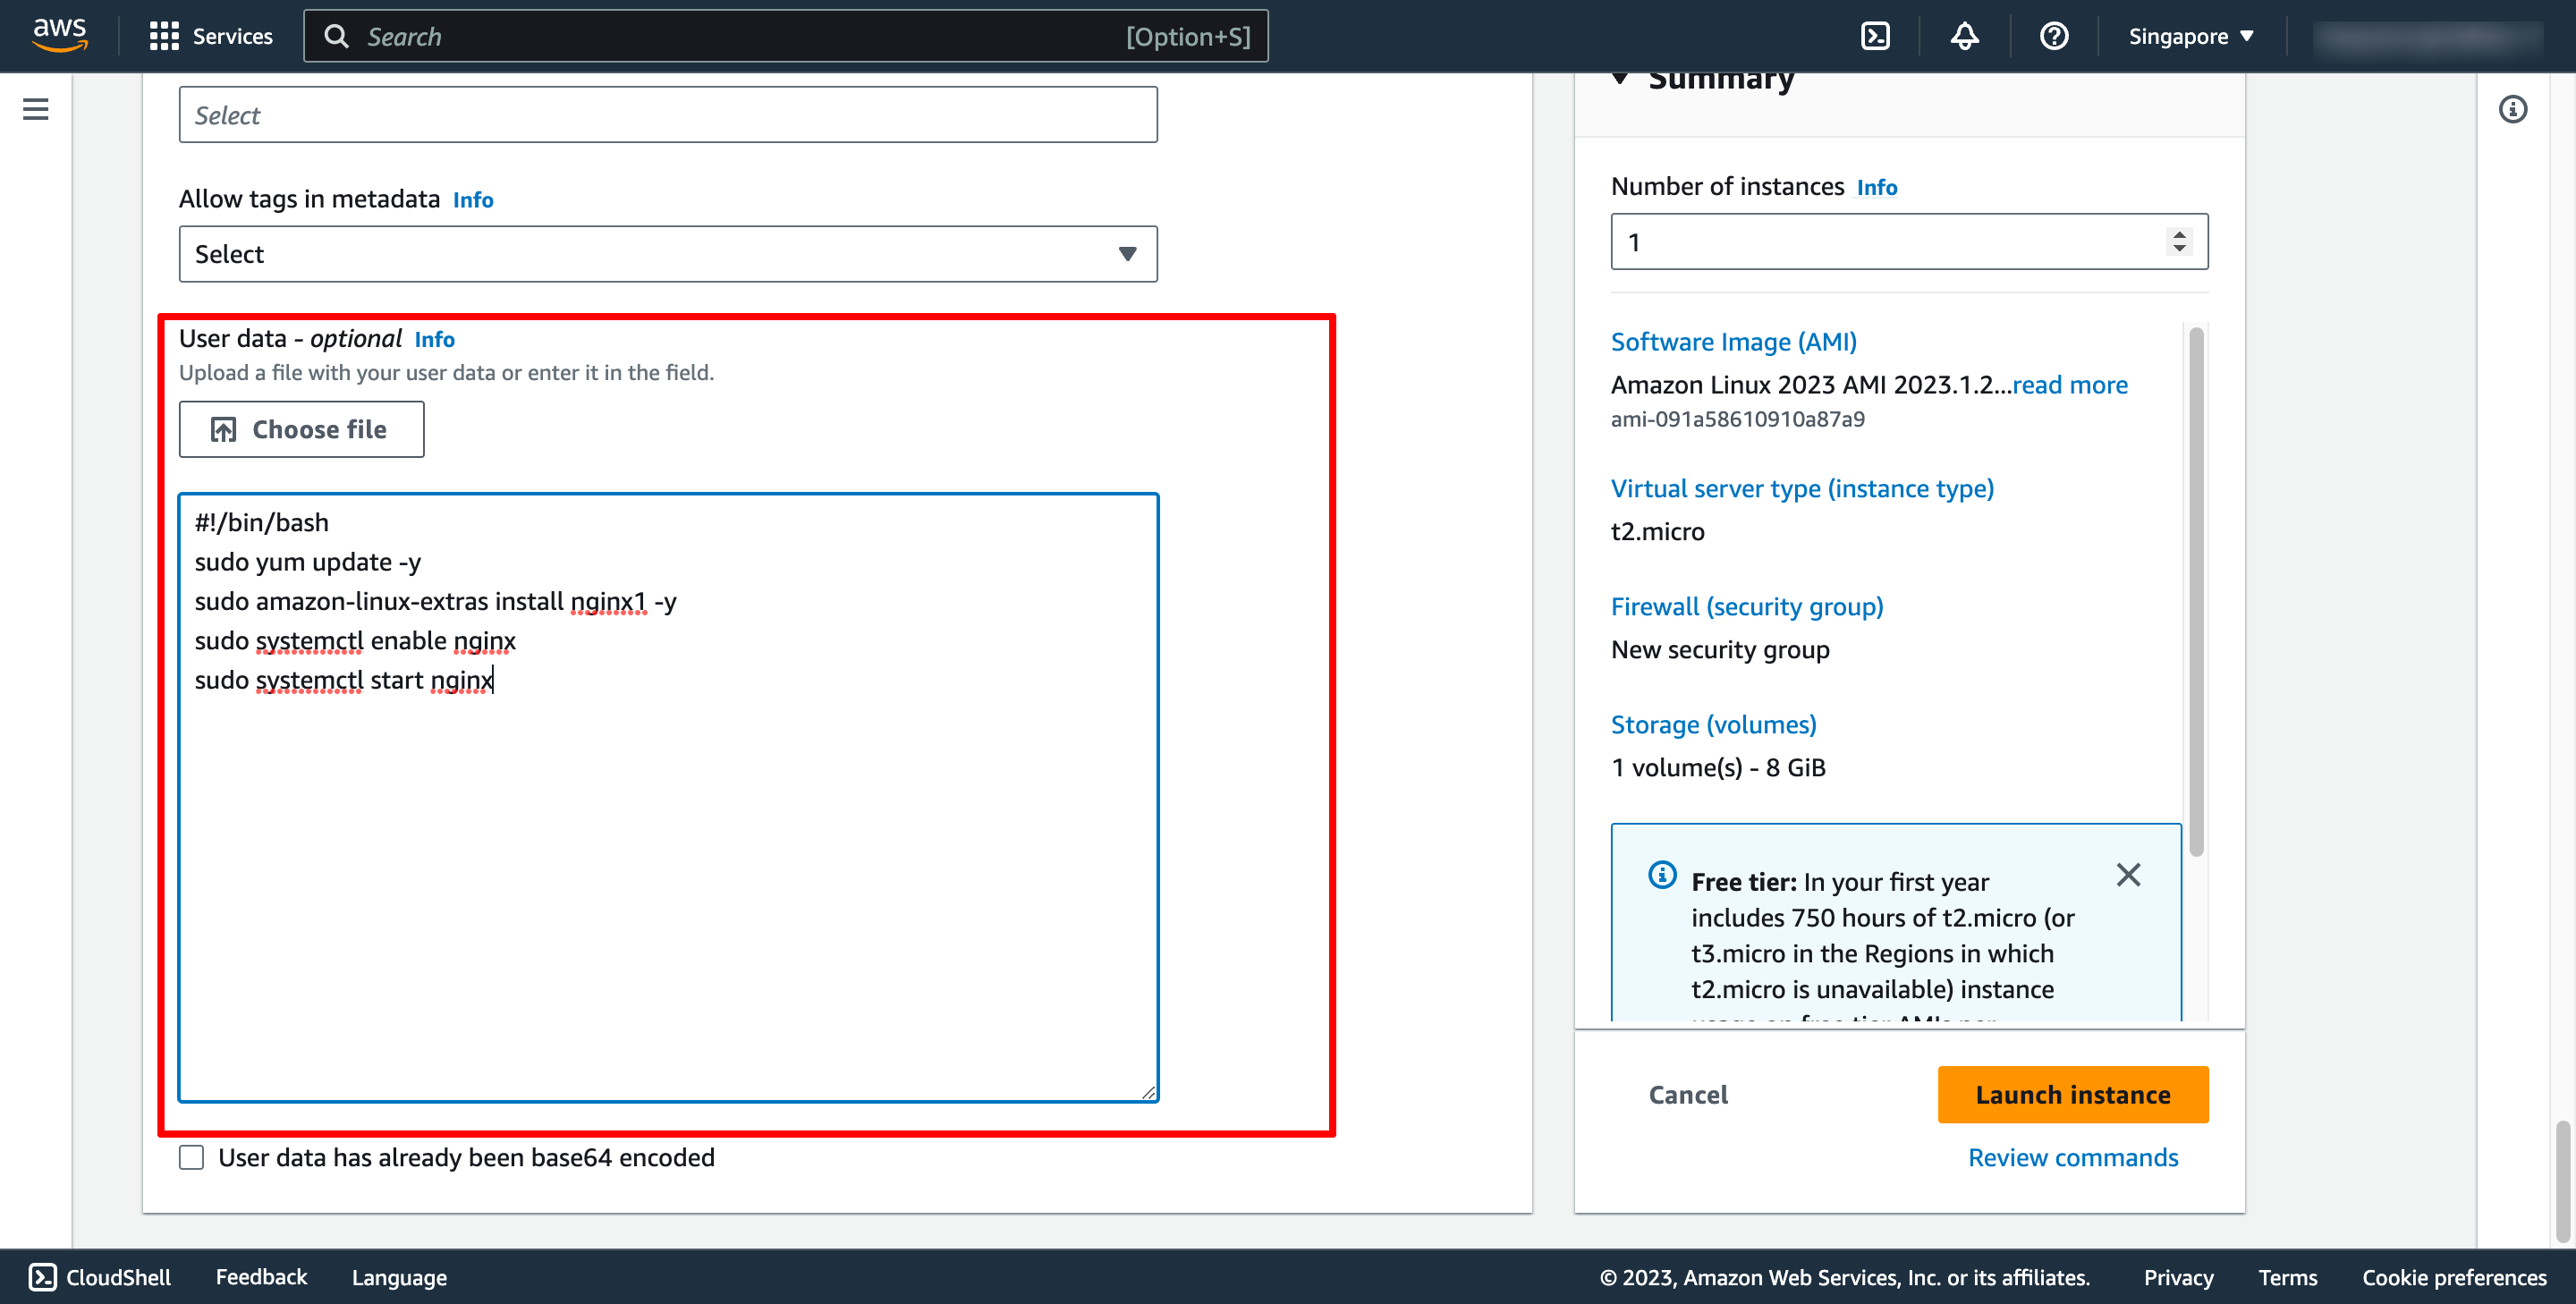
 In Advanced details, enter you commands in User data:
 Then, click to Launch instance.
Do the same with the above steps to create another instance for the app. Then, we have two instances:
Then, click to Launch instance.
Do the same with the above steps to create another instance for the app. Then, we have two instances:
 Step 2. Create Application Load Balancer
Step 2.1. Create Target group
Each target group is used to route requests to one or more registered targets. When a rule condition is met, traffic is forwarded to the corresponding target group.
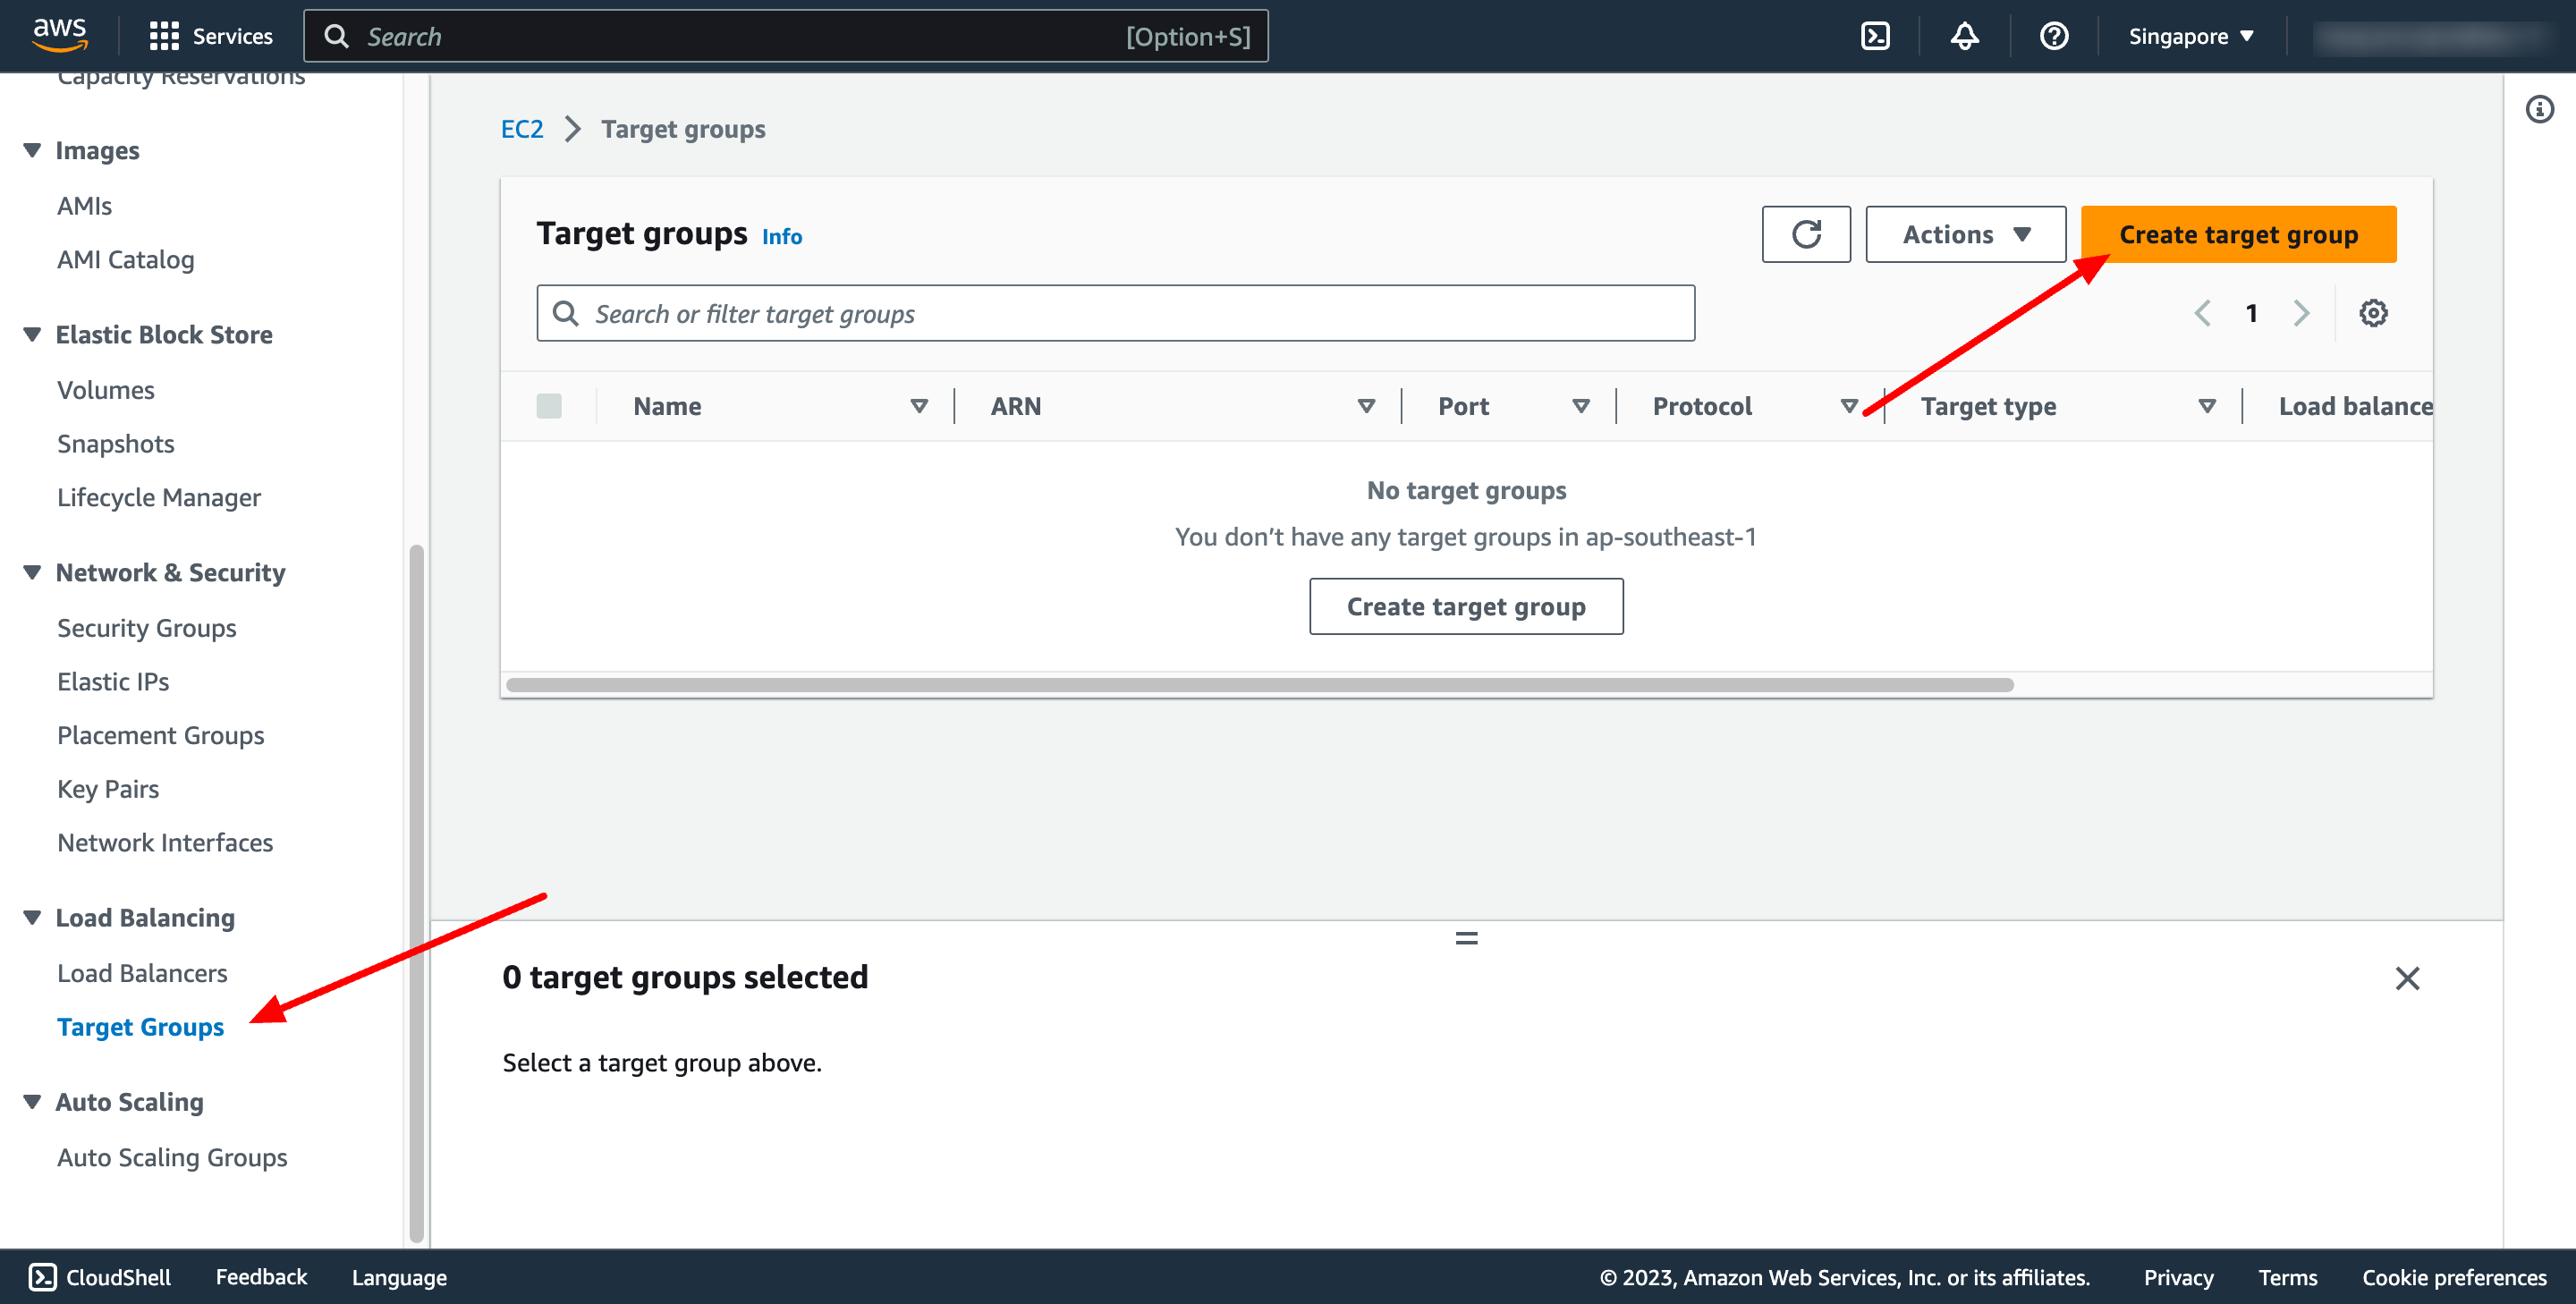
Go to Load balancer feature in EC2 service → go to Target group → click to Create target group:
Step 2. Create Application Load Balancer
Step 2.1. Create Target group
Each target group is used to route requests to one or more registered targets. When a rule condition is met, traffic is forwarded to the corresponding target group.
Go to Load balancer feature in EC2 service → go to Target group → click to Create target group:
 For Choose a target type,Instances to register targets by instance ID, IP addresses to register targets by IP address, or Lambda function to register a Lambda function as a target.
If your service's task definition uses the awsvpc network mode (which is required for the Fargate launch type), you must choose IP addresses as the target type This is because tasks that use the awsvpc network mode are associated with an elastic network interface, not an Amazon EC2 instance.
In this context, we choose Instances type.
In Register target step, please choose our web EC2 instance:
For Choose a target type,Instances to register targets by instance ID, IP addresses to register targets by IP address, or Lambda function to register a Lambda function as a target.
If your service's task definition uses the awsvpc network mode (which is required for the Fargate launch type), you must choose IP addresses as the target type This is because tasks that use the awsvpc network mode are associated with an elastic network interface, not an Amazon EC2 instance.
In this context, we choose Instances type.
In Register target step, please choose our web EC2 instance:
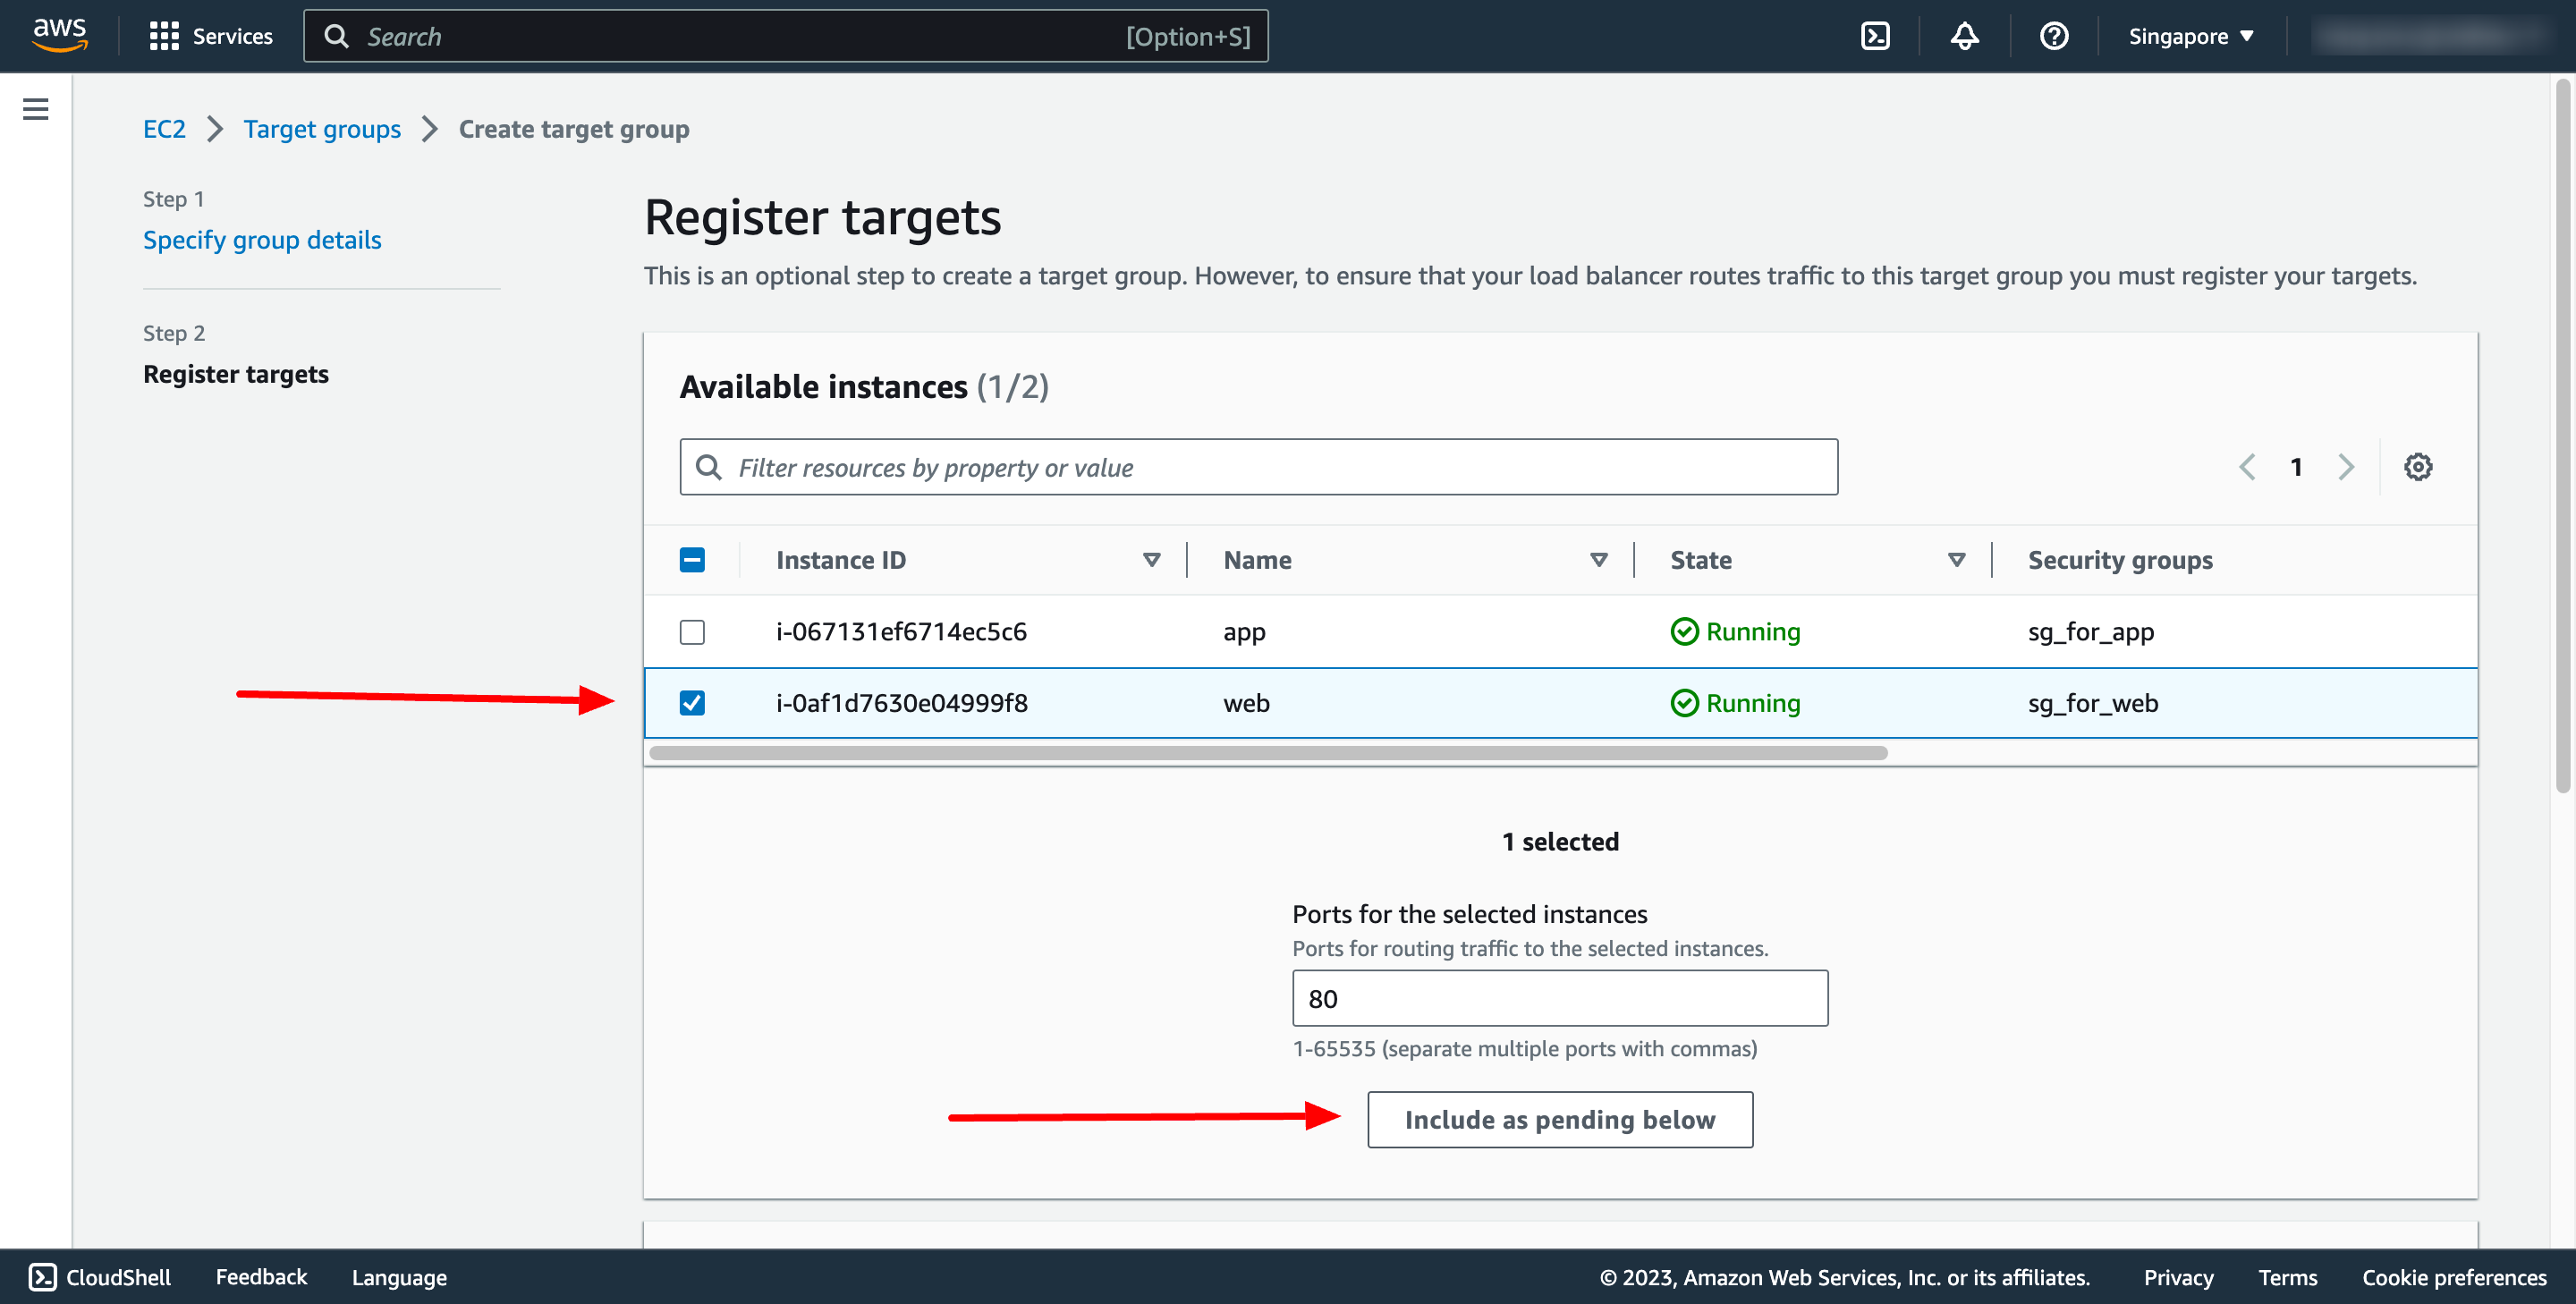 Then Create target group.
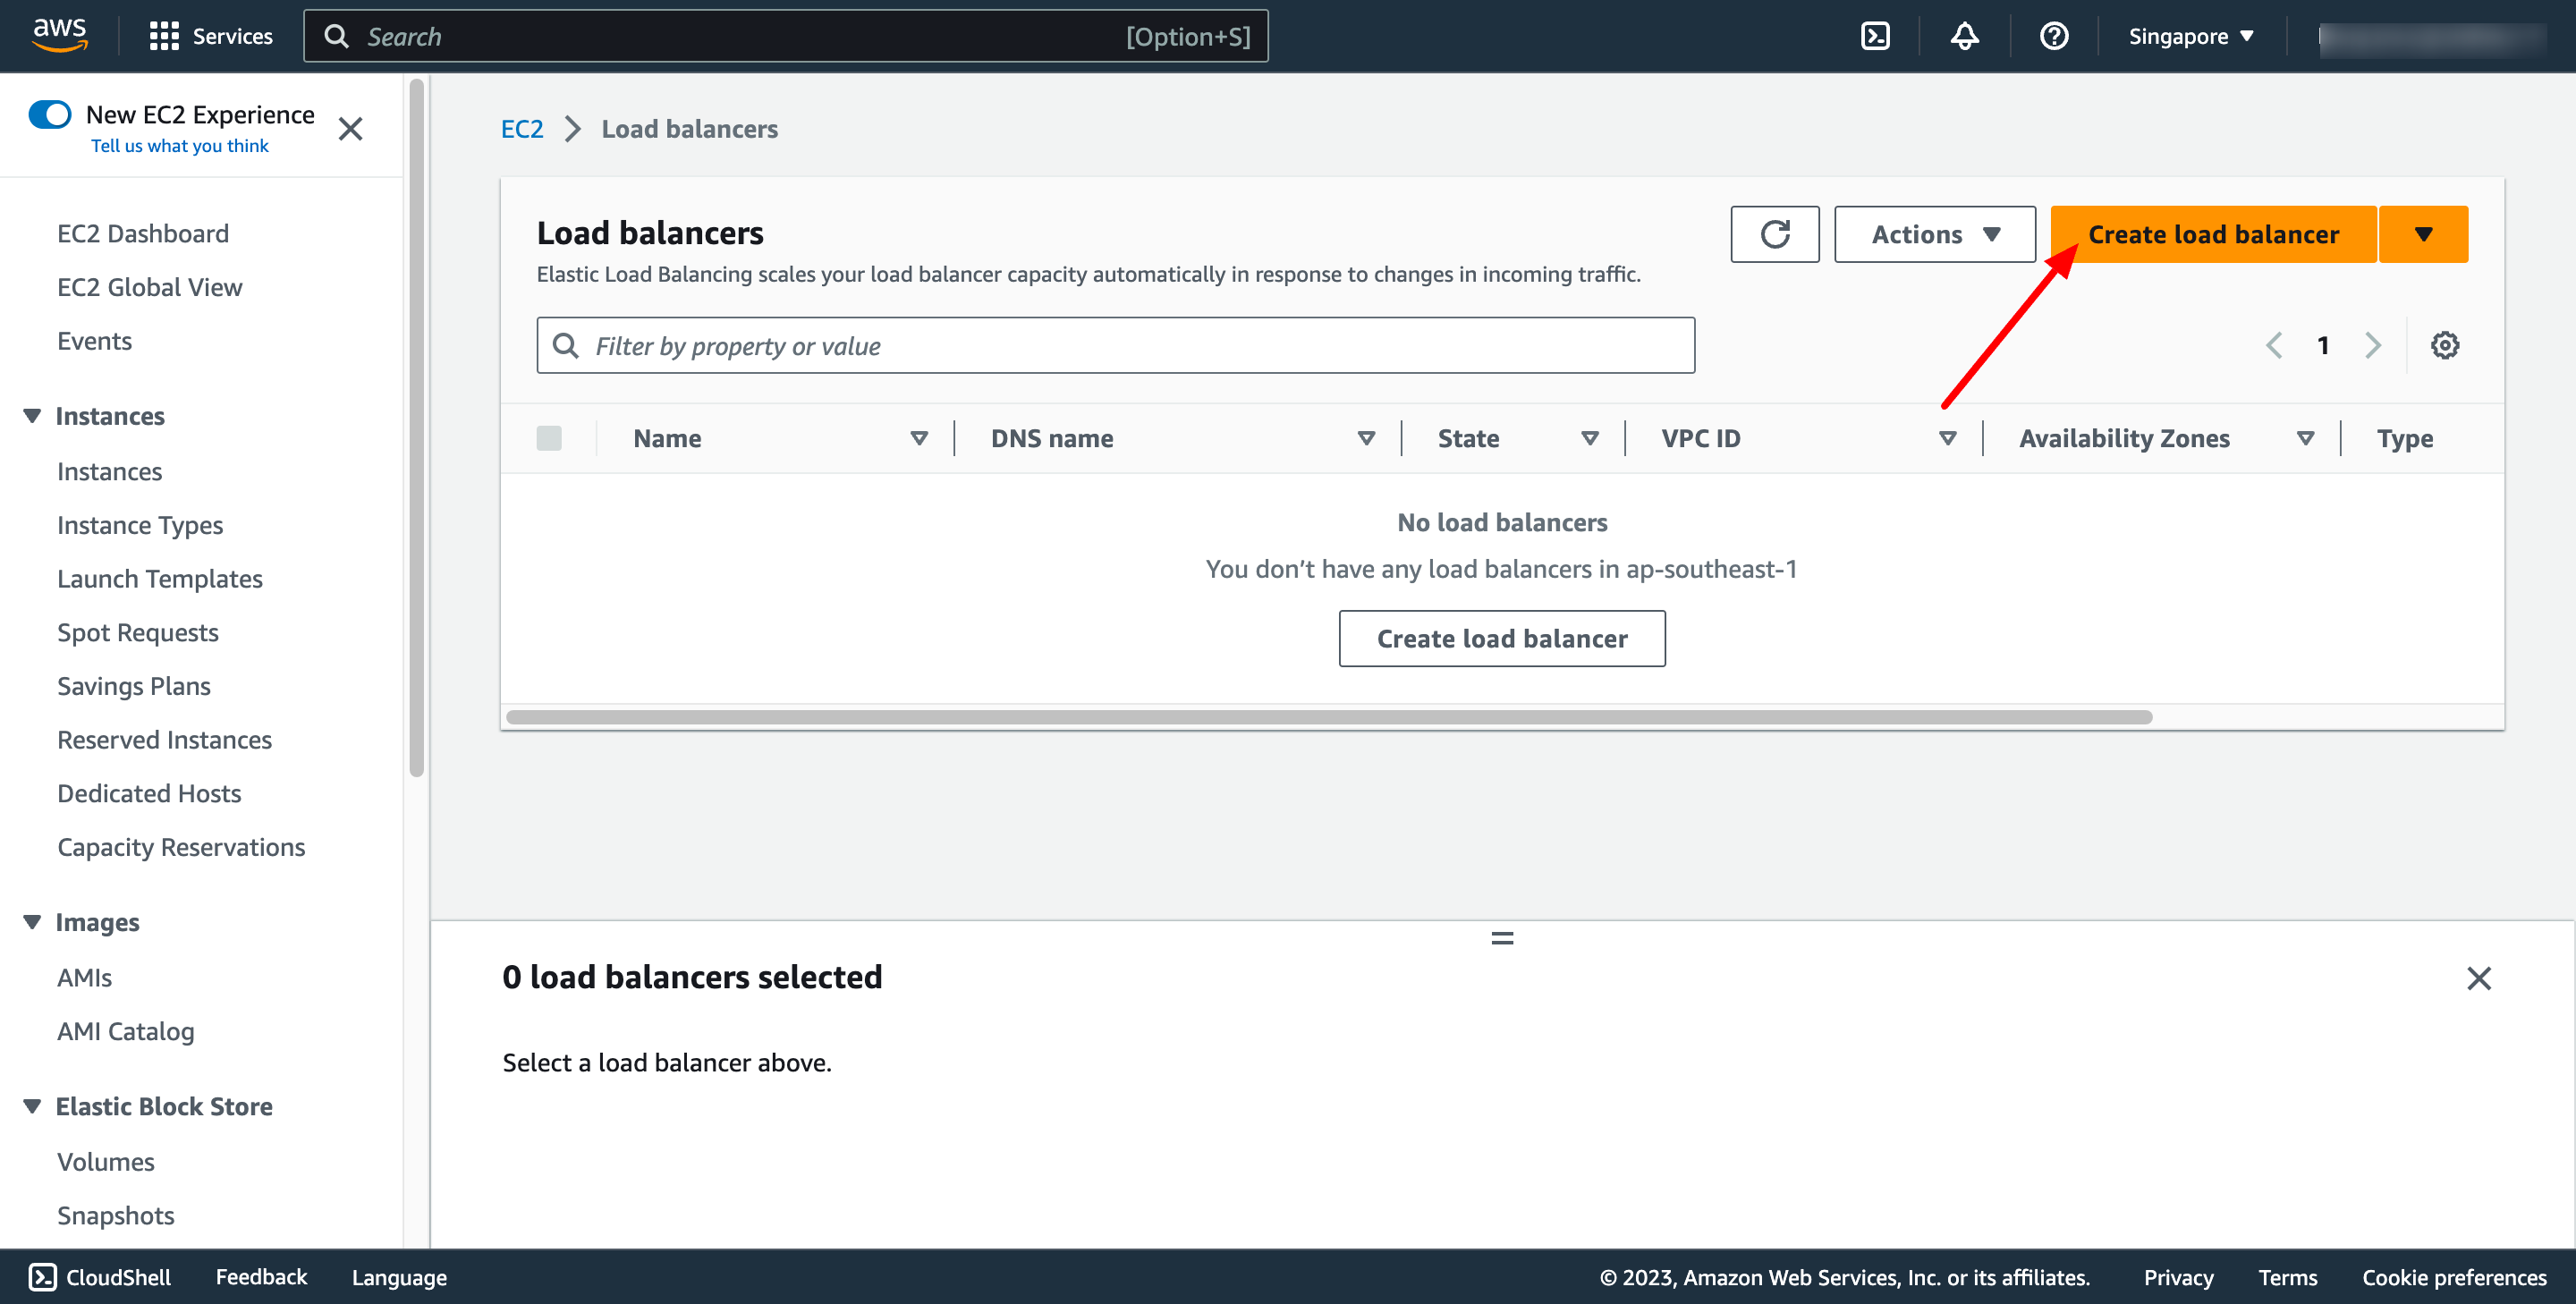
Step 2.2. Create Application Load Balancer
Navigate to Load Balancers → click to Create load balancer:
Then Create target group.
Step 2.2. Create Application Load Balancer
Navigate to Load Balancers → click to Create load balancer:
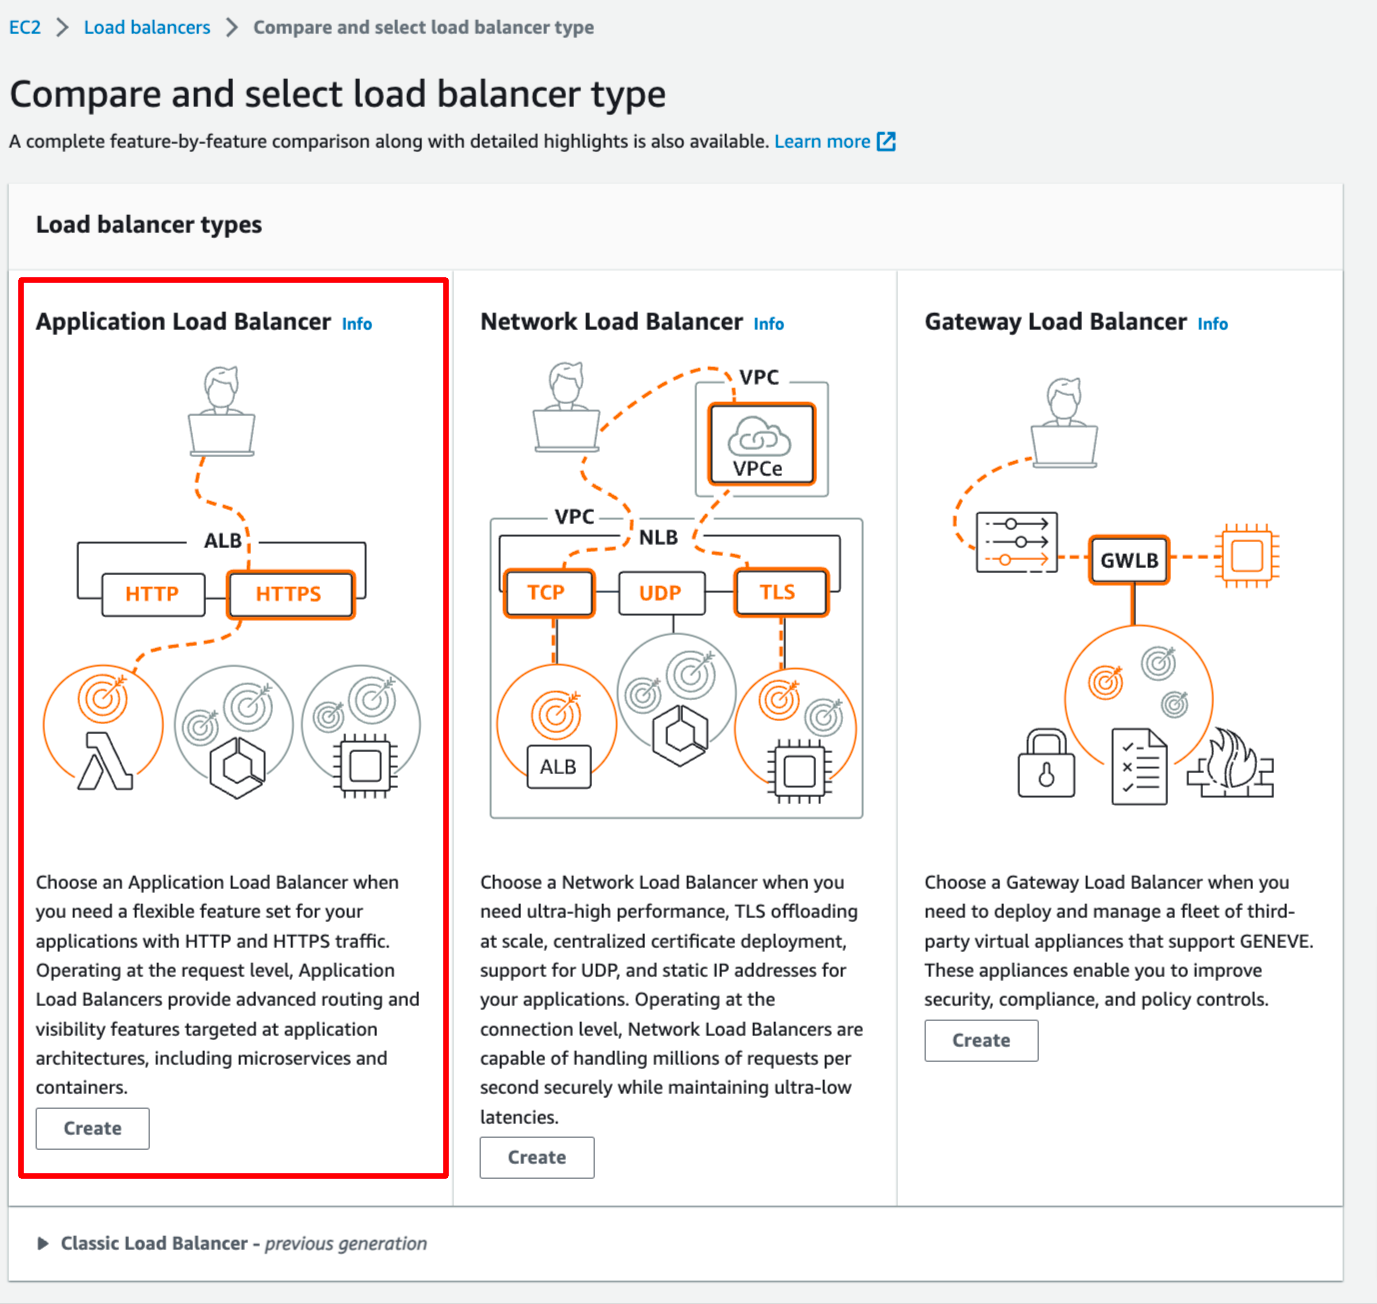
 In this blog, we use Application Load Balancer, please choose it:
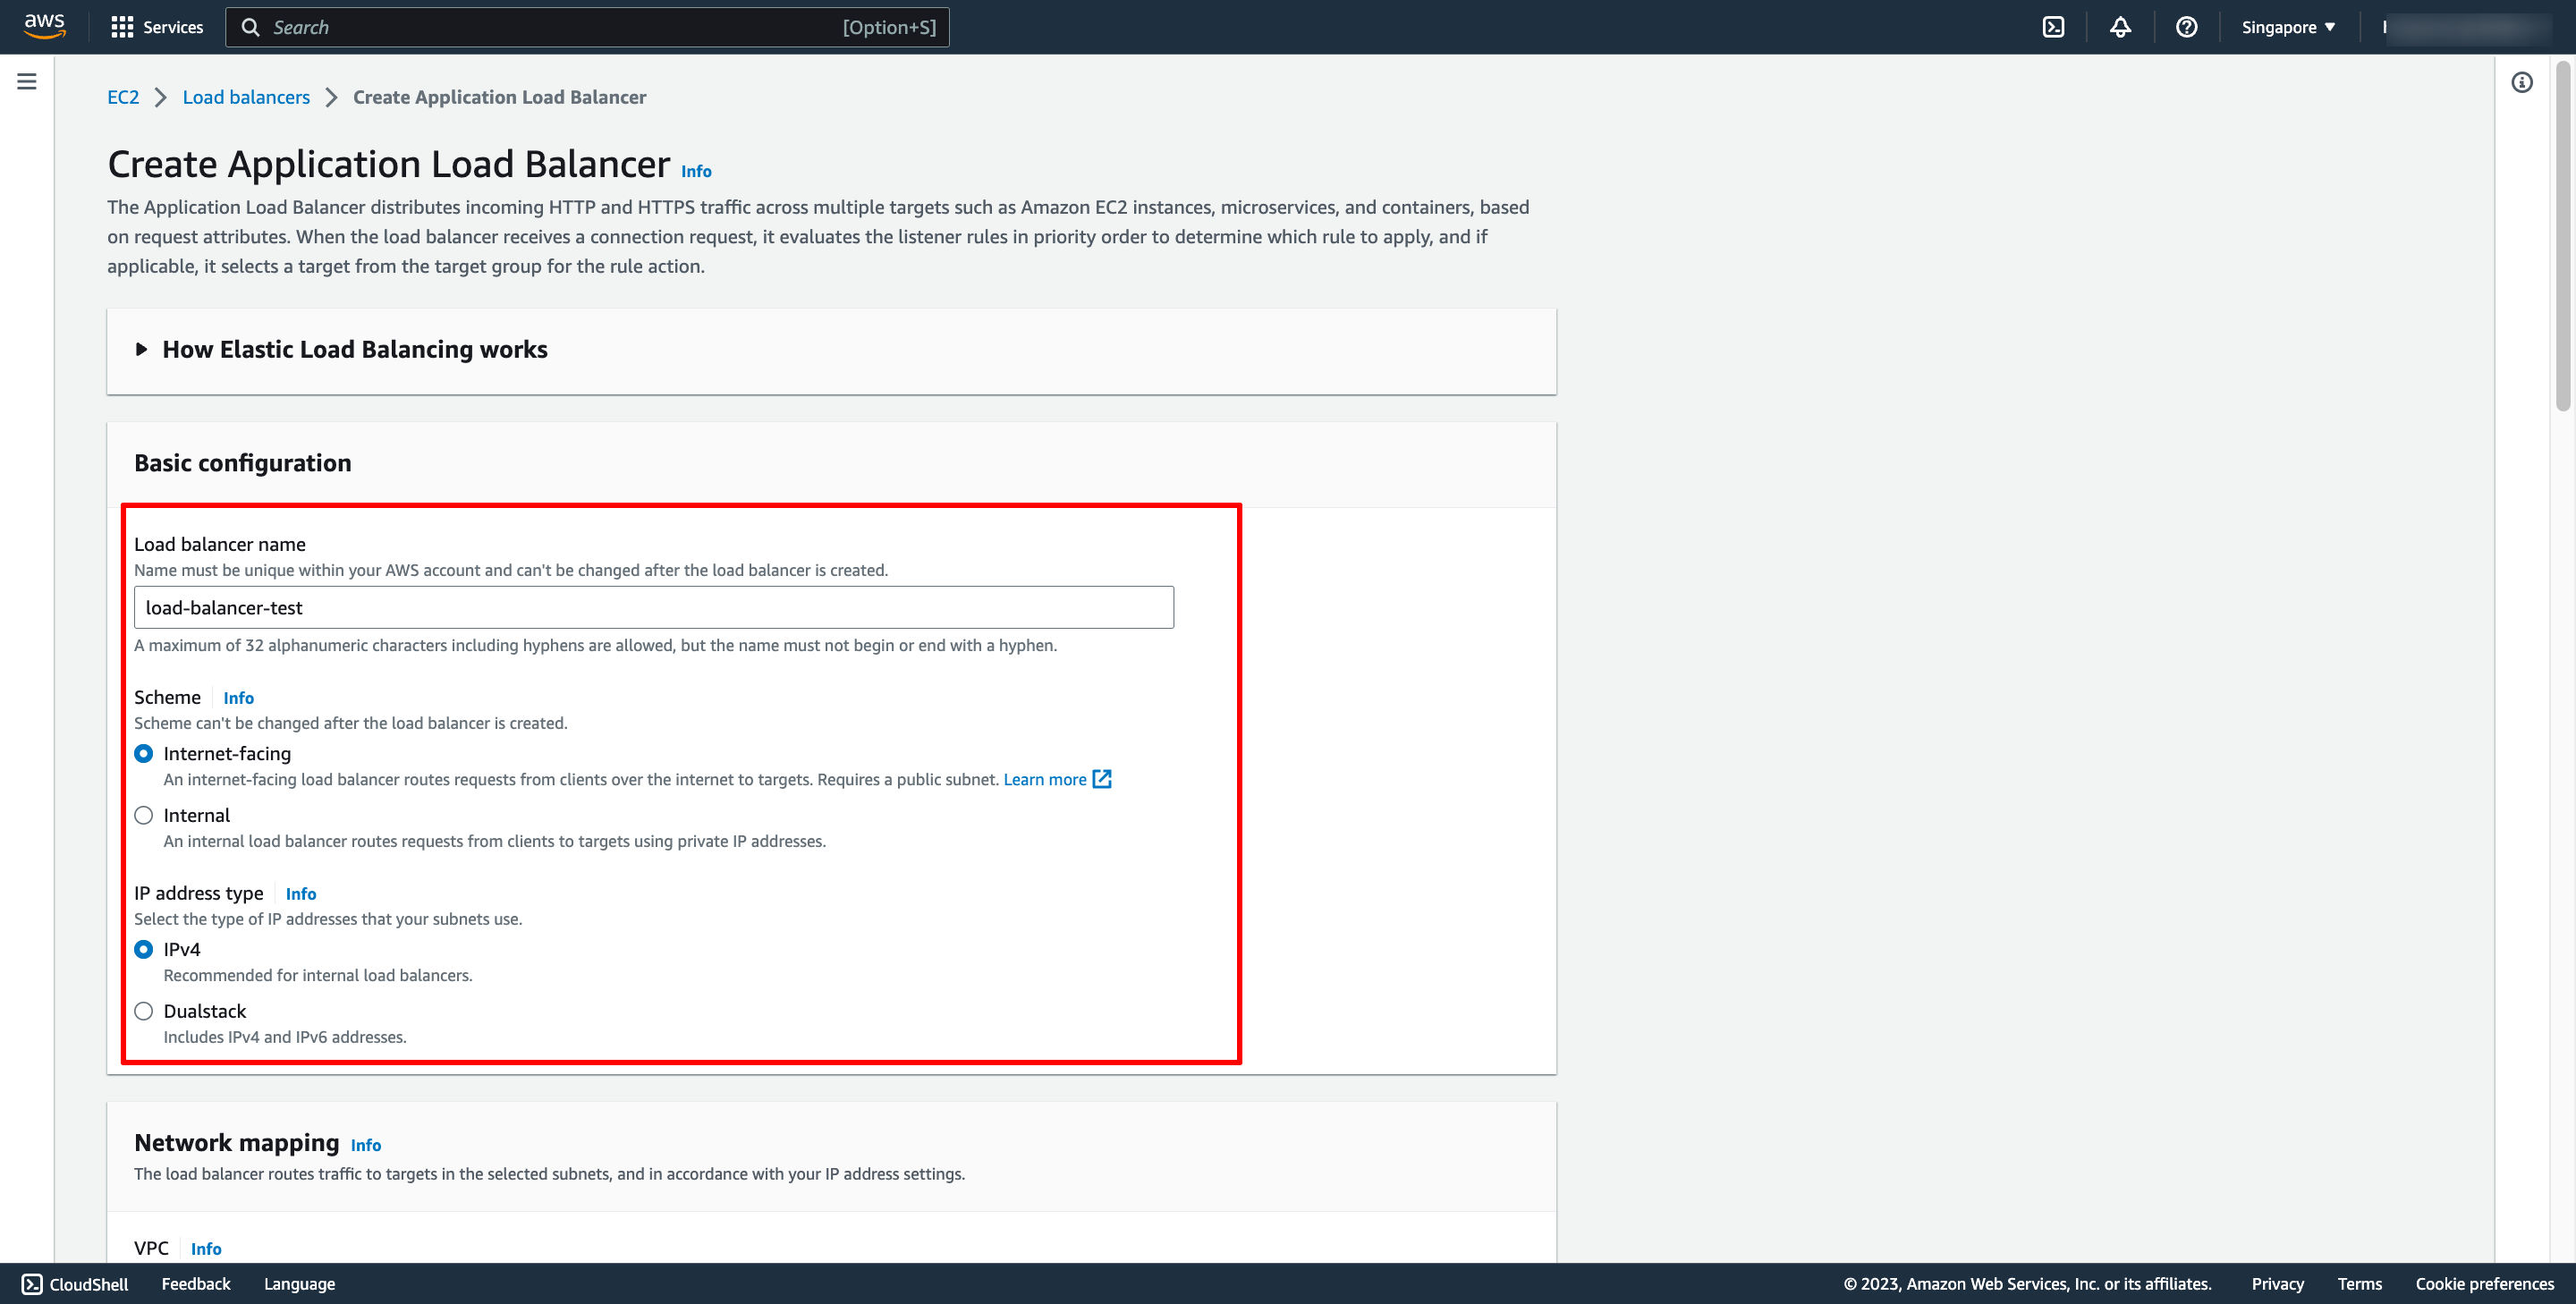
 Configure basic configuration:
 Choose Security group and Target group:
Note: Please make sure your security group has enough rules for access from Internet like port 80 and port 443.
Choose Security group and Target group:
Note: Please make sure your security group has enough rules for access from Internet like port 80 and port 443.
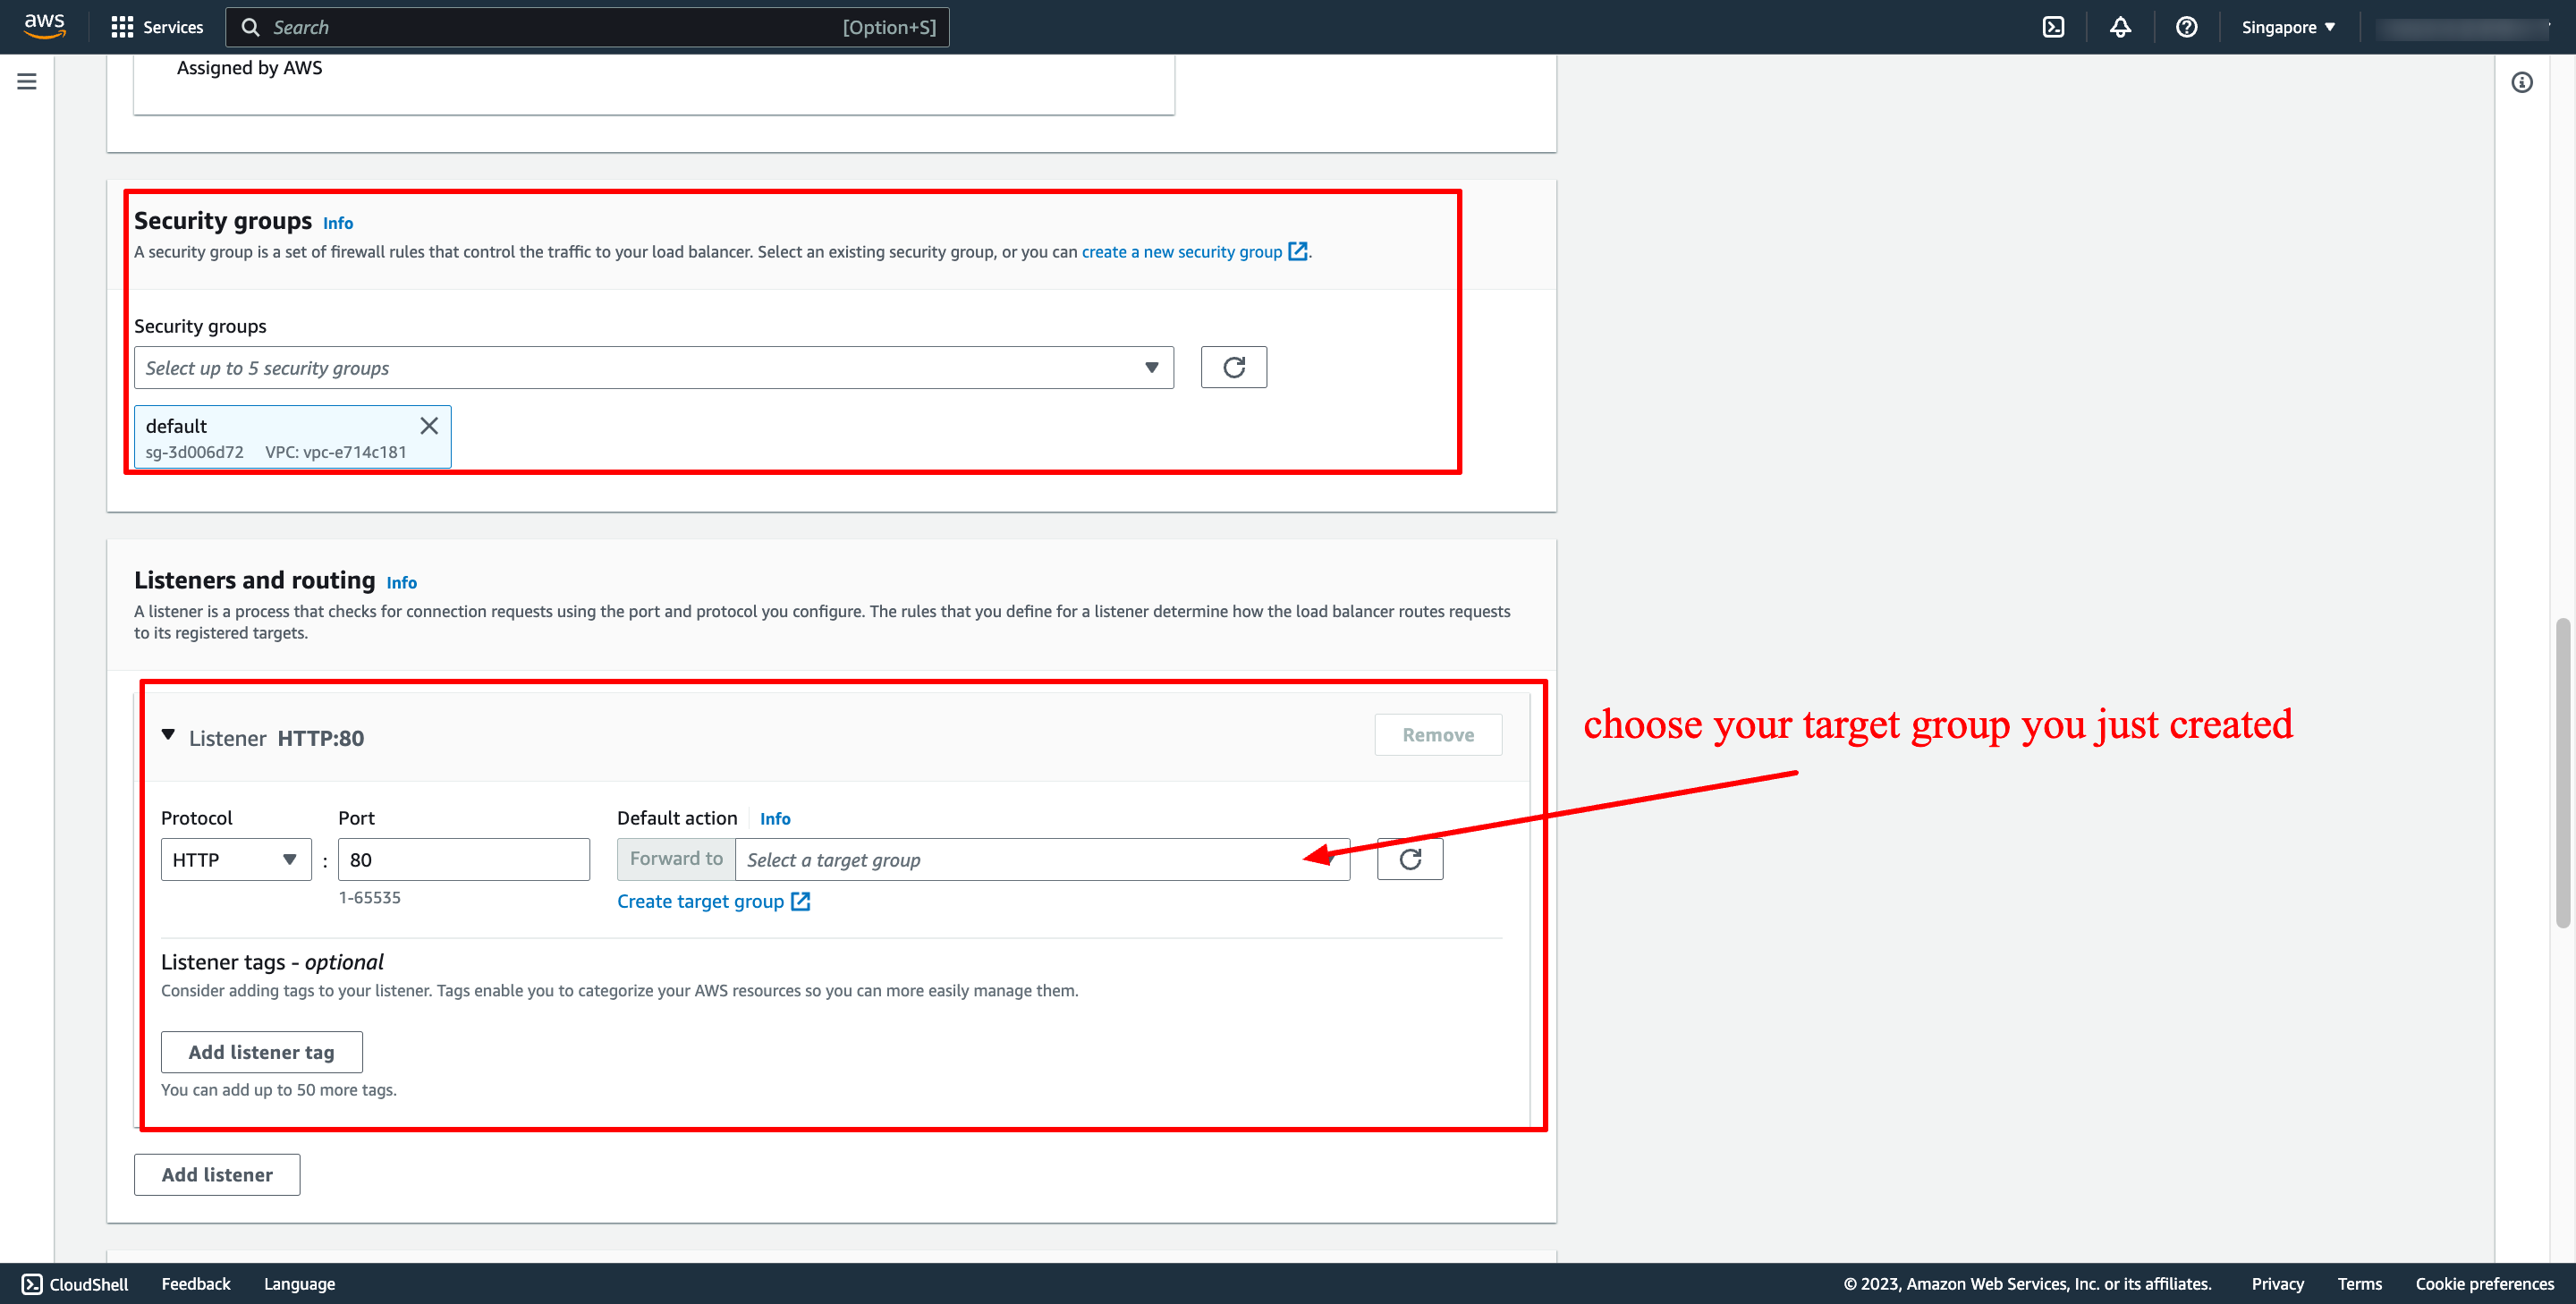 Then, create load balancer.
Step 3. Configure security groups and permission for EC2 instance
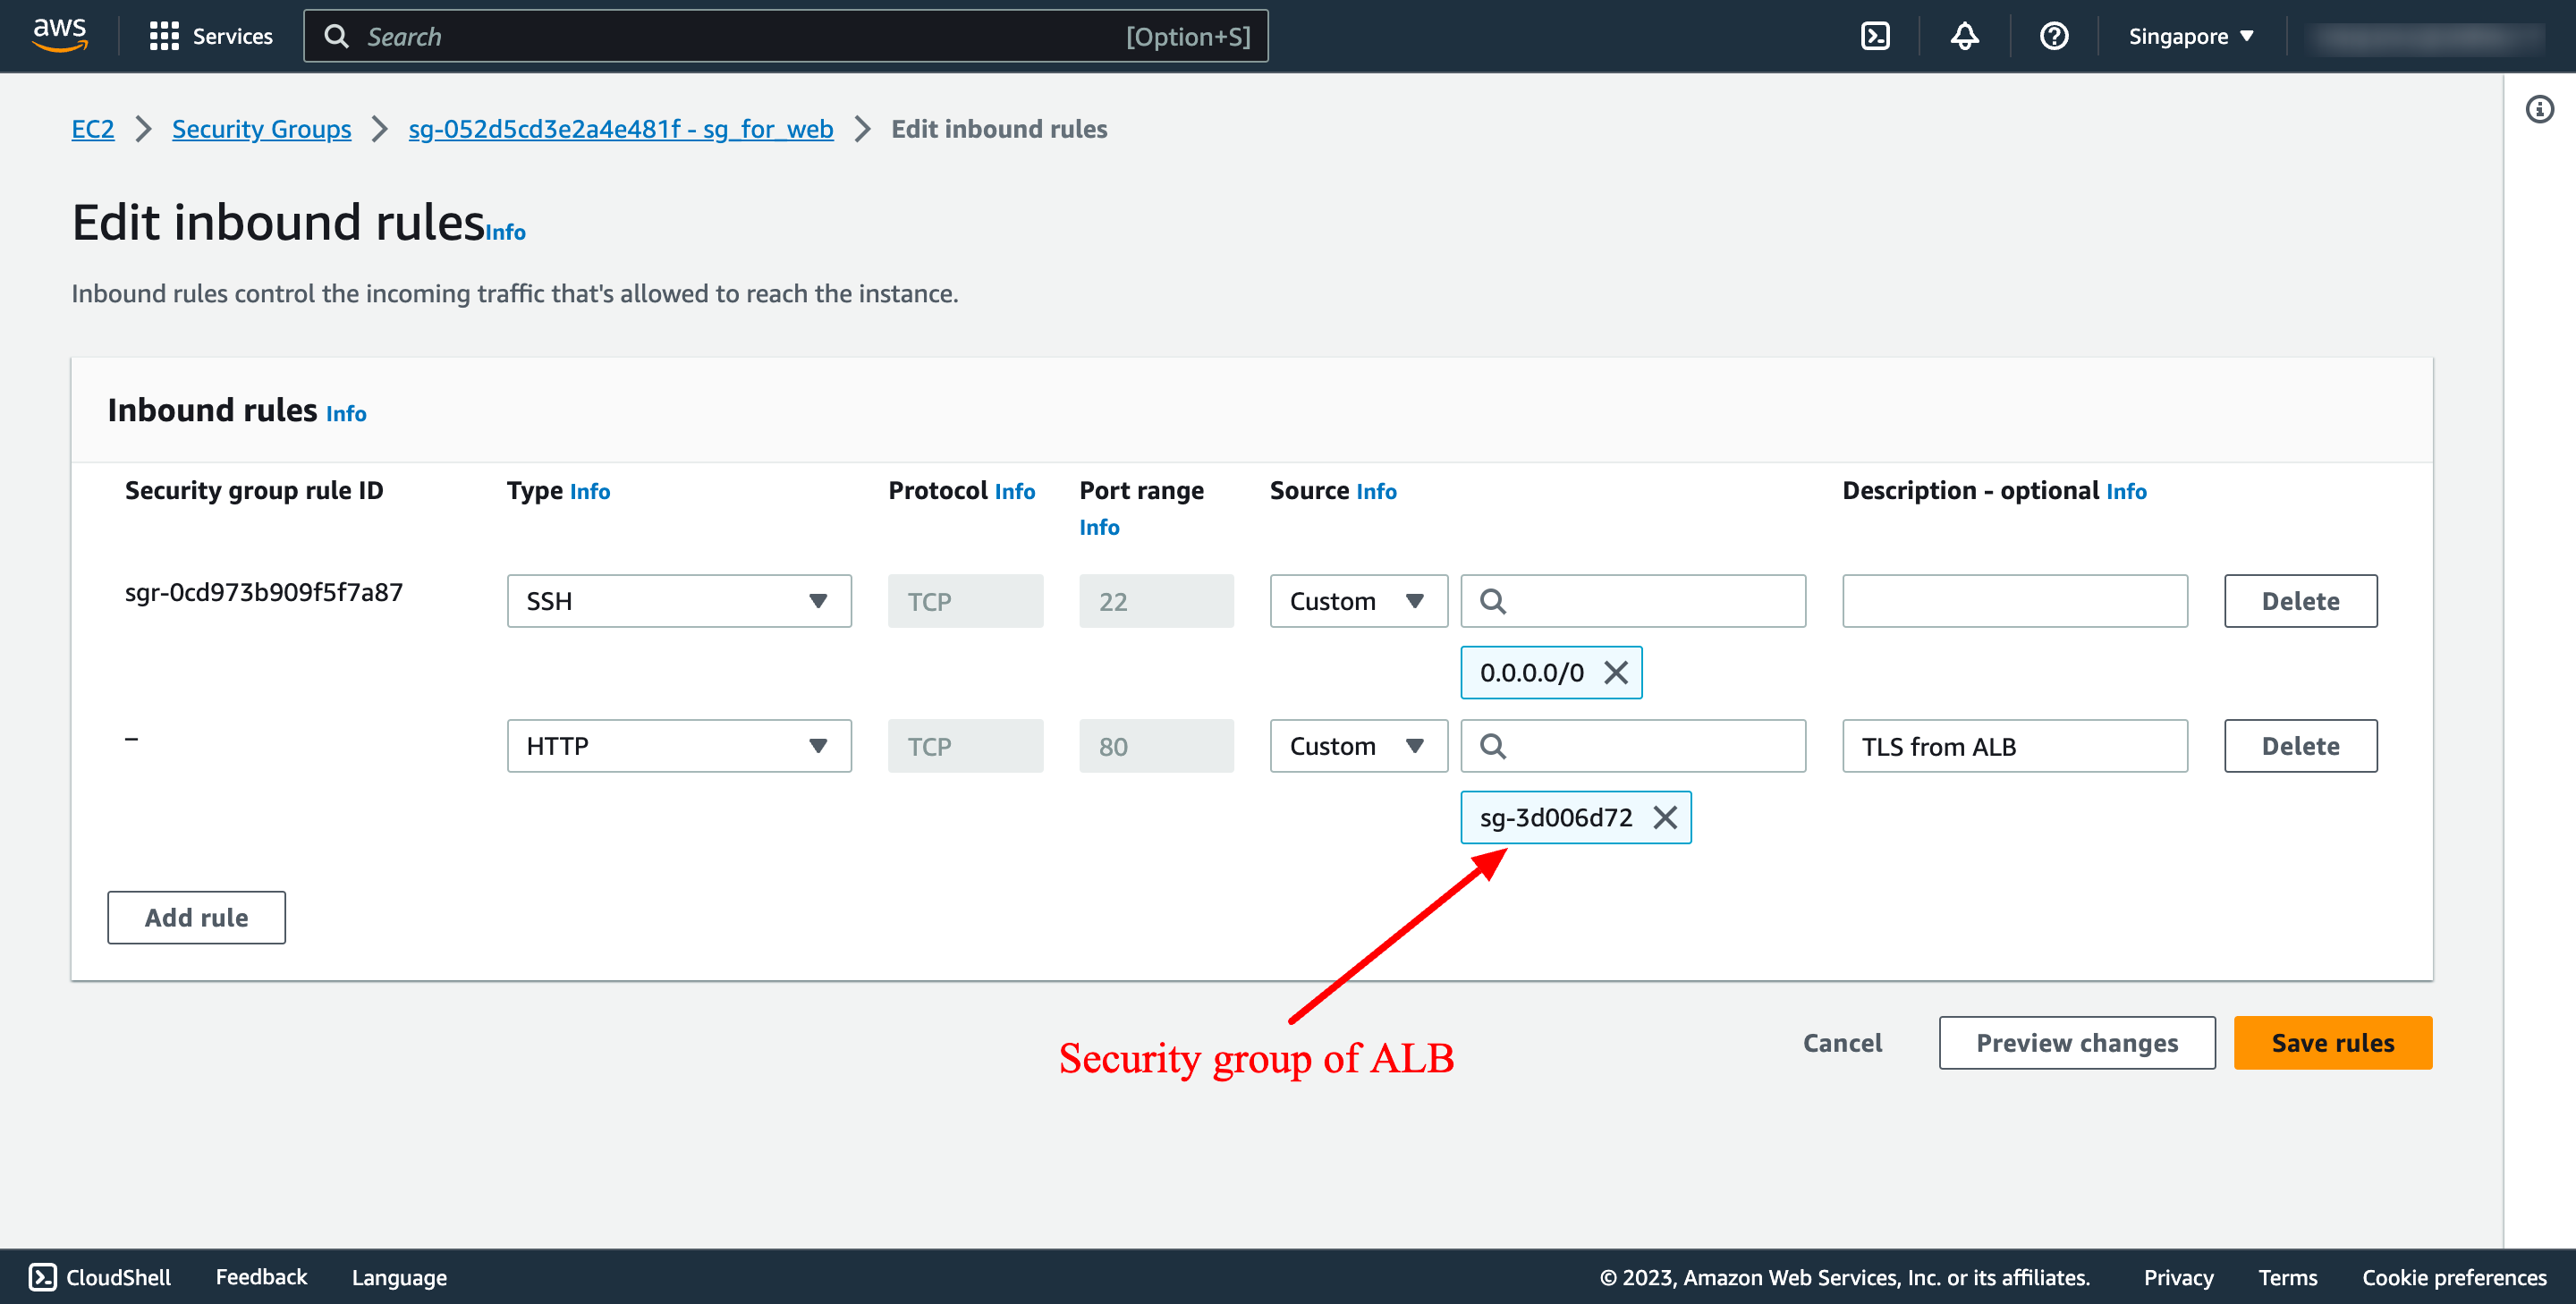
In security group of web instance, add inbound rule from the source is security group of ALB, it makes web instance can be accessed from ALB:
Then, create load balancer.
Step 3. Configure security groups and permission for EC2 instance
In security group of web instance, add inbound rule from the source is security group of ALB, it makes web instance can be accessed from ALB:
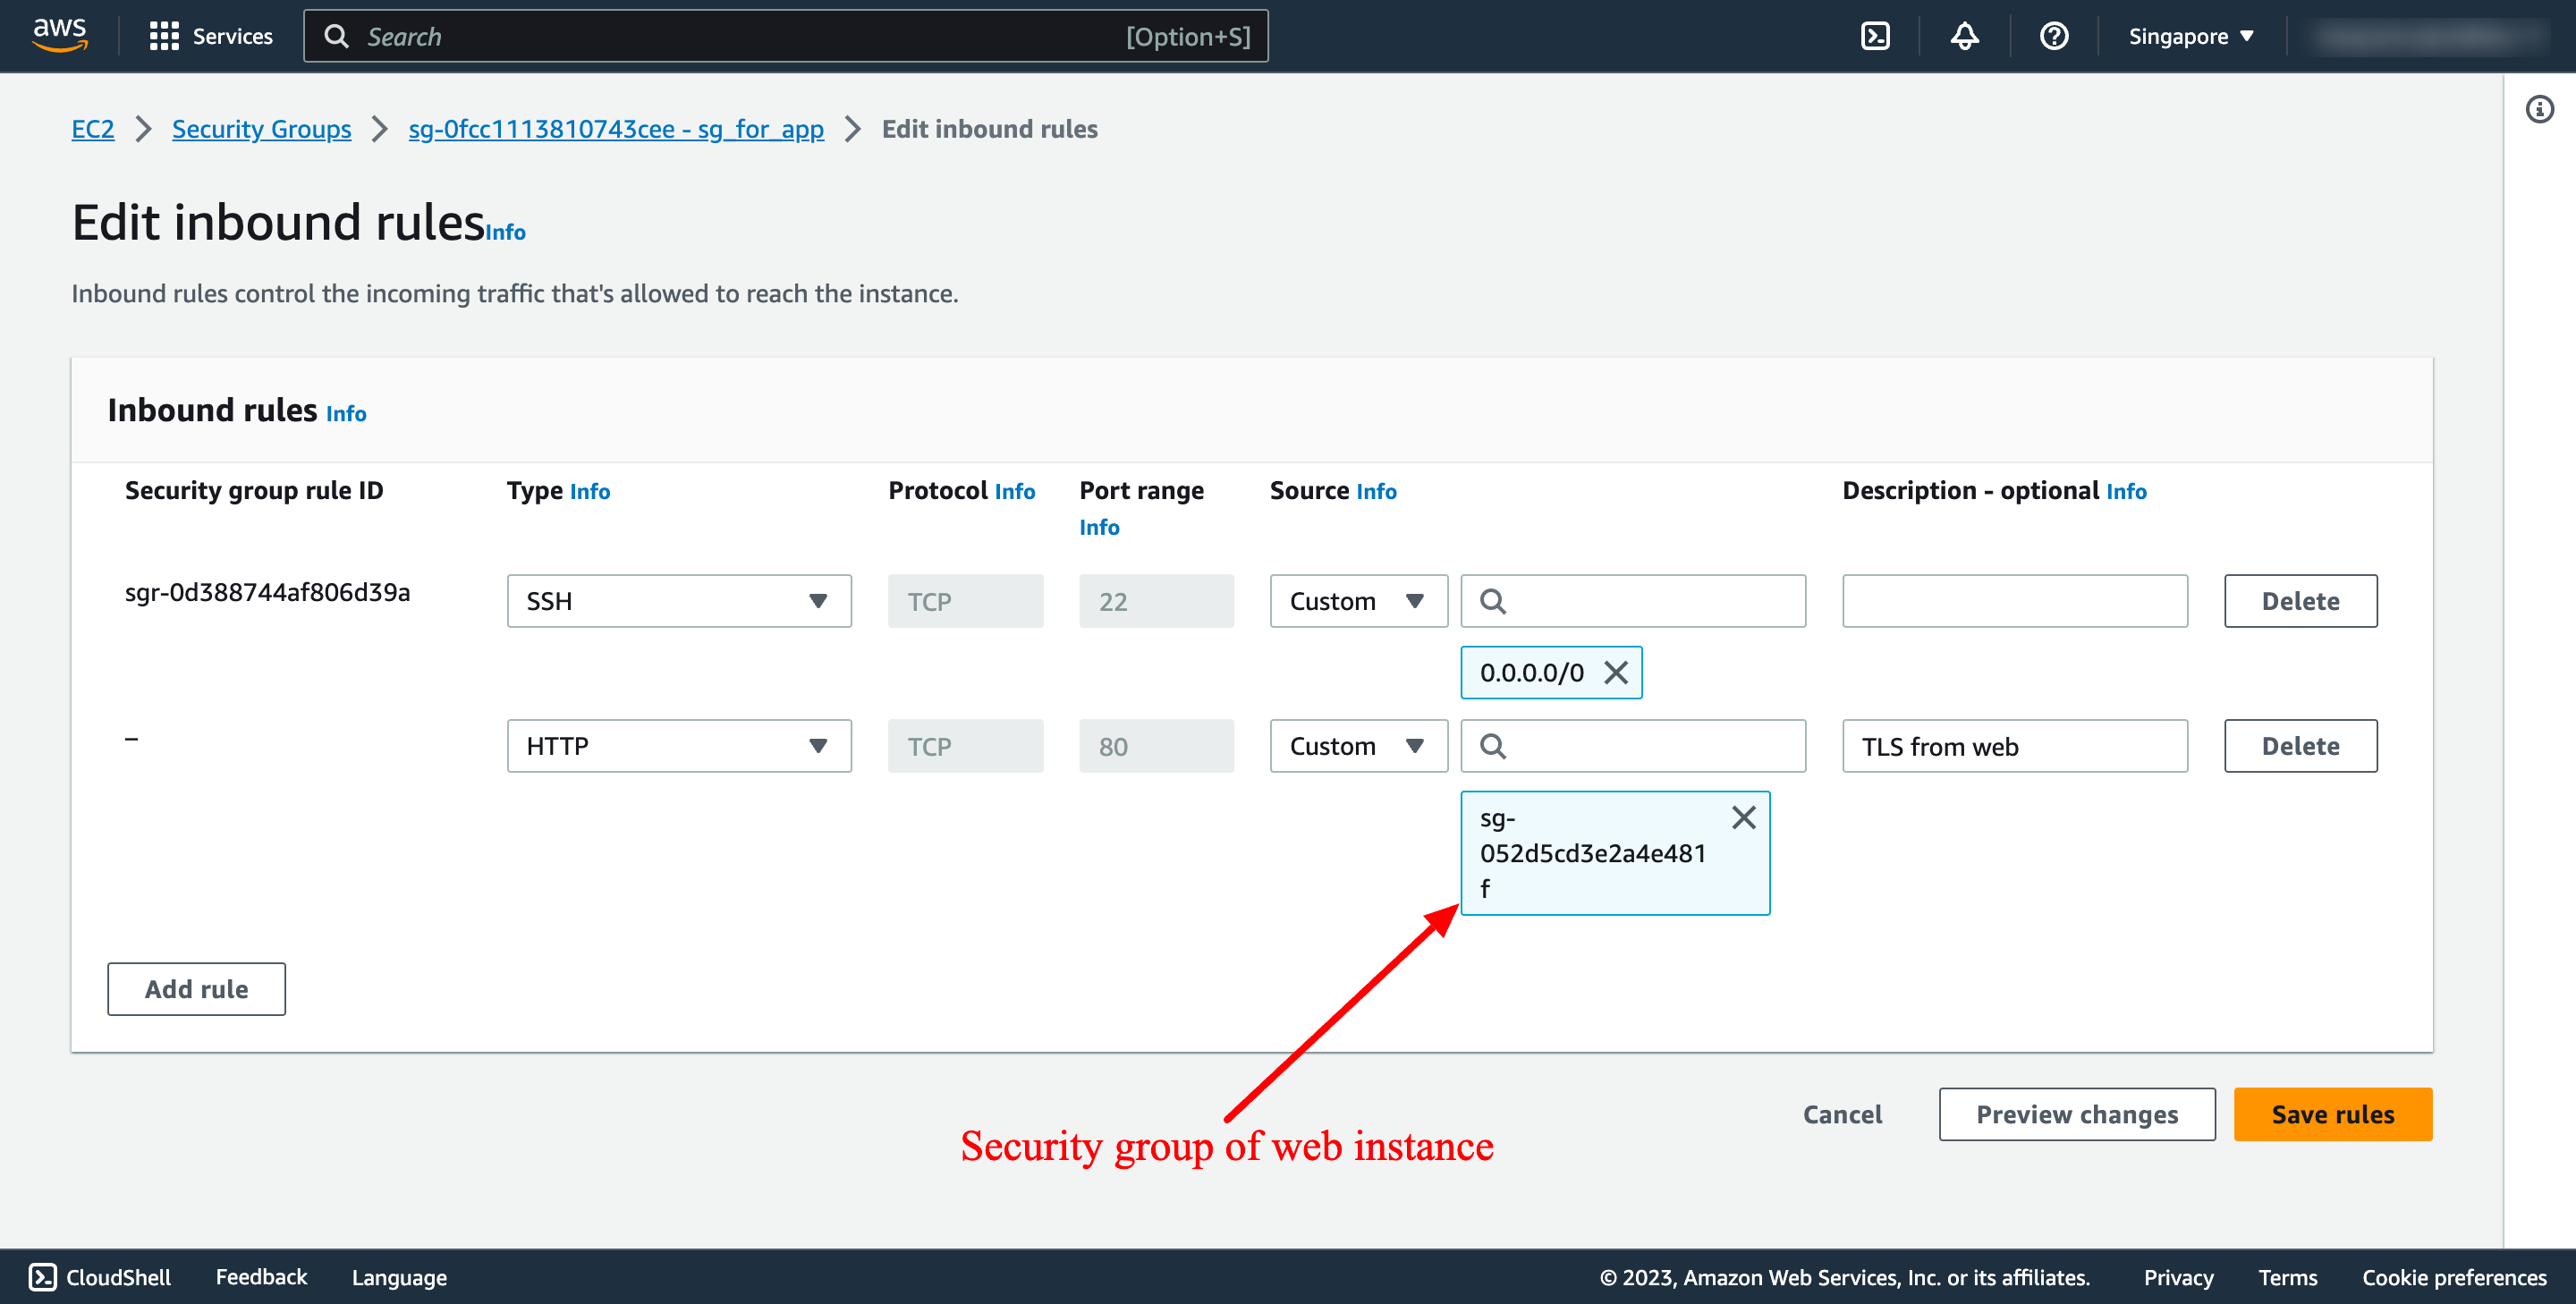
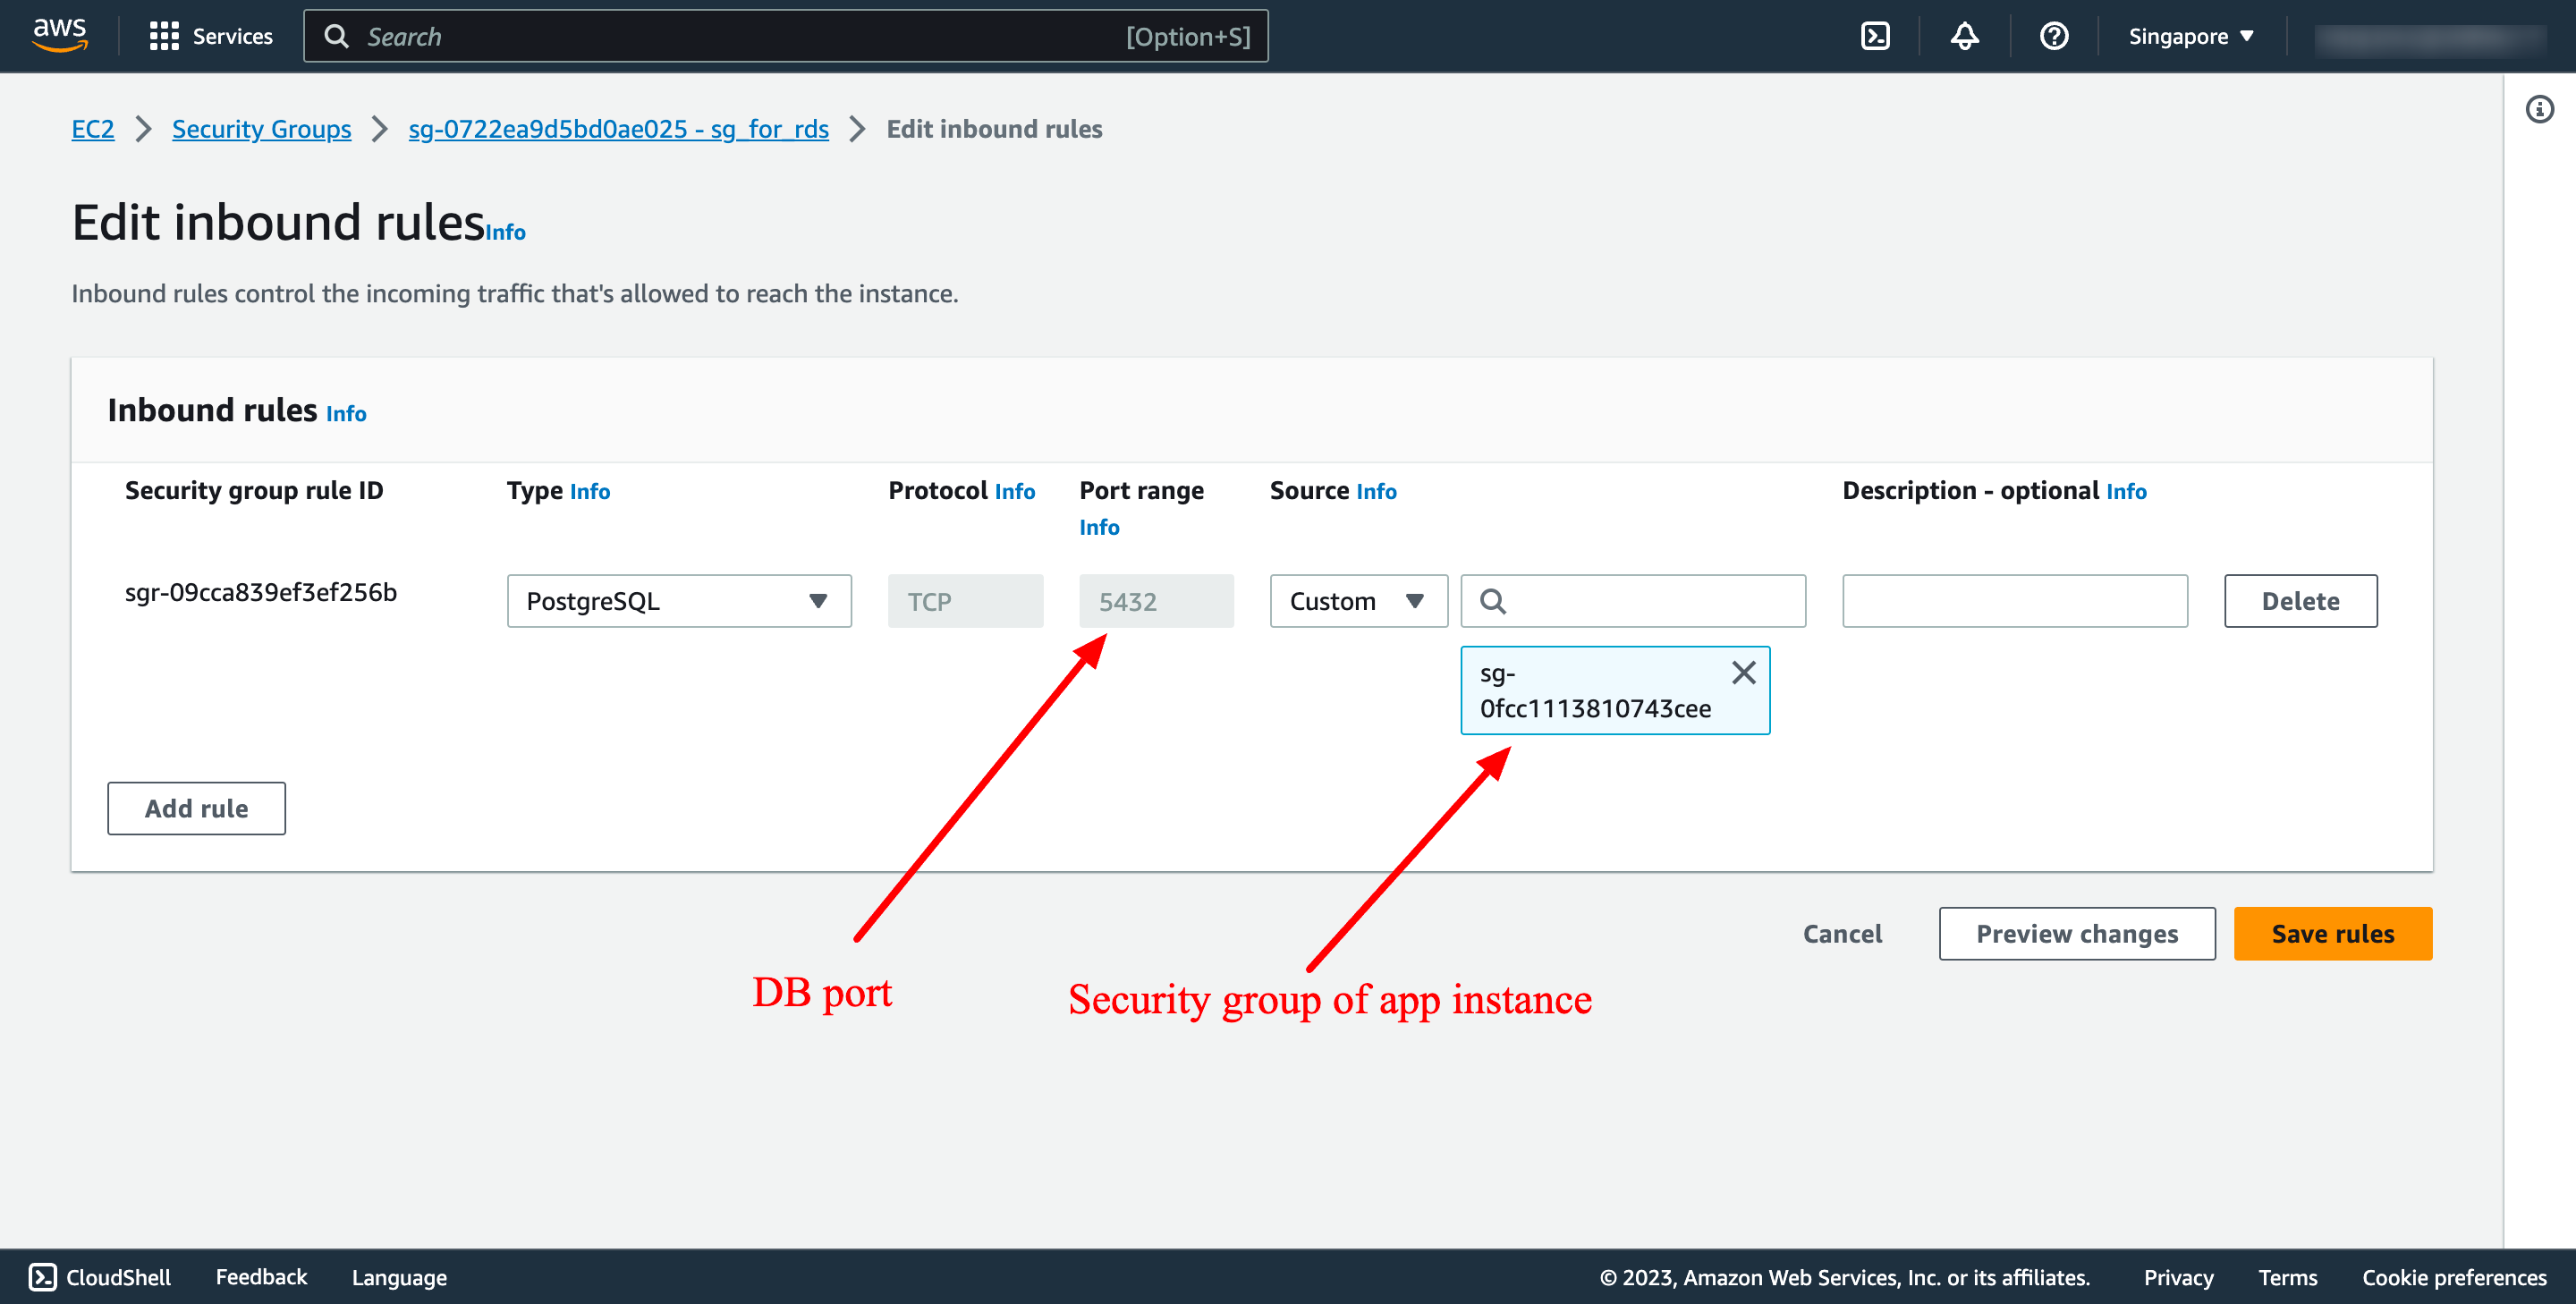
 In security group of app instance, add inbound rule from web instance:
 To make an EC2 instance can connect to a RDS instance:
In security group of RDS instance, add inbound rule from app instance:
To make an EC2 instance can connect to a RDS instance:
In security group of RDS instance, add inbound rule from app instance:
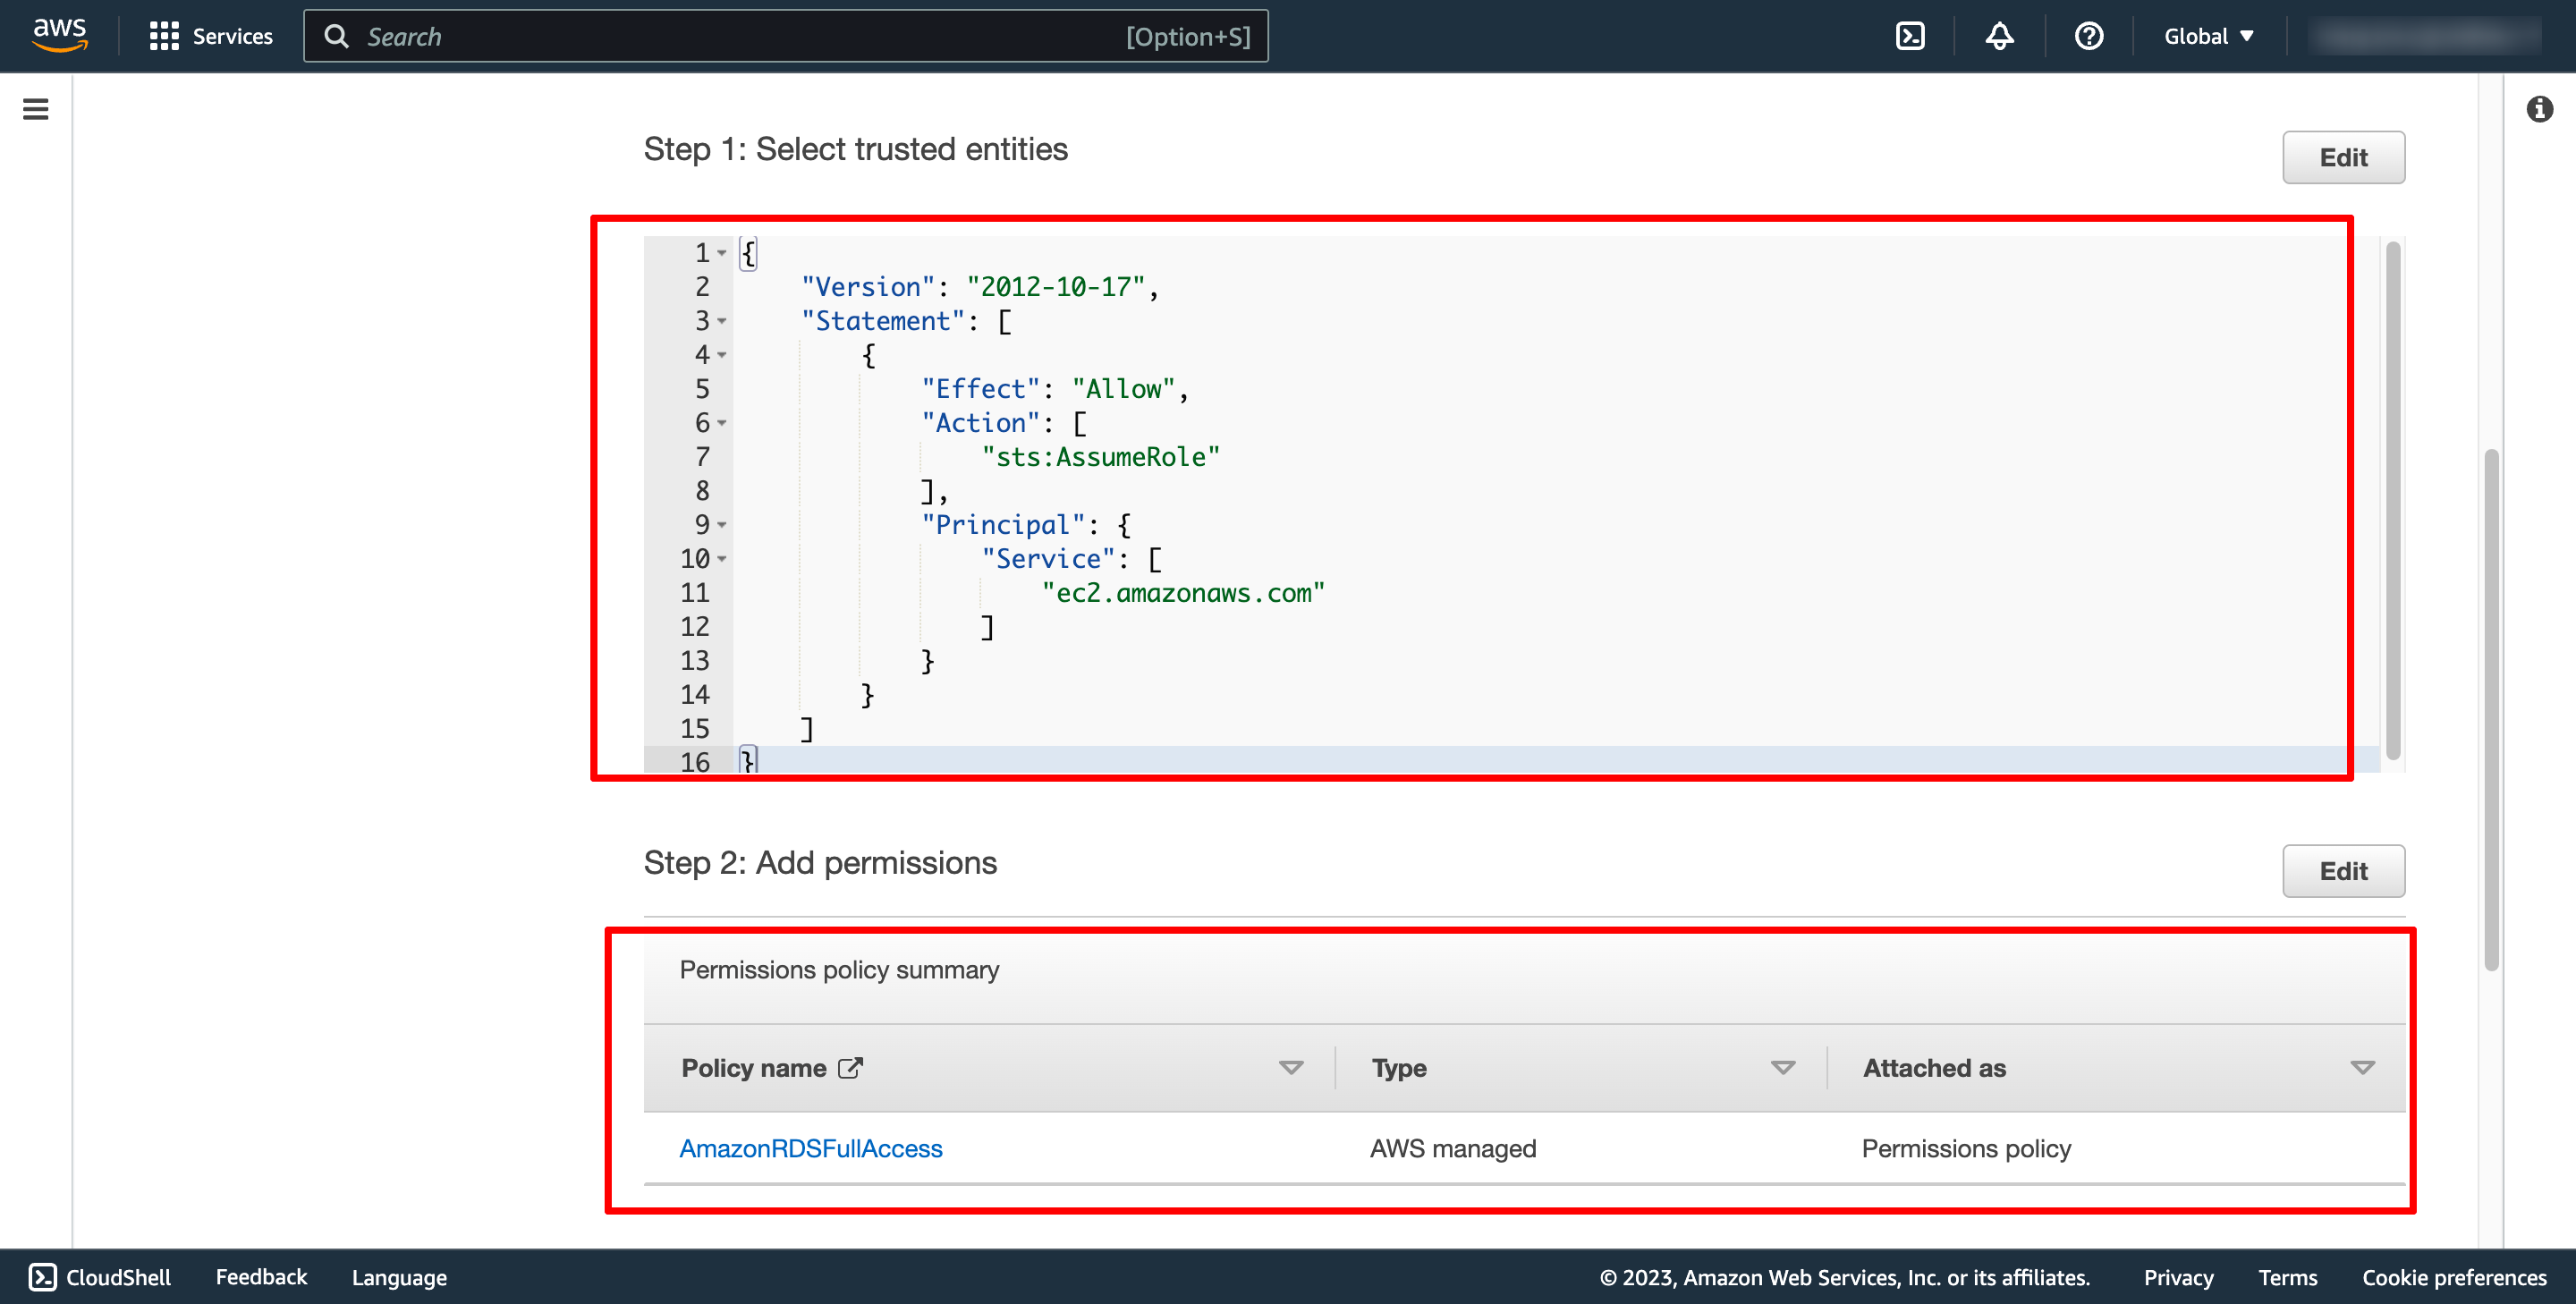
 Create EC2 IAM role with RDSAccess permission attached:
You can quick choose policy : Provides full access to Amazon RDS via the AWS Management Console. But for the best practices, you should only choose at least permissions for your role.
Create EC2 IAM role with RDSAccess permission attached:
You can quick choose policy : Provides full access to Amazon RDS via the AWS Management Console. But for the best practices, you should only choose at least permissions for your role.
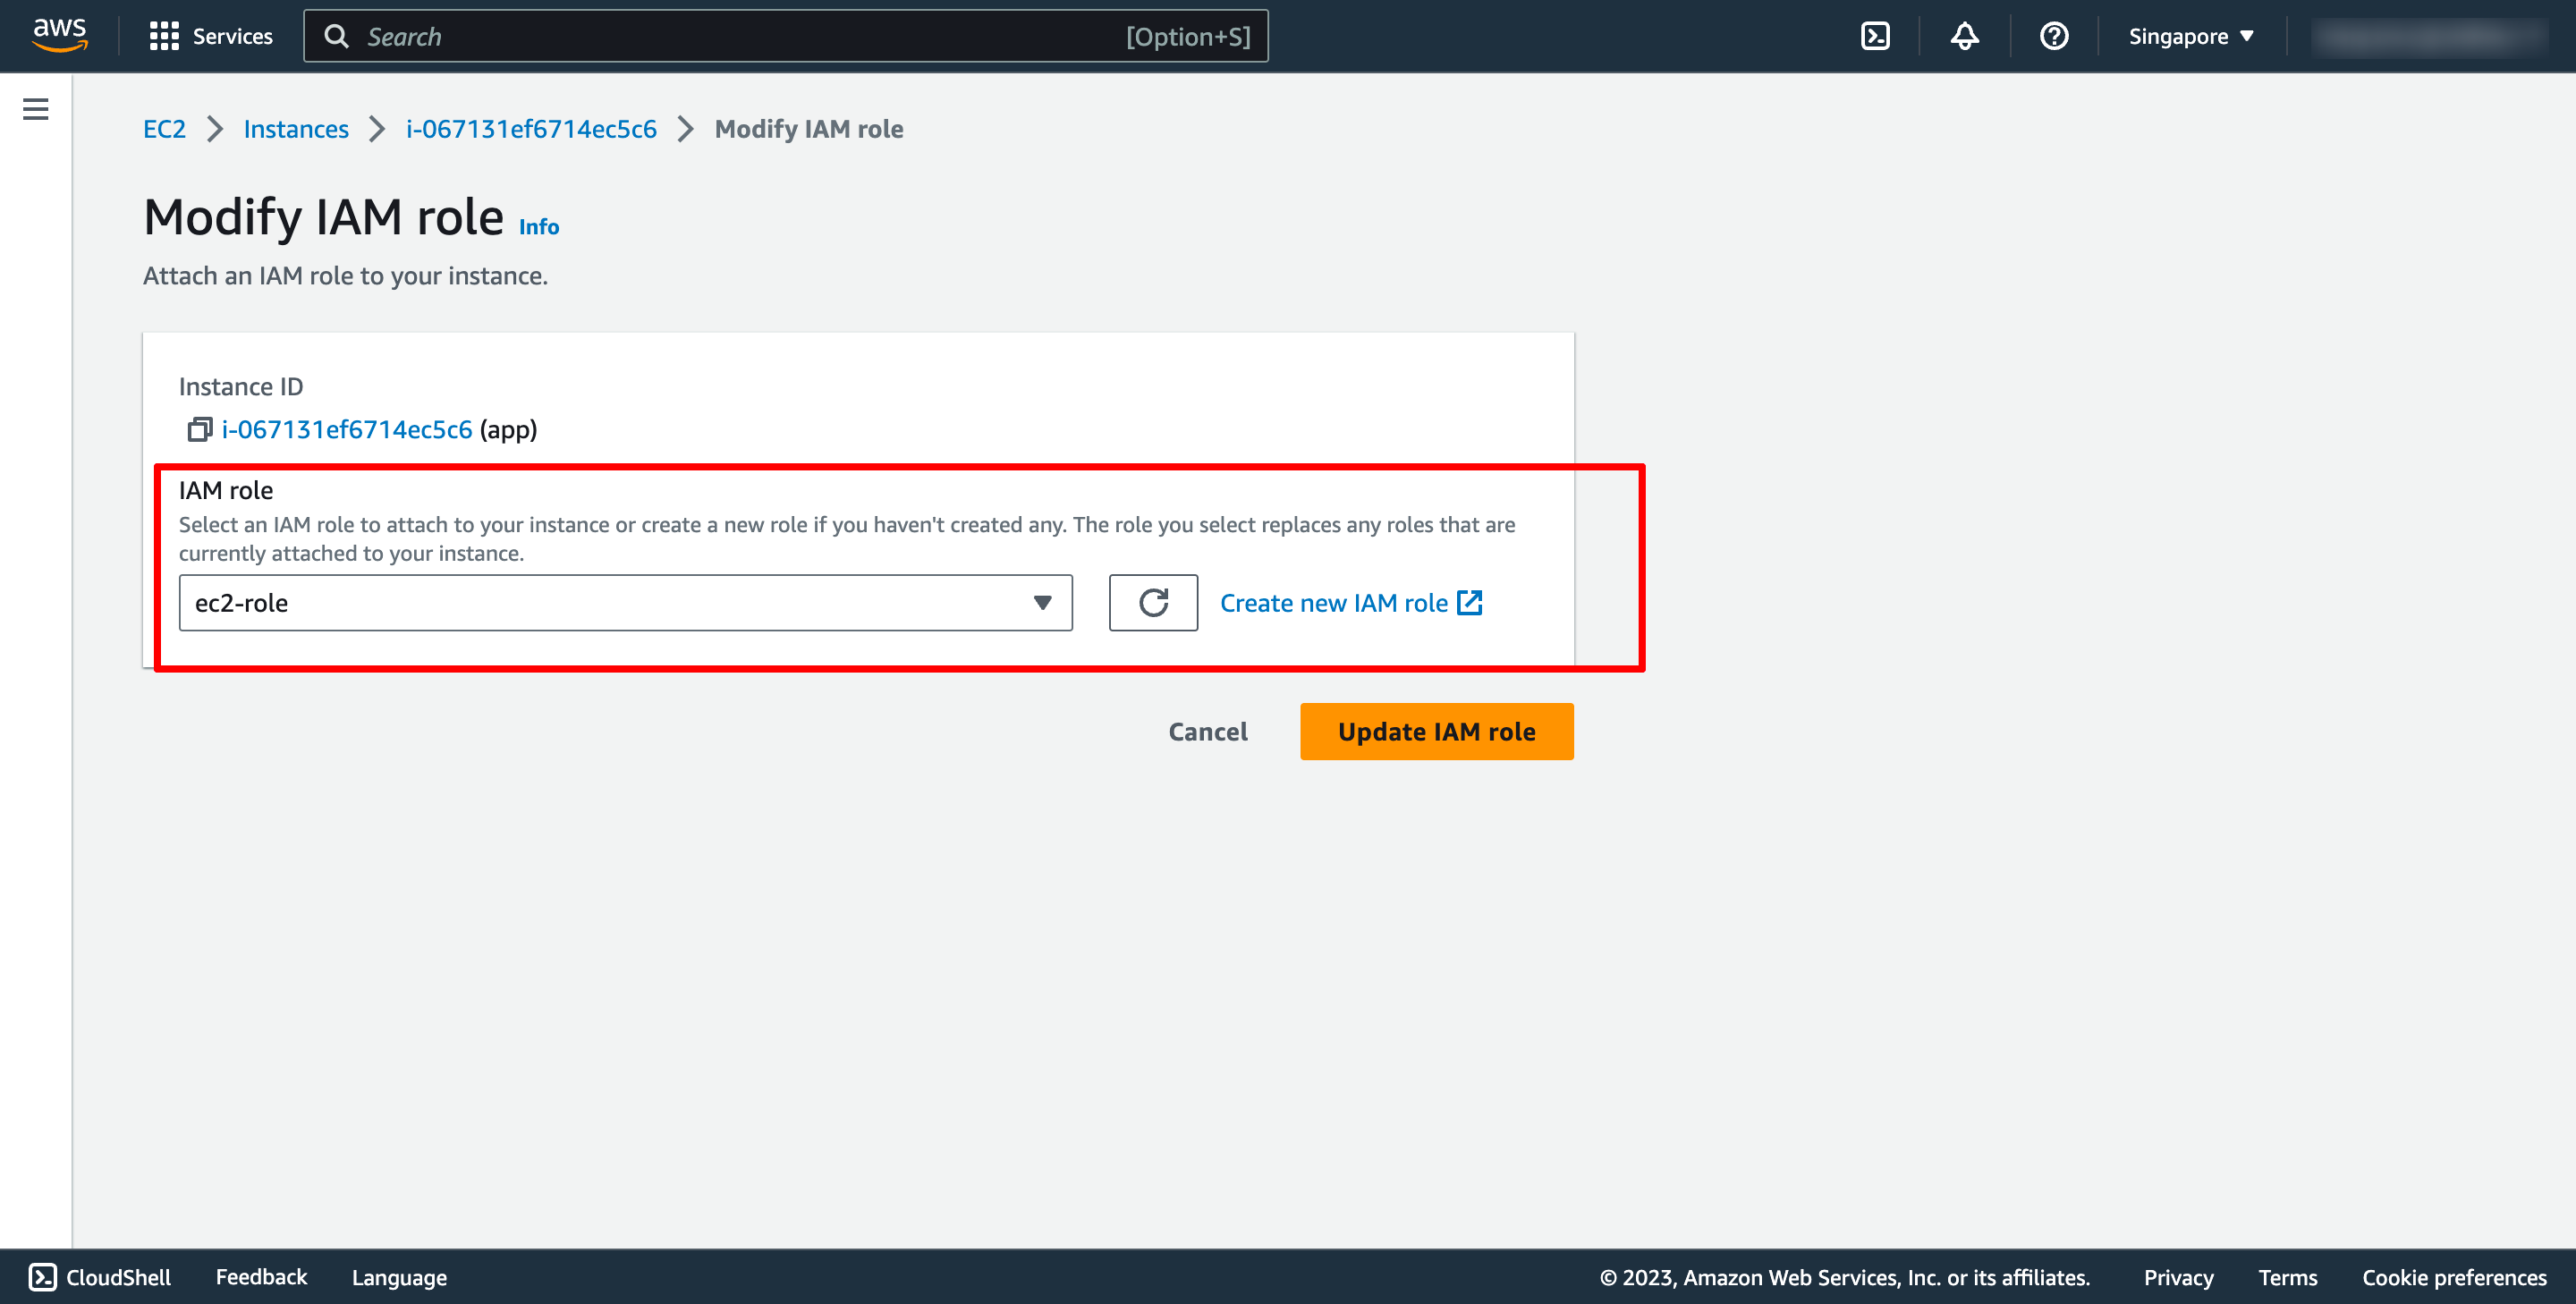
 Attach that role into app EC2 instance:
 Now, you can connect to RDS in your EC2 instance.
Advanced: Auto Scaling
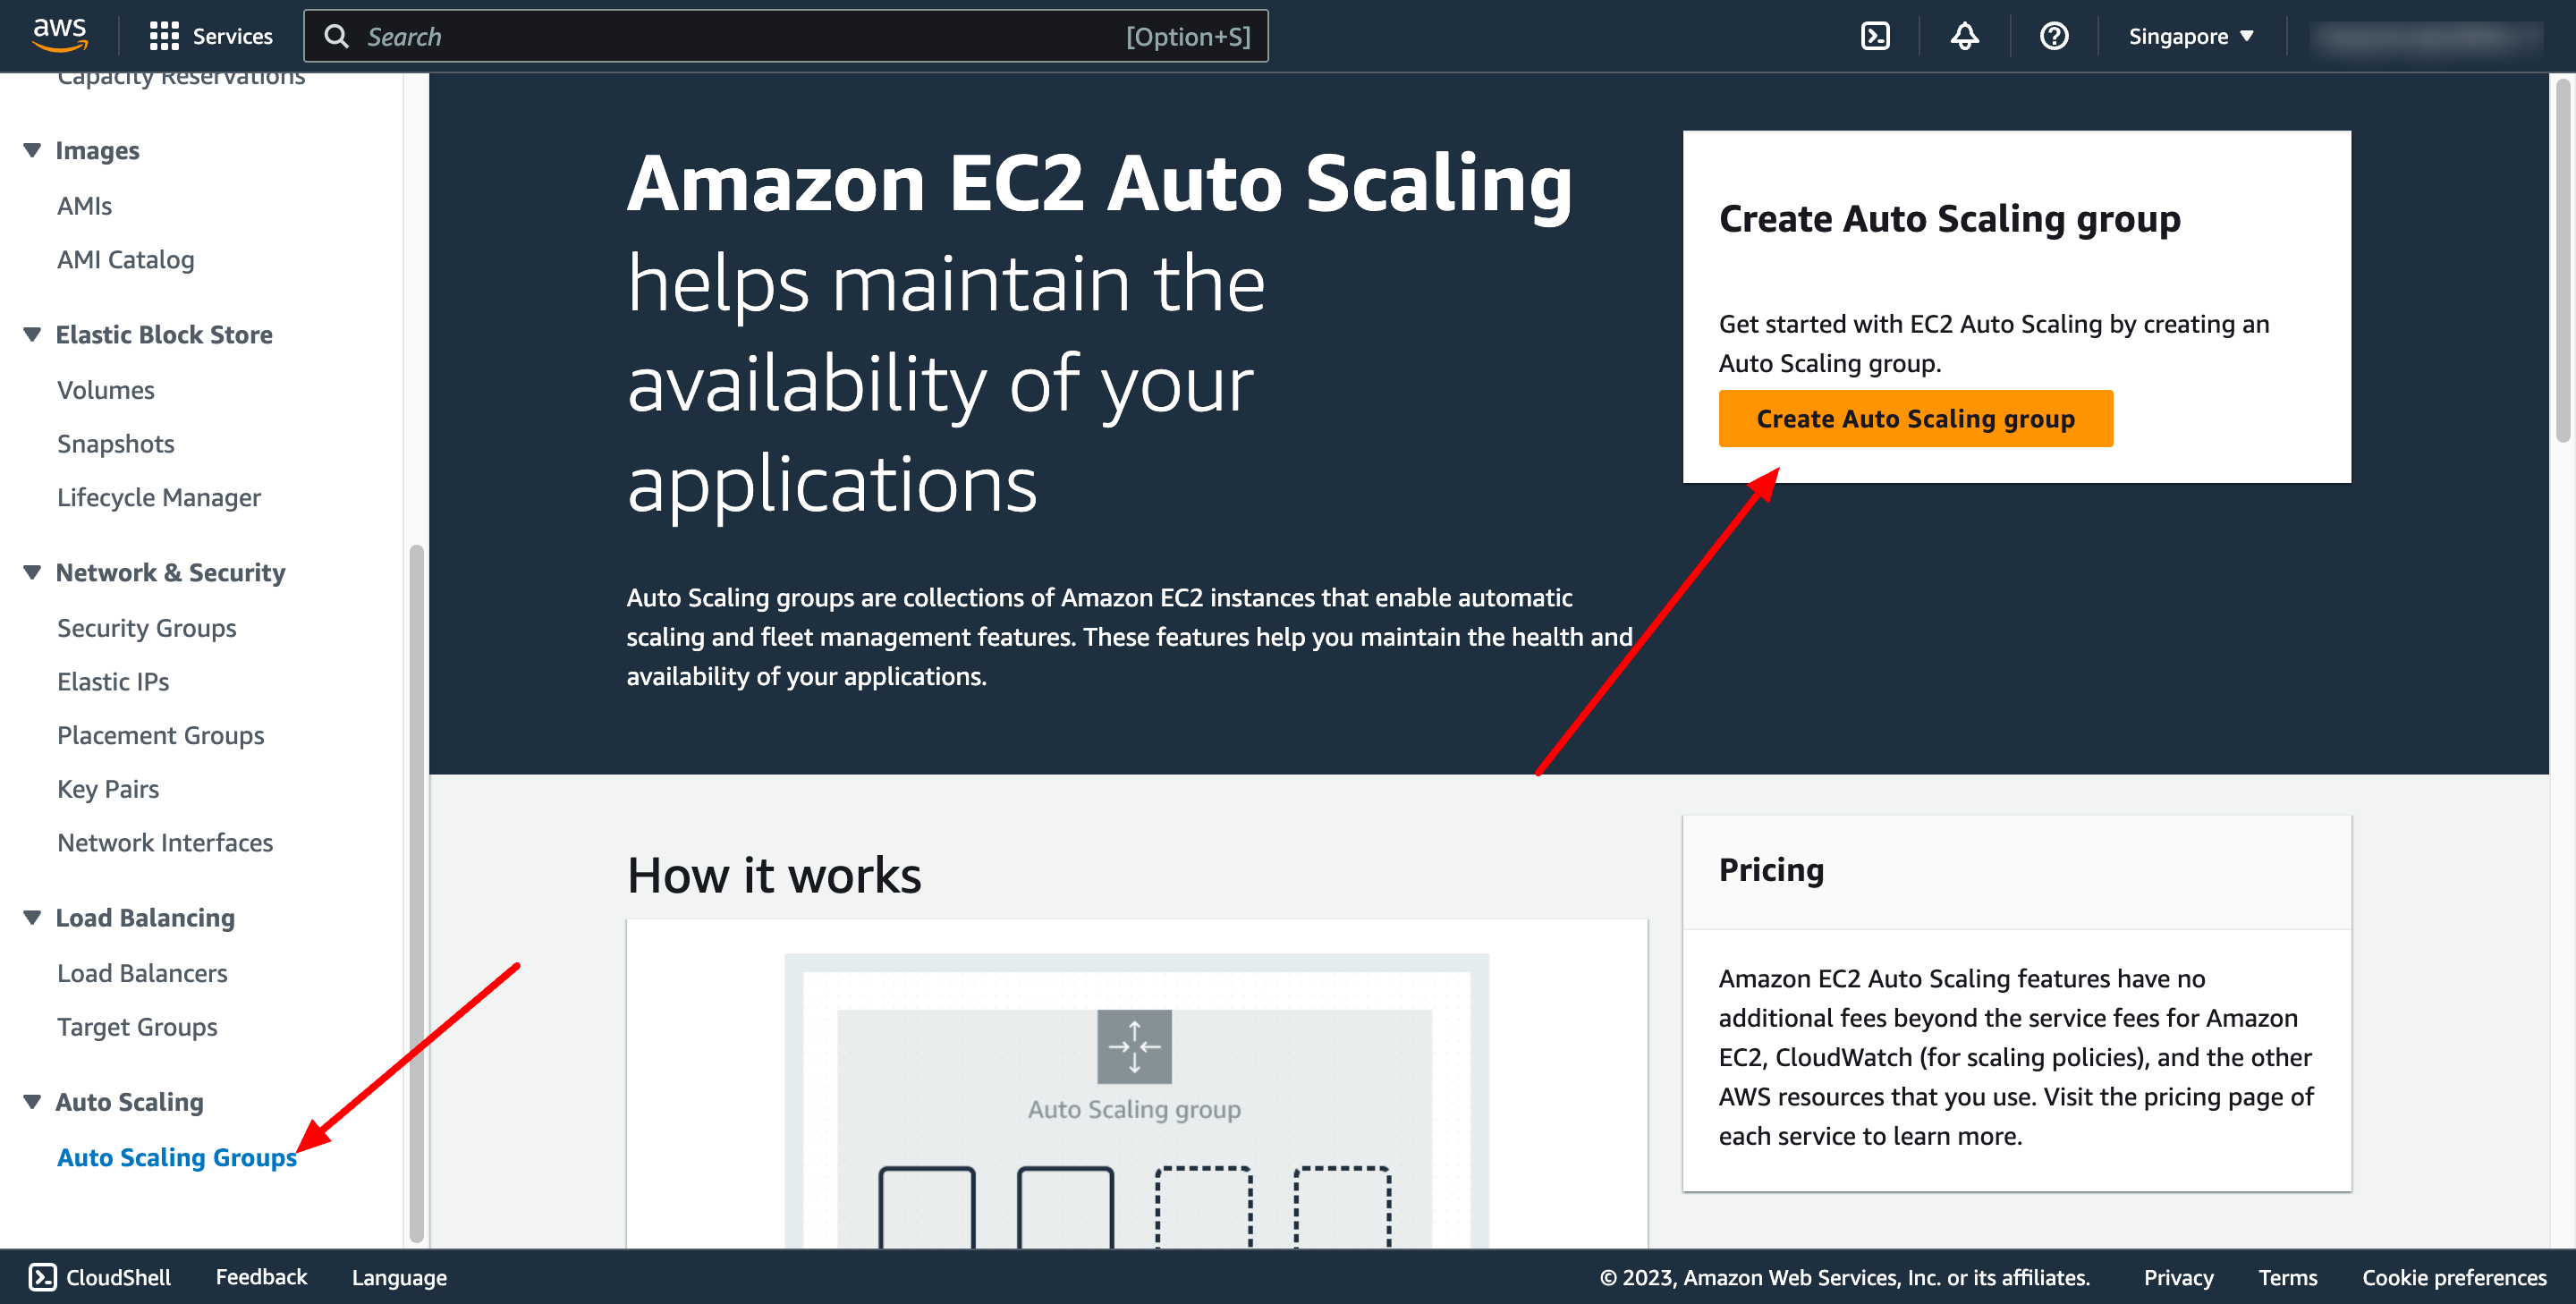
In case we want to auto scale EC2 instances, we first need to have Launch Template for instances, then need to create Auto Scaling Group, then attach load balancer to auto scaling group.
Navigate to Auto Scaling group → click to Create Auto Scaling group:
Now, you can connect to RDS in your EC2 instance.
Advanced: Auto Scaling
In case we want to auto scale EC2 instances, we first need to have Launch Template for instances, then need to create Auto Scaling Group, then attach load balancer to auto scaling group.
Navigate to Auto Scaling group → click to Create Auto Scaling group:
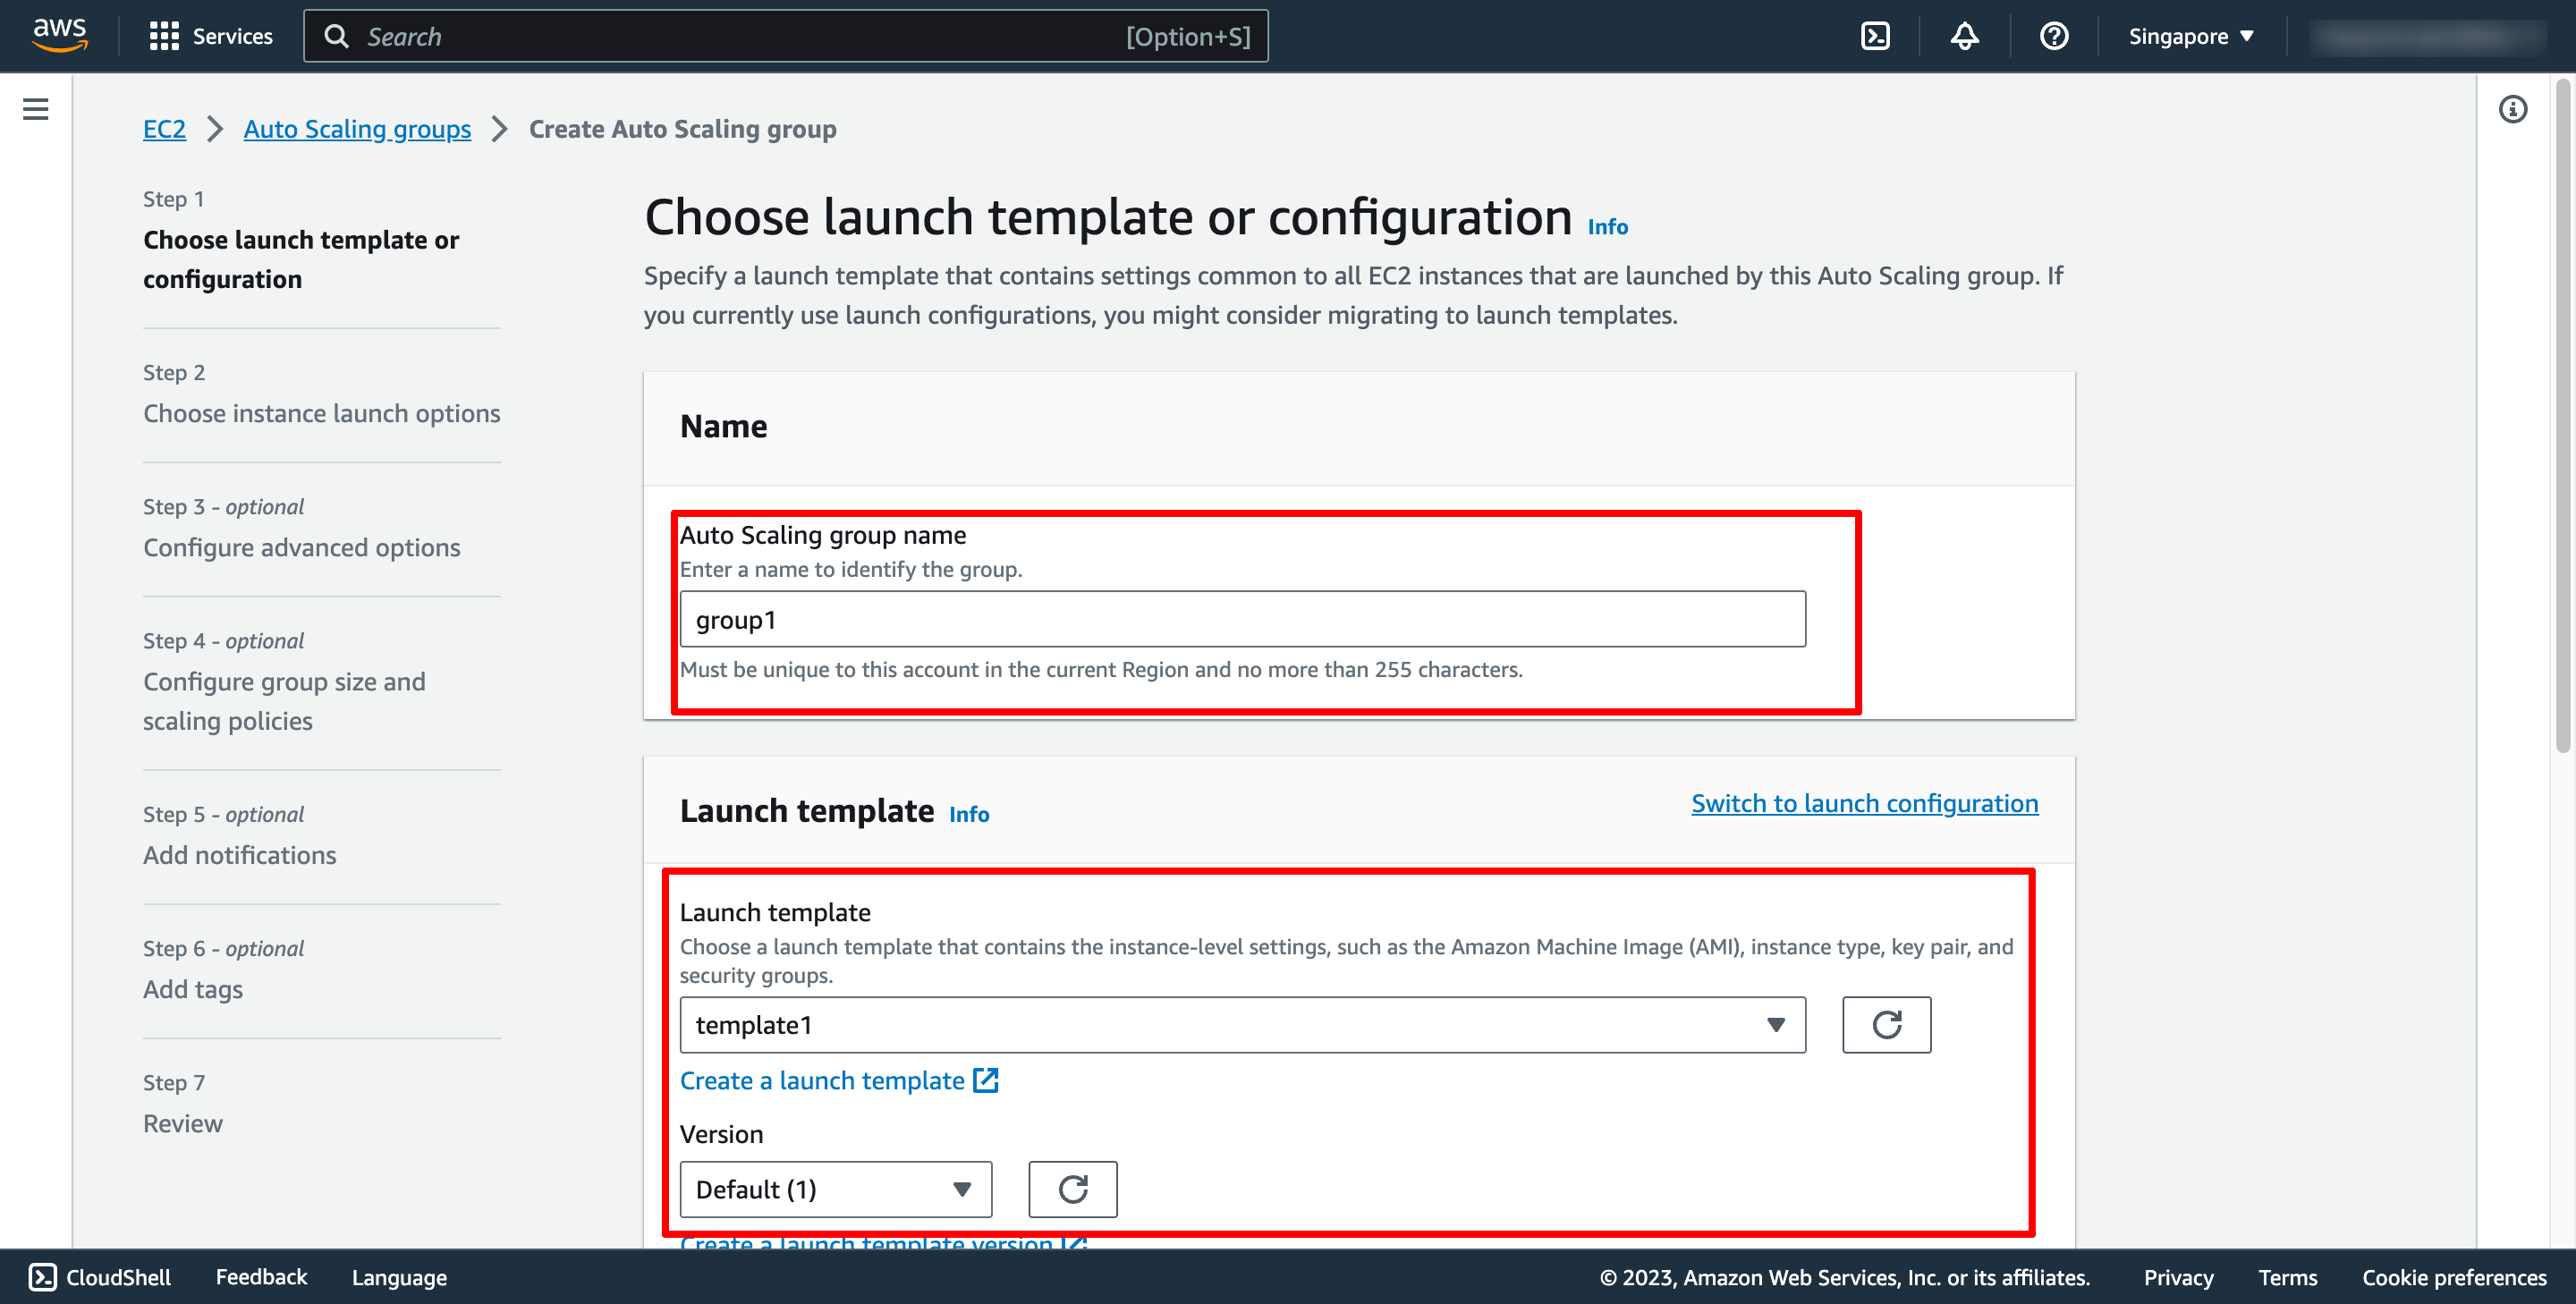
 Enter name of auto scaling group and choose the launch template you just created:
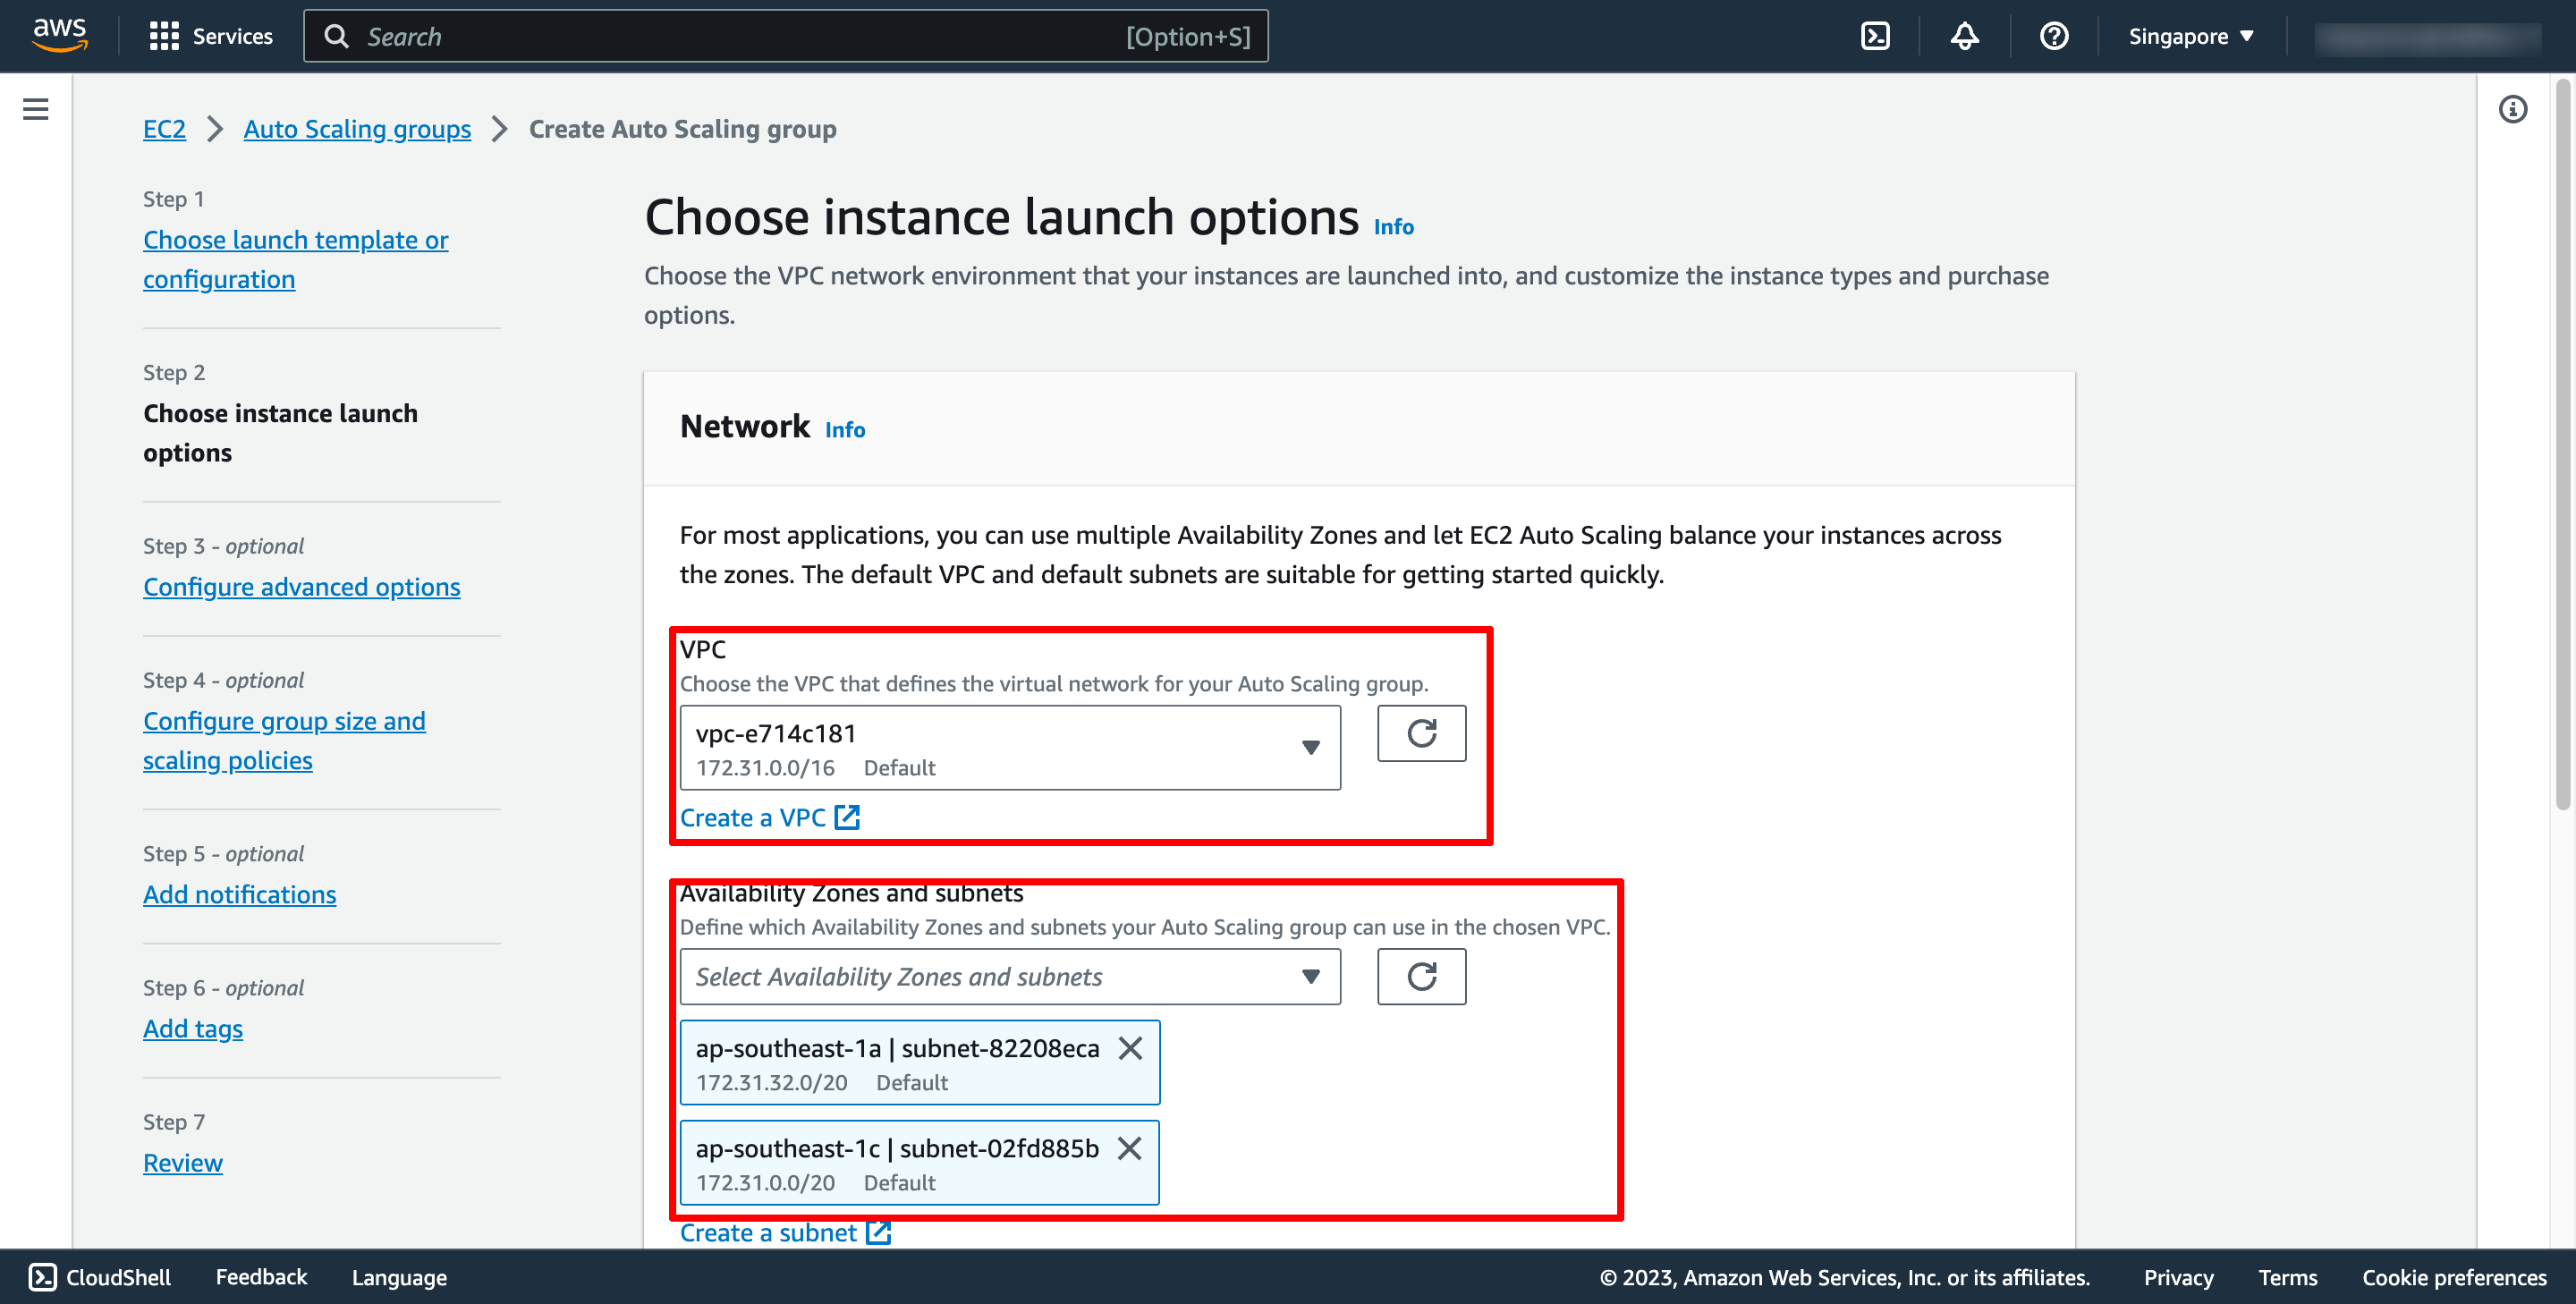
 Step 2 is choosing instance launch option, in here, you can choose the VPC and subnets:
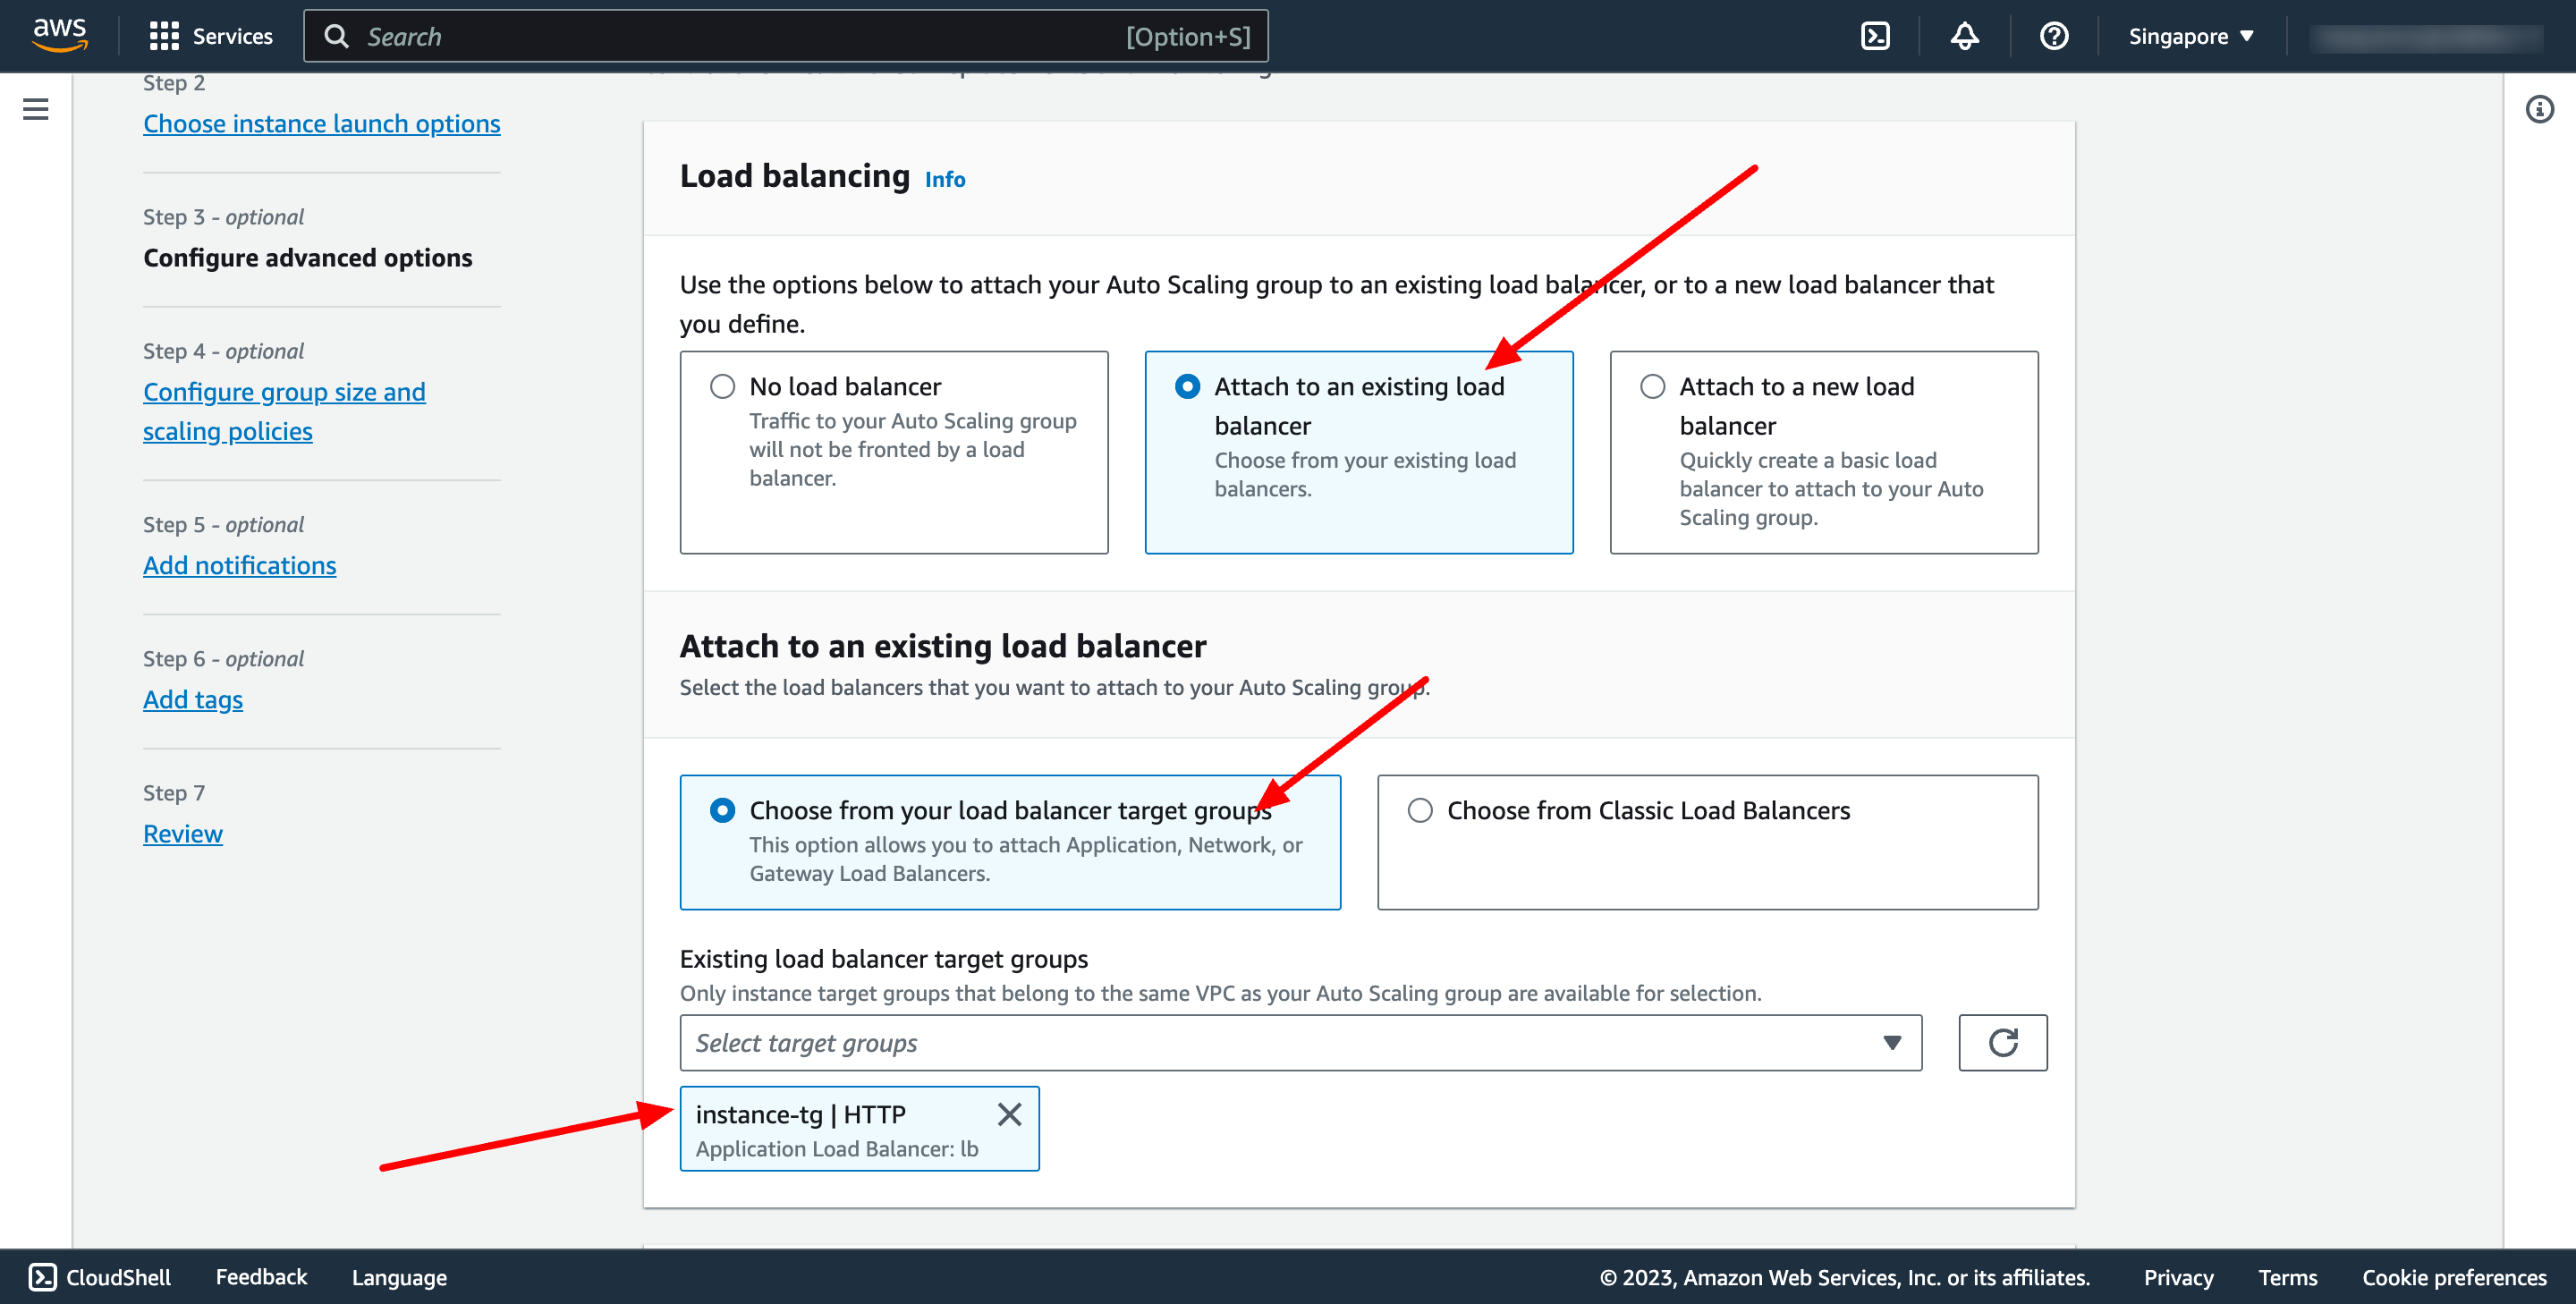
 Step 3 is configuring Load balancing, please choose the Application Load Balancer you created in the previous step.
 Step 4 is configuring group size and scaling policy.
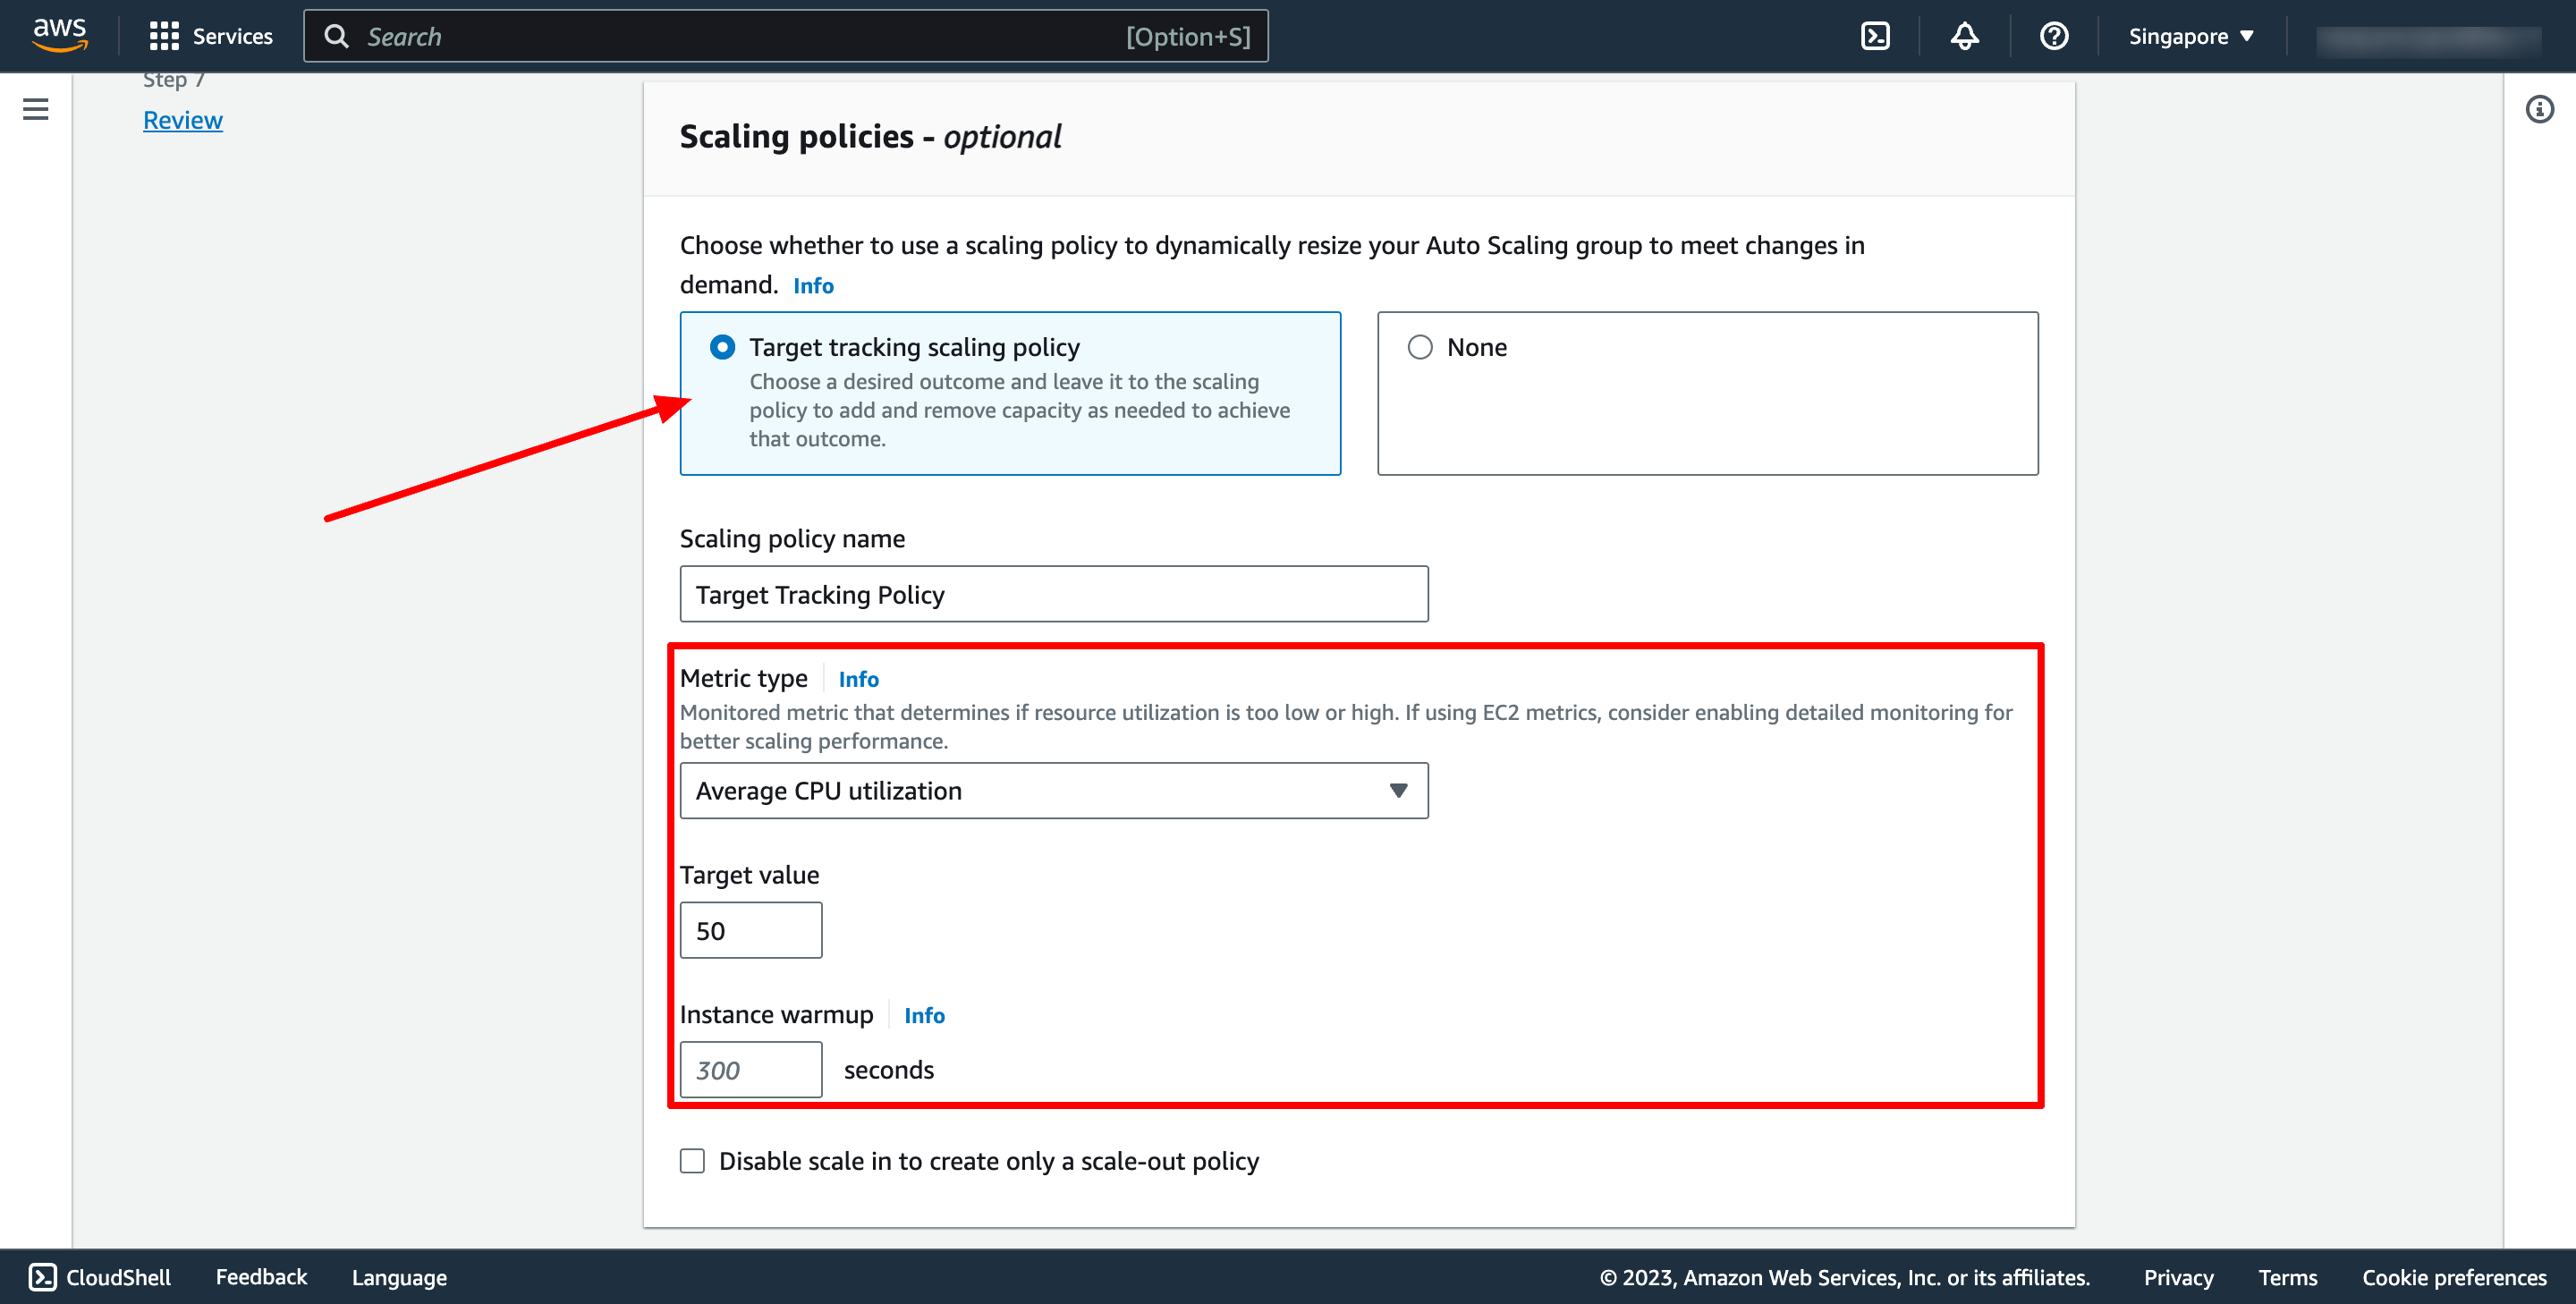
 Selection Target tracking scaling policy, and then configure your policy:
 Notification and Tags step we can skip if don’t needed.
Then review again and create Auto Scaling group.
8-10 hours (with DevOps knowledge)
4-5 days (without DevOps knowledge)
Notification and Tags step we can skip if don’t needed.
Then review again and create Auto Scaling group.
8-10 hours (with DevOps knowledge)
4-5 days (without DevOps knowledge)
Enter instance name:
Choose OS image (AMI) for you instance:
Choose instance type and key pair:
Key pair is used to login to instance via SSH.
In Network setting, you can choose the VPC and subnet you want to place your instance there:
You also can choose or create new Security group. In this case, please choose Create security group, you don’t need to add the rules for security group now, we will do that later.
The AMI you selected includes one or more volumes of storage, including the root device volume. On the Add Storage page, you can specify additional volumes to attach to the instance by choosing Add New Volume:
In Advanced details, enter you commands in User data:
Then, click to Launch instance.
Do the same with the above steps to create another instance for the app. Then, we have two instances:
Step 2. Create Application Load Balancer
Step 2.1. Create Target group
Each target group is used to route requests to one or more registered targets. When a rule condition is met, traffic is forwarded to the corresponding target group.
Go to Load balancer feature in EC2 service → go to Target group → click to Create target group:
For Choose a target type,Instances to register targets by instance ID, IP addresses to register targets by IP address, or Lambda function to register a Lambda function as a target.
If your service's task definition uses the awsvpc network mode (which is required for the Fargate launch type), you must choose IP addresses as the target type This is because tasks that use the awsvpc network mode are associated with an elastic network interface, not an Amazon EC2 instance.
In this context, we choose Instances type.
In Register target step, please choose our web EC2 instance:
Then Create target group.
Step 2.2. Create Application Load Balancer
Navigate to Load Balancers → click to Create load balancer:
In this blog, we use Application Load Balancer, please choose it:
Configure basic configuration:
- For Scheme, choose Internet-facing or Internal.
- For IP address type, choose the IP adressing for the containers subnets.
- For VPC, select the same VPC that you used for the container instances on which you intend to run your service.
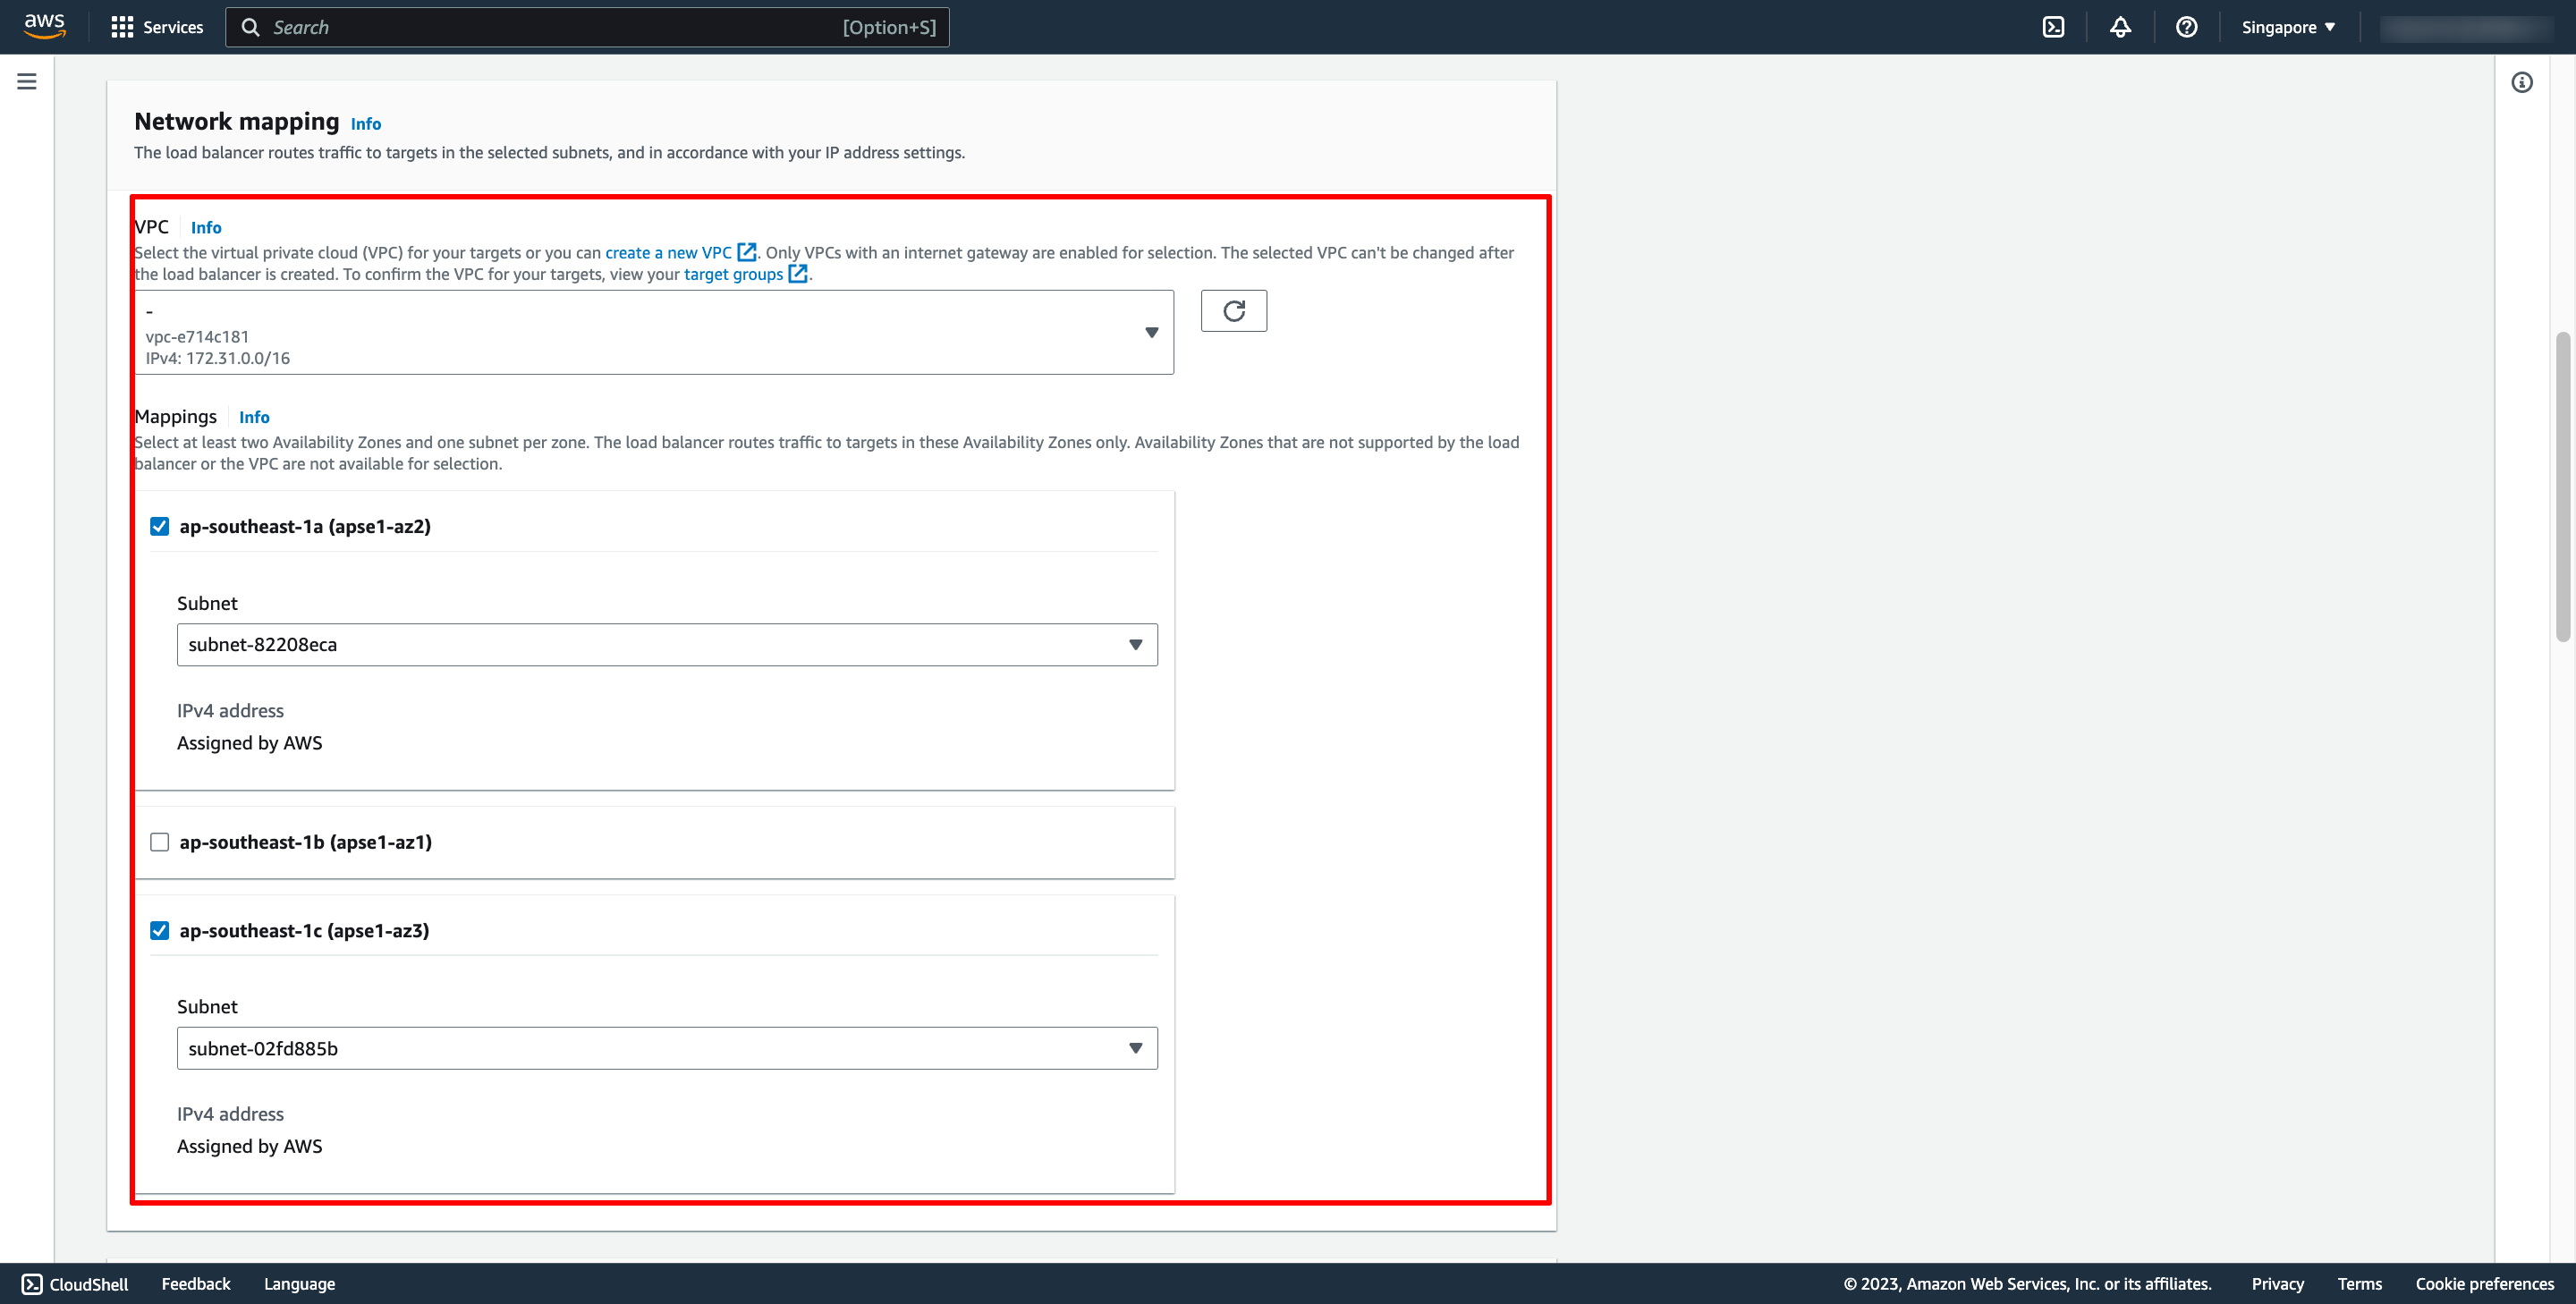
- For Mappings, select the Availability Zones to use for your load balancer. If there is one subnet for that Availability Zone, it is selected. If there is more than one subnet for that Availability Zone, select one of the subnets. You can select only one subnet per Availability Zone. Your load balancer subnet configuration must include all Availability Zones that your container instances reside in.
Choose Security group and Target group:
Note: Please make sure your security group has enough rules for access from Internet like port 80 and port 443.
Then, create load balancer.
Step 3. Configure security groups and permission for EC2 instance
In security group of web instance, add inbound rule from the source is security group of ALB, it makes web instance can be accessed from ALB:
In security group of app instance, add inbound rule from web instance:
To make an EC2 instance can connect to a RDS instance:
In security group of RDS instance, add inbound rule from app instance:
Create EC2 IAM role with RDSAccess permission attached:
You can quick choose policy : Provides full access to Amazon RDS via the AWS Management Console. But for the best practices, you should only choose at least permissions for your role.
Attach that role into app EC2 instance:
Now, you can connect to RDS in your EC2 instance.
Advanced: Auto Scaling
In case we want to auto scale EC2 instances, we first need to have Launch Template for instances, then need to create Auto Scaling Group, then attach load balancer to auto scaling group.
Navigate to Auto Scaling group → click to Create Auto Scaling group:
Enter name of auto scaling group and choose the launch template you just created:
Step 2 is choosing instance launch option, in here, you can choose the VPC and subnets:
Step 3 is configuring Load balancing, please choose the Application Load Balancer you created in the previous step.
Step 4 is configuring group size and scaling policy.
Selection Target tracking scaling policy, and then configure your policy:
Notification and Tags step we can skip if don’t needed.
Then review again and create Auto Scaling group.
8-10 hours (with DevOps knowledge)
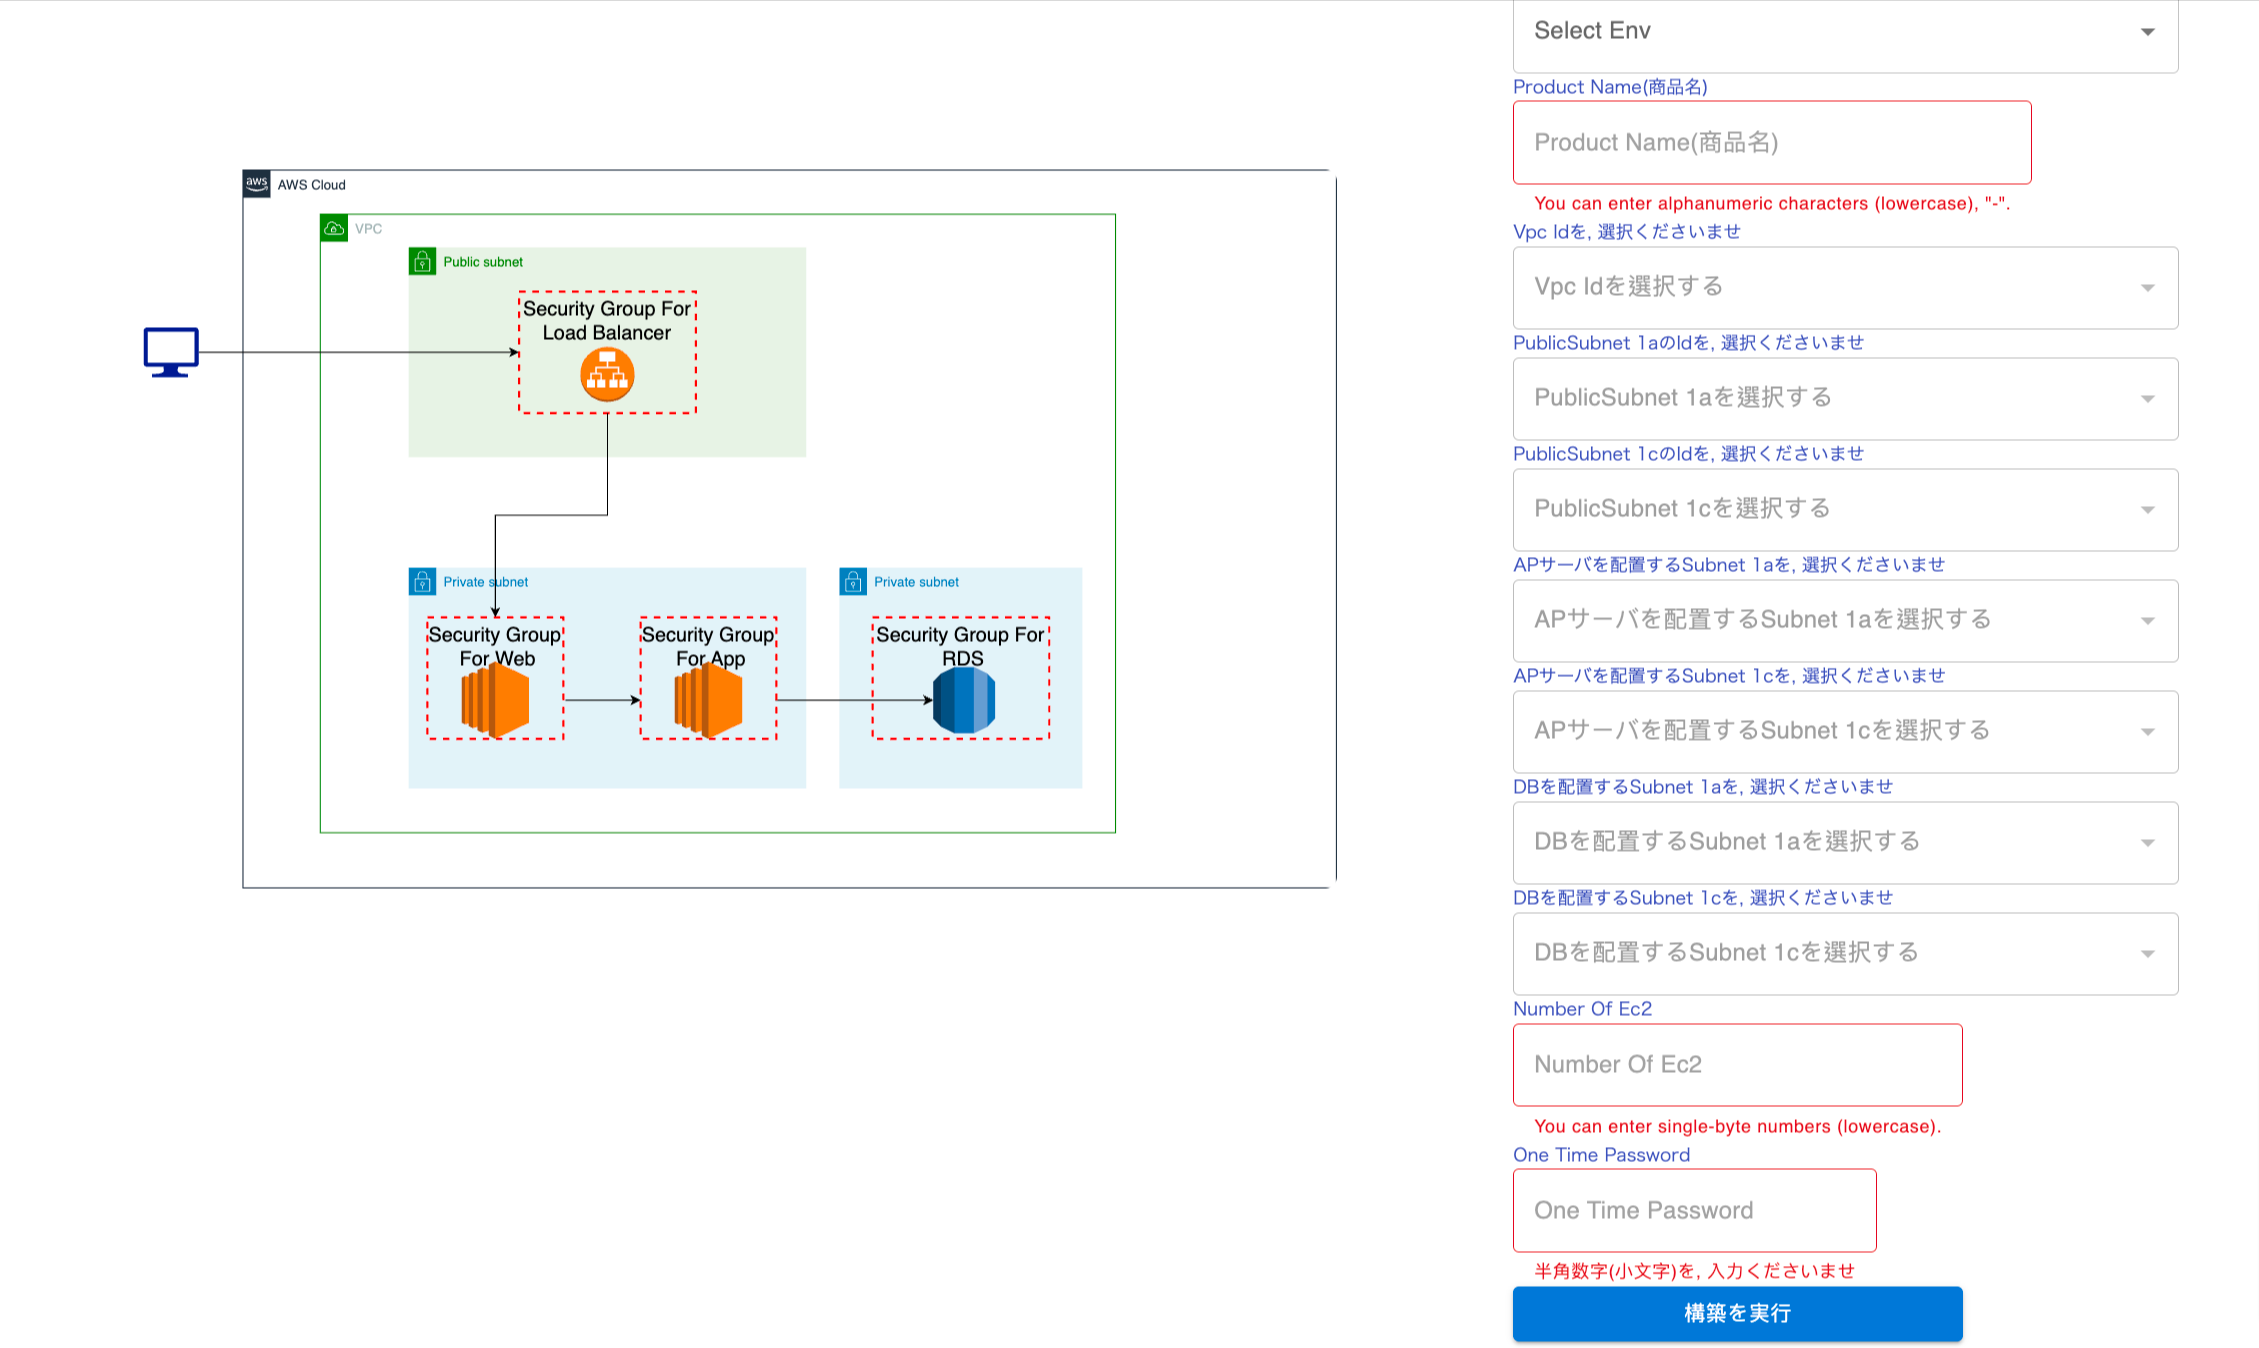
4-5 days (without DevOps knowledge) 5. Creating AWS Load Balancing to EC2 instances with Prismscaler
PrismScaler form
PrismScaler help you setup Load Balancing to EC2 instances by one clicking.
Prism Scaler provides you with an intuitive model and a concise form, you just need to fill in the necessary information and press create, now PrismScaler will automatically build a simple web application/system that moves on a container on AWS:
 5-15 minutes (without DevOps knowledge)
- One load balancer, public
- As a web server, the EC2 instance is n (variable), private
- As an AP server, the EC2 instance is n (variable), private
- One RDS for private
- Role, SecurityGroup, cluster associated with the above
- Automatically build applications/systems with legacy three -layer structures on AWS If it is necessary to separate the web server and the AP server for security matters, etc.
- It is necessary to save data such as user information, and when the user is changed, the screening and processing of the screen are changed.
5-15 minutes (without DevOps knowledge) 6. How to connect two EC2 instances with each other and connect to a private RDS
To connect Amazon EC2 instances to a private Amazon RDS (Relational Database Service) instance, you need to set up the appropriate network and security configurations to ensure secure and reliable communication between your EC2 instances and the RDS instance. Here are the general steps to achieve this:
VPC Configuration:
- Ensure that both your EC2 instances and your RDS instance are located within the same Amazon Virtual Private Cloud (VPC) or connected VPCs. If they are not in the same VPC, you will need to set up VPC peering or VPN connections to enable communication.
- Configure the security groups for both the EC2 instances and the RDS instance to allow traffic between them. Specifically, the security group for your RDS instance should allow incoming traffic from the security group associated with your EC2 instances.
- Make sure that both your EC2 instances and your RDS instance are in private subnets (subnets not directly accessible from the internet). This enhances security by isolating them from the public internet.
- If you want to use IAM database authentication for your RDS instance, configure your database users to authenticate using IAM roles. This eliminates the need for hardcoding database credentials in your EC2 instances.
- In your application code running on the EC2 instances, configure the database connection settings to point to the private DNS endpoint of your RDS instance. The private DNS endpoint typically follows the format [YourDBInstanceName].[RandomCharacters].[Region].rds.amazonaws.com.
7. Describe more about how to scale instances in auto scaling case
Scaling instances in an auto scaling group is a fundamental aspect of AWS Auto Scaling, a service that automatically adjusts the number of Amazon EC2 instances in your application's auto scaling group based on various conditions. Scaling can occur in two ways: scaling out (increasing the number of instances) and scaling in (decreasing the number of instances). Here's a more detailed description of how to scale instances in an auto scaling group:
Create an Auto Scaling Group (ASG):
- The first step is to create an Auto Scaling Group (ASG) through the AWS Management Console, AWS CLI, or AWS SDKs. When creating the ASG, you specify the minimum, desired, and maximum number of instances in the group. These settings define the scaling boundaries for your ASG.
- After creating the ASG, you define scaling policies. There are two types of scaling policies:
- Target Tracking Scaling Policy: This type of policy allows you to set a target value for a specific metric, such as CPU utilization or network in/out, and Auto Scaling will automatically adjust the number of instances to maintain that target. For example, you can create a target tracking policy to maintain a CPU utilization of 50%.
- Step Scaling Policy: Step scaling policies allow you to define scaling adjustments based on various conditions. For example, you can specify that if CPU utilization exceeds a certain threshold for a specified period, add two instances. If it falls below a threshold, remove one instance.
- Attach the scaling policies you've defined to your ASG. You can attach one or more policies for scaling out and scaling in. These policies dictate how the group should respond to changes in the application's demand.
- To make more informed scaling decisions, you can set up CloudWatch alarms that trigger based on specific metrics. For example, you can create an alarm that triggers when CPU utilization exceeds 80% for 5 minutes. These alarms can be used as the basis for scaling actions in your policies.
- As your application runs, AWS Auto Scaling continuously monitors the metrics specified in your scaling policies and CloudWatch alarms. When a scaling event is triggered, the ASG responds accordingly.
- If the specified metric exceeds the thresholds you've defined in your scaling policies or if a CloudWatch alarm is triggered, the ASG will automatically add instances to the group. It will create new instances based on the Amazon Machine Image (AMI) and launch configuration you specified when creating the ASG.
- Conversely, if the specified metric falls below the thresholds or if another CloudWatch alarm triggers, the ASG will automatically remove instances from the group. Instances are terminated according to termination policies you've configured.
- Regularly review the performance of your ASG and scaling policies. You can fine-tune the scaling thresholds and policies as needed to ensure that your application scales optimally and cost-effectively.
8. Reference
The reference section lists the sources or external materials used in the article, allowing readers to explore further or verify the information provided.