1. Introduction
The introduction provides an overview of the article's focus, which is to present a comprehensive guide on AWS VPN Endpoint and the VPN Client tool. It may briefly explain the significance of AWS VPN Endpoint in establishing secure connections to Amazon VPCs (Virtual Private Clouds) and the role of the VPN Client tool in facilitating client-side VPN connectivity.
2. Purpose
This section states the purpose of the article, which is to educate readers about AWS VPN Endpoint and the VPN Client tool and demonstrate how to set them up. It aims to provide both DevOps and non-DevOps methods to cater to different experience levels.
3. What is AWS VPN endpoint?
These VPN connections enable you to securely connect your on-premises data centers or remote networks to your Amazon Virtual Private Cloud (VPC) environments. Here are some key points about AWS VPN endpoints:
- Virtual Private Cloud (VPC): A VPC is a logically isolated section of the AWS Cloud where you can launch AWS resources. VPCs allow you to define your own network topology, IP address ranges, and control over network routing.
- VPN Connections: VPN connections are used to extend your on-premises network into your VPC using encrypted tunnels over the public internet. AWS provides two types of VPN connections:
- Site-to-Site VPN: This allows you to connect your on-premises data center or office network to your VPC over an IPsec VPN tunnel. It is used for secure communication between your local network and resources in your VPC.
- Client VPN: This enables individual users or remote offices to connect to your VPC securely over SSL/TLS. It's particularly useful for remote access to resources hosted in your VPC.
- AWS VPN Gateway: AWS VPN Gateway is the service that manages VPN connections in AWS. It's a fully managed service that provides the necessary infrastructure for establishing and managing VPN connections. AWS offers two types of VPN Gateway:
- Virtual Private Gateway (VGW): This is used for Site-to-Site VPN connections. It is associated with a VPC and provides the entry and exit point for VPN traffic between your VPC and your on-premises network.
- Client VPN Endpoint: This is used for Client VPN connections. It allows remote users or offices to connect to your VPC securely.
- VPN Configuration: To establish VPN connections, you need to configure your VPN endpoints with the necessary settings, such as IP address ranges, pre-shared keys, and routing information.
- Security: VPN connections use encryption to secure data in transit between your on-premises network and your VPC. IPsec (Internet Protocol Security) is commonly used for Site-to-Site VPNs, while SSL/TLS is used for Client VPNs.
- High Availability: AWS VPN Gateway is designed for high availability and provides redundancy for VPN connections. You can set up multiple VPN connections for failover and load balancing.
- Monitoring and Logging: AWS provides monitoring and logging capabilities to track the status and performance of your VPN connections. You can use AWS CloudWatch and CloudTrail for this purpose.
- Costs: AWS charges for VPN data transfer and the use of VPN endpoints. Pricing may vary based on factors like data transfer volume and the number of VPN connections.
4. How to create certificate for VPN?
We can create SSL certificate for VPN by OpenVPN open source.
Download OpenVPN package
git clone https://github.com/OpenVPN/easy-rsa.git
Initialize
cd easy-rsa/easyrsa3/
./easyrsa init-pki
Create CA
./easyrsa build-ca nopass
You will be asked for your name, so enter any name
Create server key
./easyrsa build-server-full server nopass
Create a client key
./easyrsa build-client-full client123.domain.tld nopass
Copy files to ssl folder created before, this 5 files are generated:
- pki/ca.crt
- pki/issued/server.crt
- pki/private/server.key
- pki/issued/client123.domain.tld.crt
- pki/private/client123.domain.tld.key
5. Creating AWS Client VPN with AWS console
Step 1. Prepare SSL certificate
How to create certificate for VPN
Step 2. Import certificate to ACM
Go to AWS Certificate Manager service → choose Import a certificate:
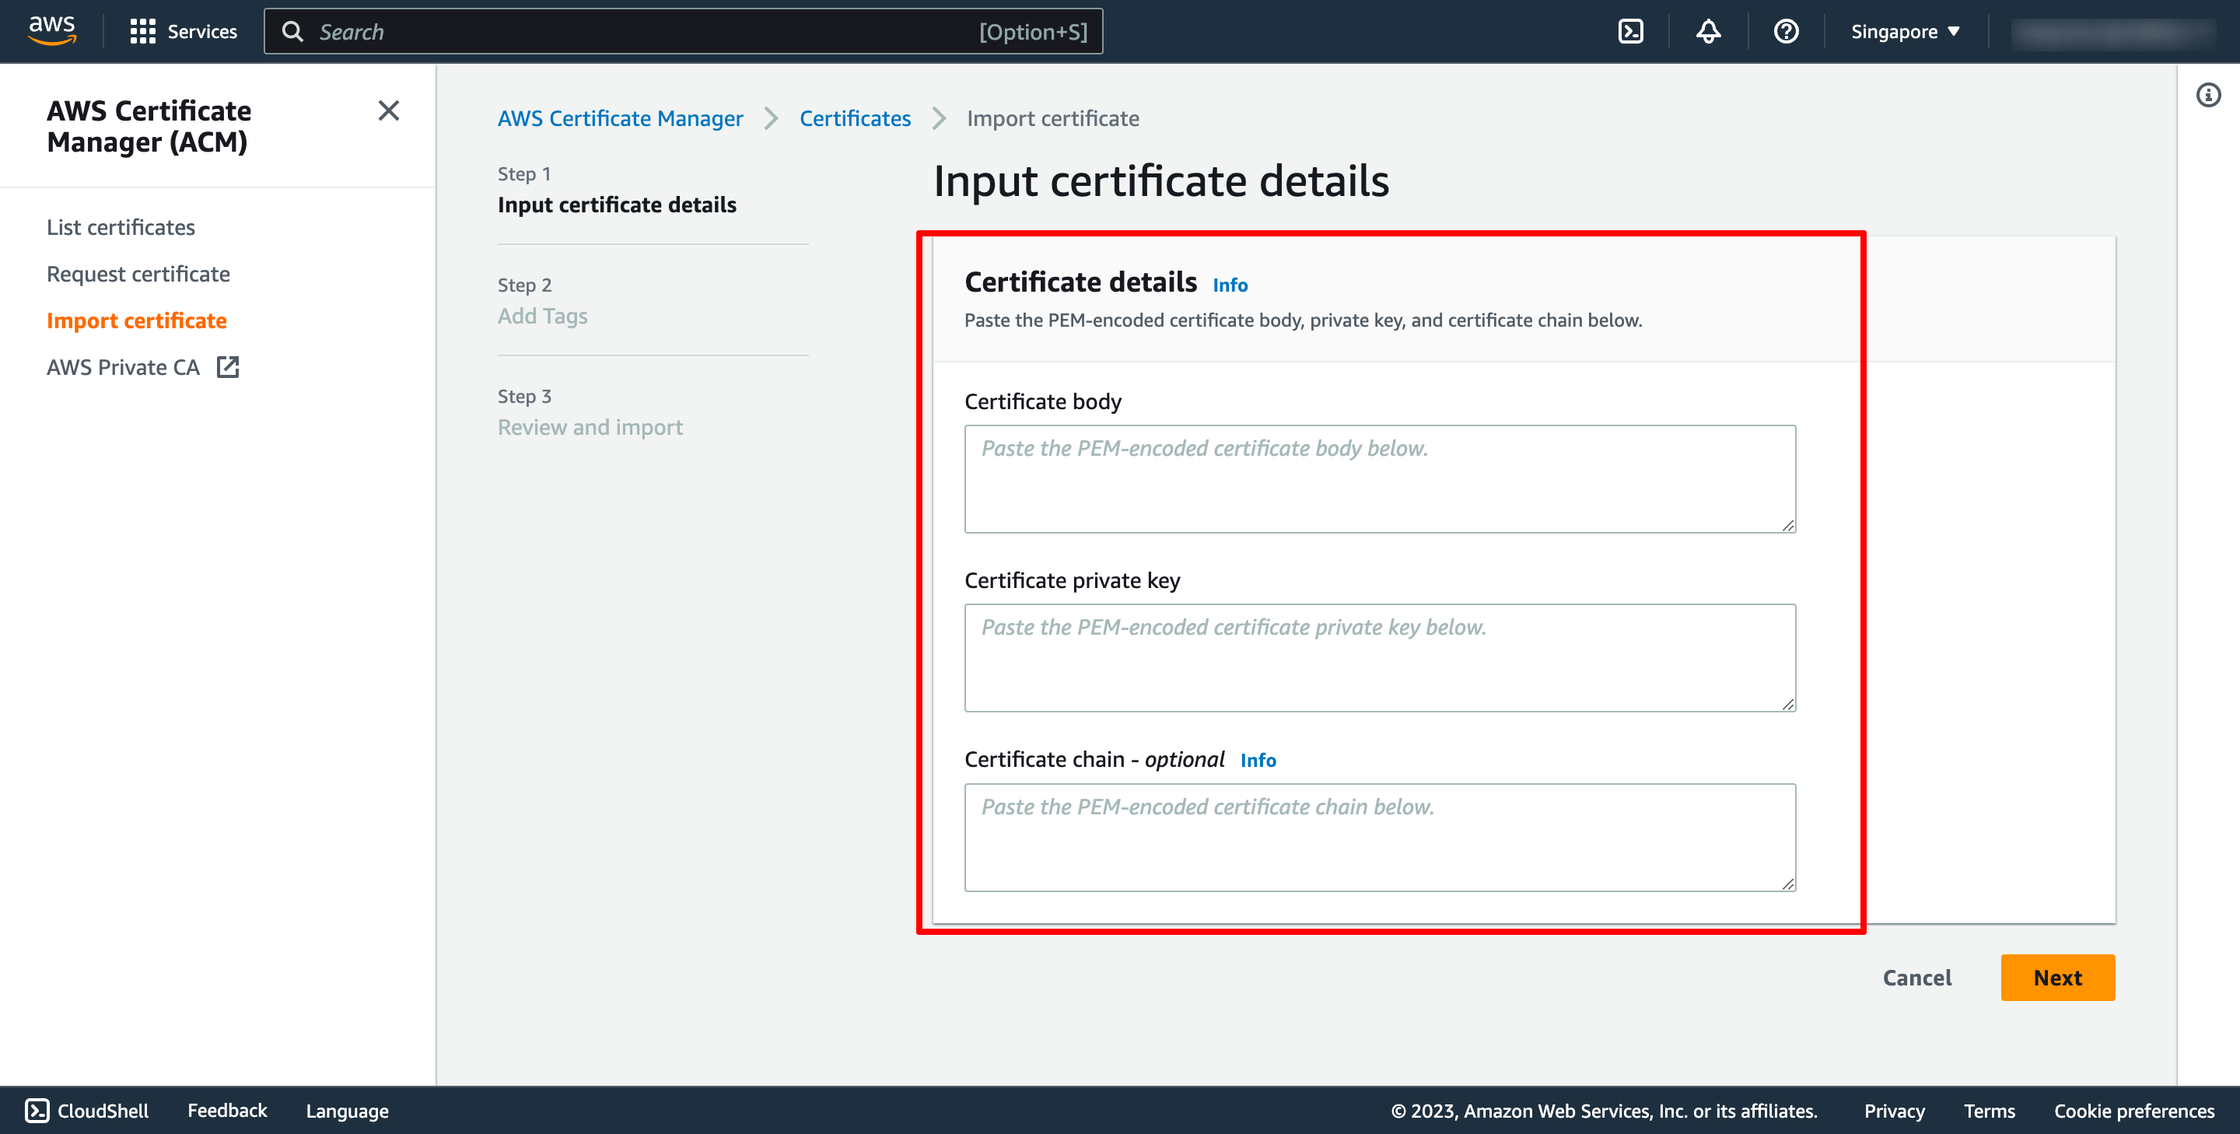
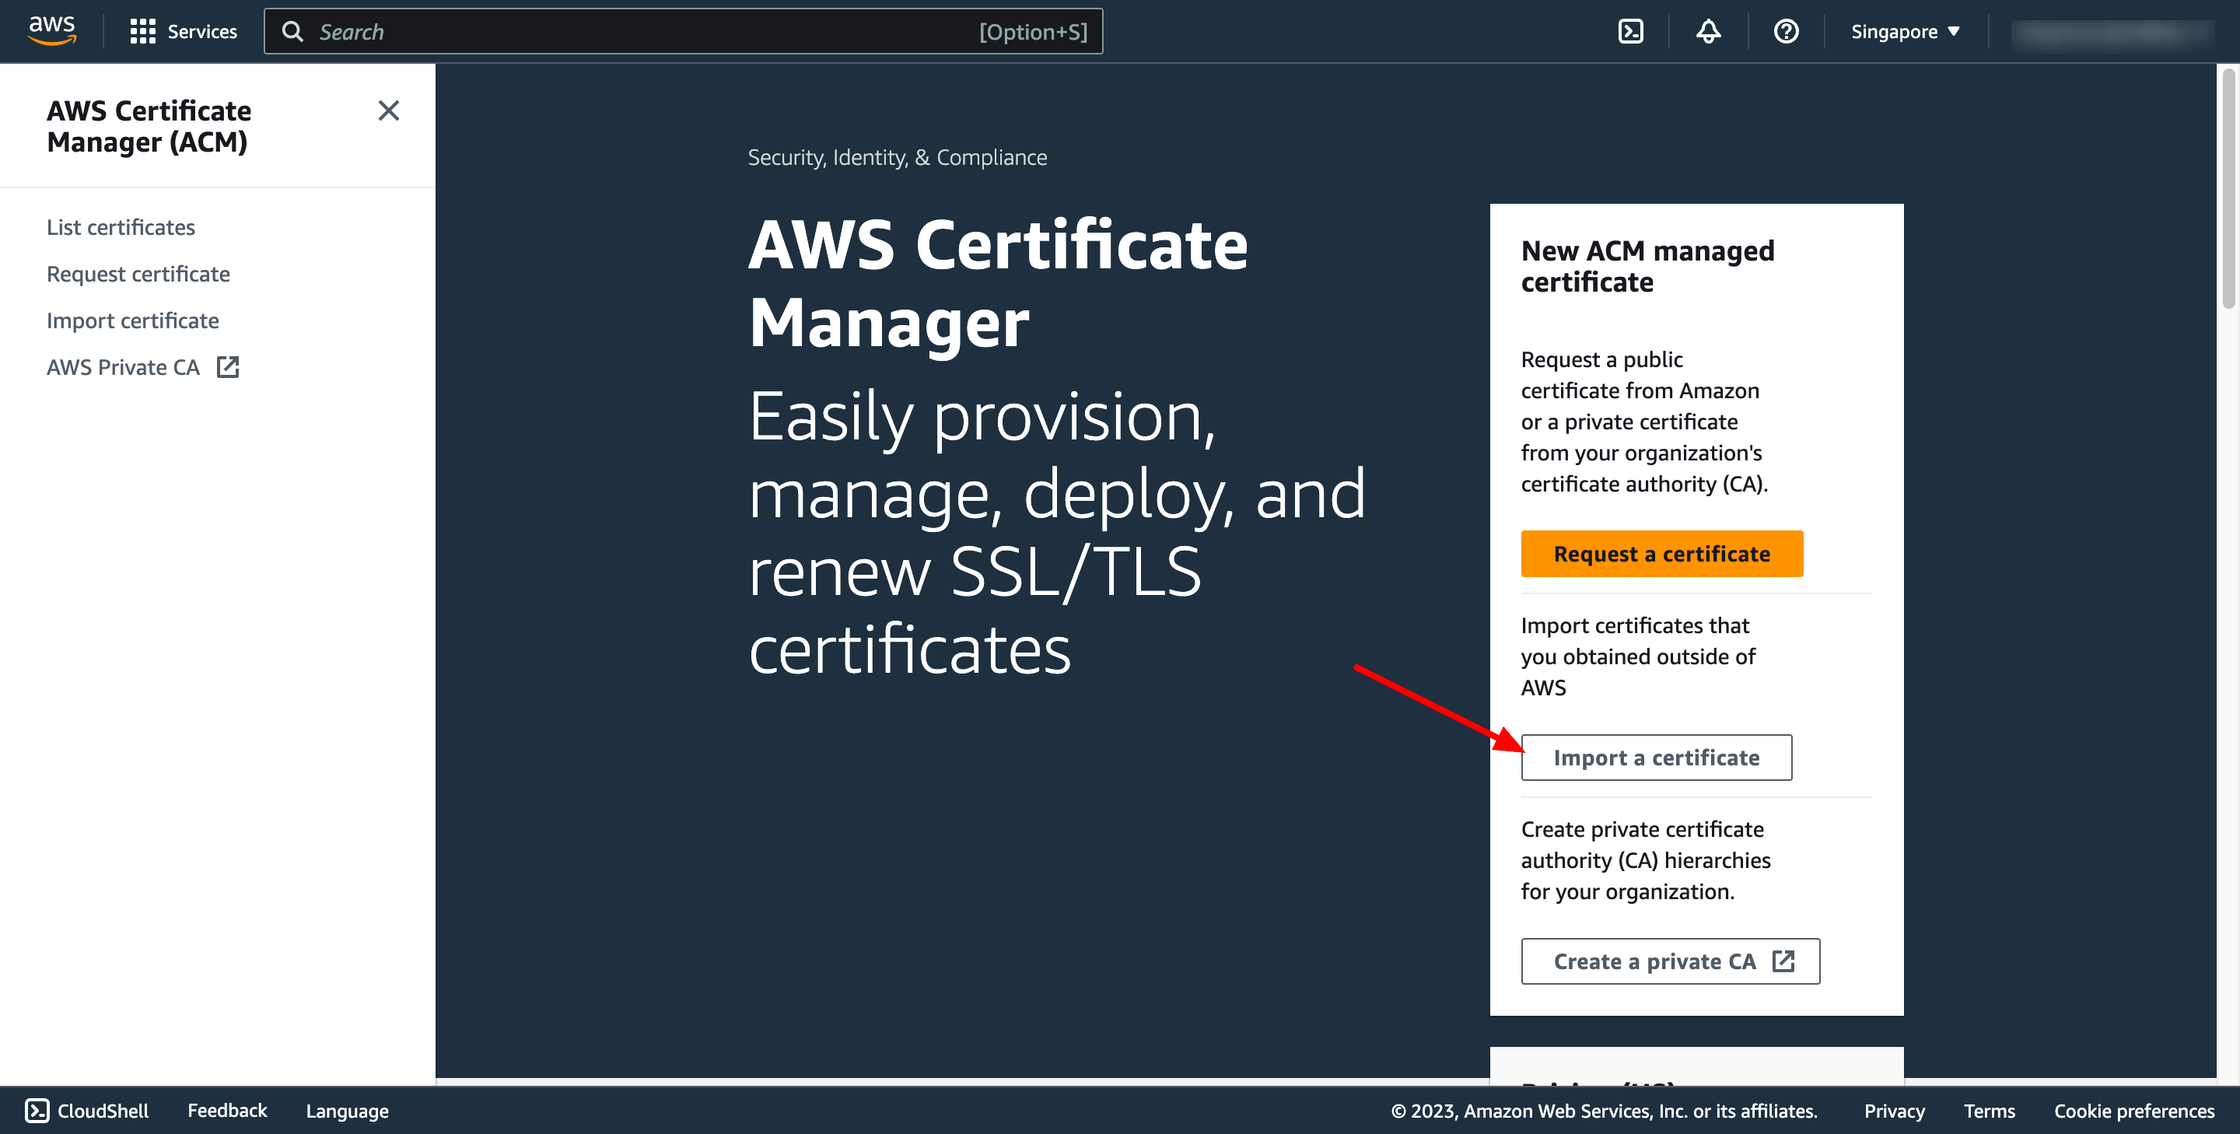 We need to import two certificates, one for server and one for client.
server key
In the certificate body, the contents of server.crt
In the private key of the certificate, the contents of server.key
In the certificate chain, the contents of ca.crt
client key
Contents of client123.domain.tld.crt in the certificate body
Contents of client123.domain.tld.key in the private key of the certificate
In the certificate chain, the contents of ca.crt
We need to import two certificates, one for server and one for client.
server key
In the certificate body, the contents of server.crt
In the private key of the certificate, the contents of server.key
In the certificate chain, the contents of ca.crt
client key
Contents of client123.domain.tld.crt in the certificate body
Contents of client123.domain.tld.key in the private key of the certificate
In the certificate chain, the contents of ca.crt
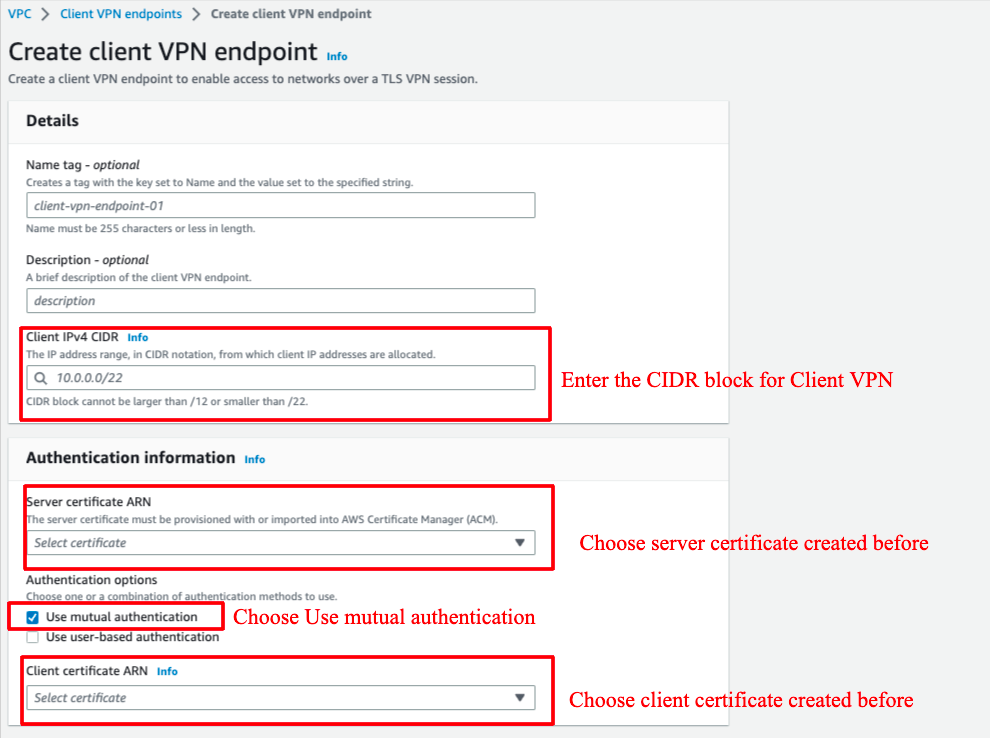
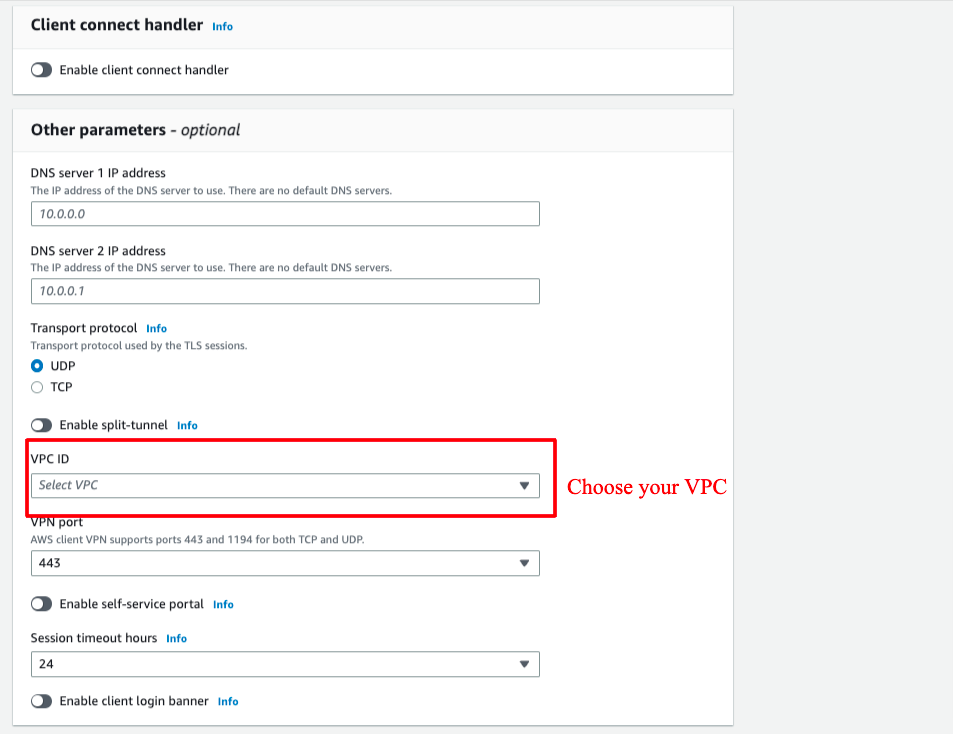
 Step 3. Create Client VPN Endpoint
Go to VPC → go to Client VPN endpoints → choose Create client VPN endpoint:
Step 3. Create Client VPN Endpoint
Go to VPC → go to Client VPN endpoints → choose Create client VPN endpoint:
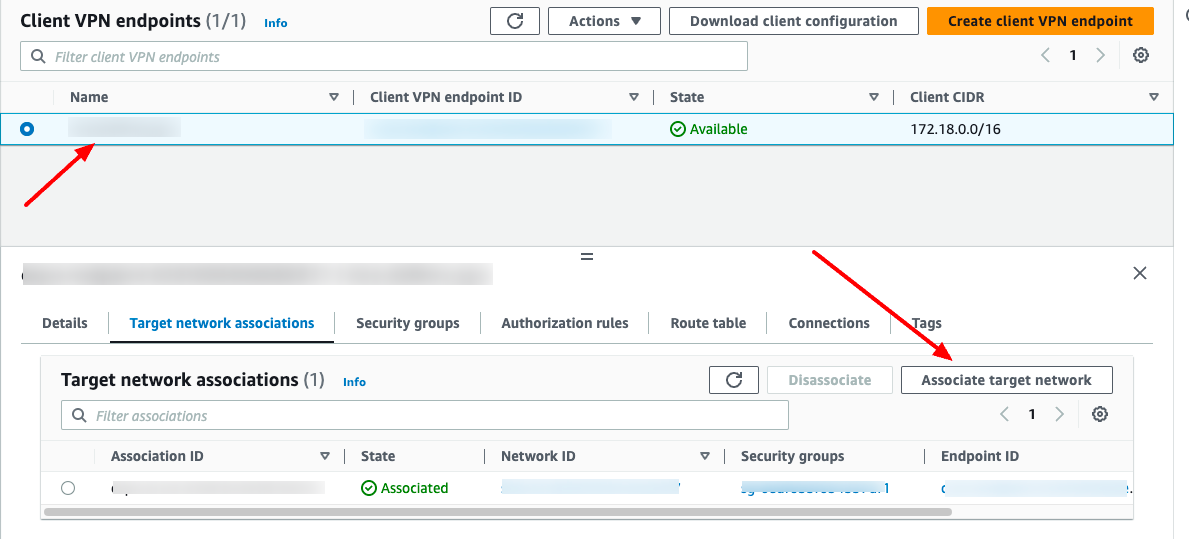
 Step 4. Associate a target network
After Client VPN created, click to it, choose "Target network associations" tab, choose "Associate target network" button to select VPC and subnet.
When you associate the first subnet with the Client VPN endpoint, the following happens:
The state of the Client VPN endpoint changes to available. Clients can now establish a VPN connection, but they cannot access any resources in the VPC until you add the authorization rules.
The local route of the VPC is automatically added to the Client VPN endpoint route table.
The VPC's default security group is automatically applied for the Client VPN endpoint.
Step 4. Associate a target network
After Client VPN created, click to it, choose "Target network associations" tab, choose "Associate target network" button to select VPC and subnet.
When you associate the first subnet with the Client VPN endpoint, the following happens:
The state of the Client VPN endpoint changes to available. Clients can now establish a VPN connection, but they cannot access any resources in the VPC until you add the authorization rules.
The local route of the VPC is automatically added to the Client VPN endpoint route table.
The VPC's default security group is automatically applied for the Client VPN endpoint.
We need to import two certificates, one for server and one for client.
server key
In the certificate body, the contents of server.crt
In the private key of the certificate, the contents of server.key
In the certificate chain, the contents of ca.crt
client key
Contents of client123.domain.tld.crt in the certificate body
Contents of client123.domain.tld.key in the private key of the certificate
In the certificate chain, the contents of ca.crt
Step 3. Create Client VPN Endpoint
Go to VPC → go to Client VPN endpoints → choose Create client VPN endpoint:
Step 4. Associate a target network
After Client VPN created, click to it, choose "Target network associations" tab, choose "Associate target network" button to select VPC and subnet.
When you associate the first subnet with the Client VPN endpoint, the following happens:
The state of the Client VPN endpoint changes to available. Clients can now establish a VPN connection, but they cannot access any resources in the VPC until you add the authorization rules.
The local route of the VPC is automatically added to the Client VPN endpoint route table.
The VPC's default security group is automatically applied for the Client VPN endpoint.
Step 5. Add an authorization rule for the VPC
Choose "Authorization rules" tab, choose "Add authorization rule" button and enter the CIDR of the network for which you want to allow access.Step 6. Provide access to the internet
Choose "Route Table", and then choose "Create Route". For Route destination, enter 0.0.0.0/0. For Subnet ID for target network association, specify the ID of the subnet through which to route traffic. For Destination network to enable access, enter 0.0.0.0/0, and choose Allow access to all users.

Step 7. Download configuration file

The .ovpn file is downloaded from AWS has no client cert and key information. Therefore, after you download that file, you have to insert client cert and key manually into that file.
With DevOps knowledge: 4-6 hours Without DevOps knowledge: 2-3 days
<cert>
* insert client1.domain.tld.cert we generated earlier.
</cert>

<key>
* insert client1.domain.tld.key we generated earlier.
</key>
6. Creating AWS Client VPN with PrismScaler
Prism Scaler provides you with an intuitive model and a concise form, you just need to fill in the necessary information and press create, now PrismScaler will automatically build a simple web application/system that moves on a container on AWS:
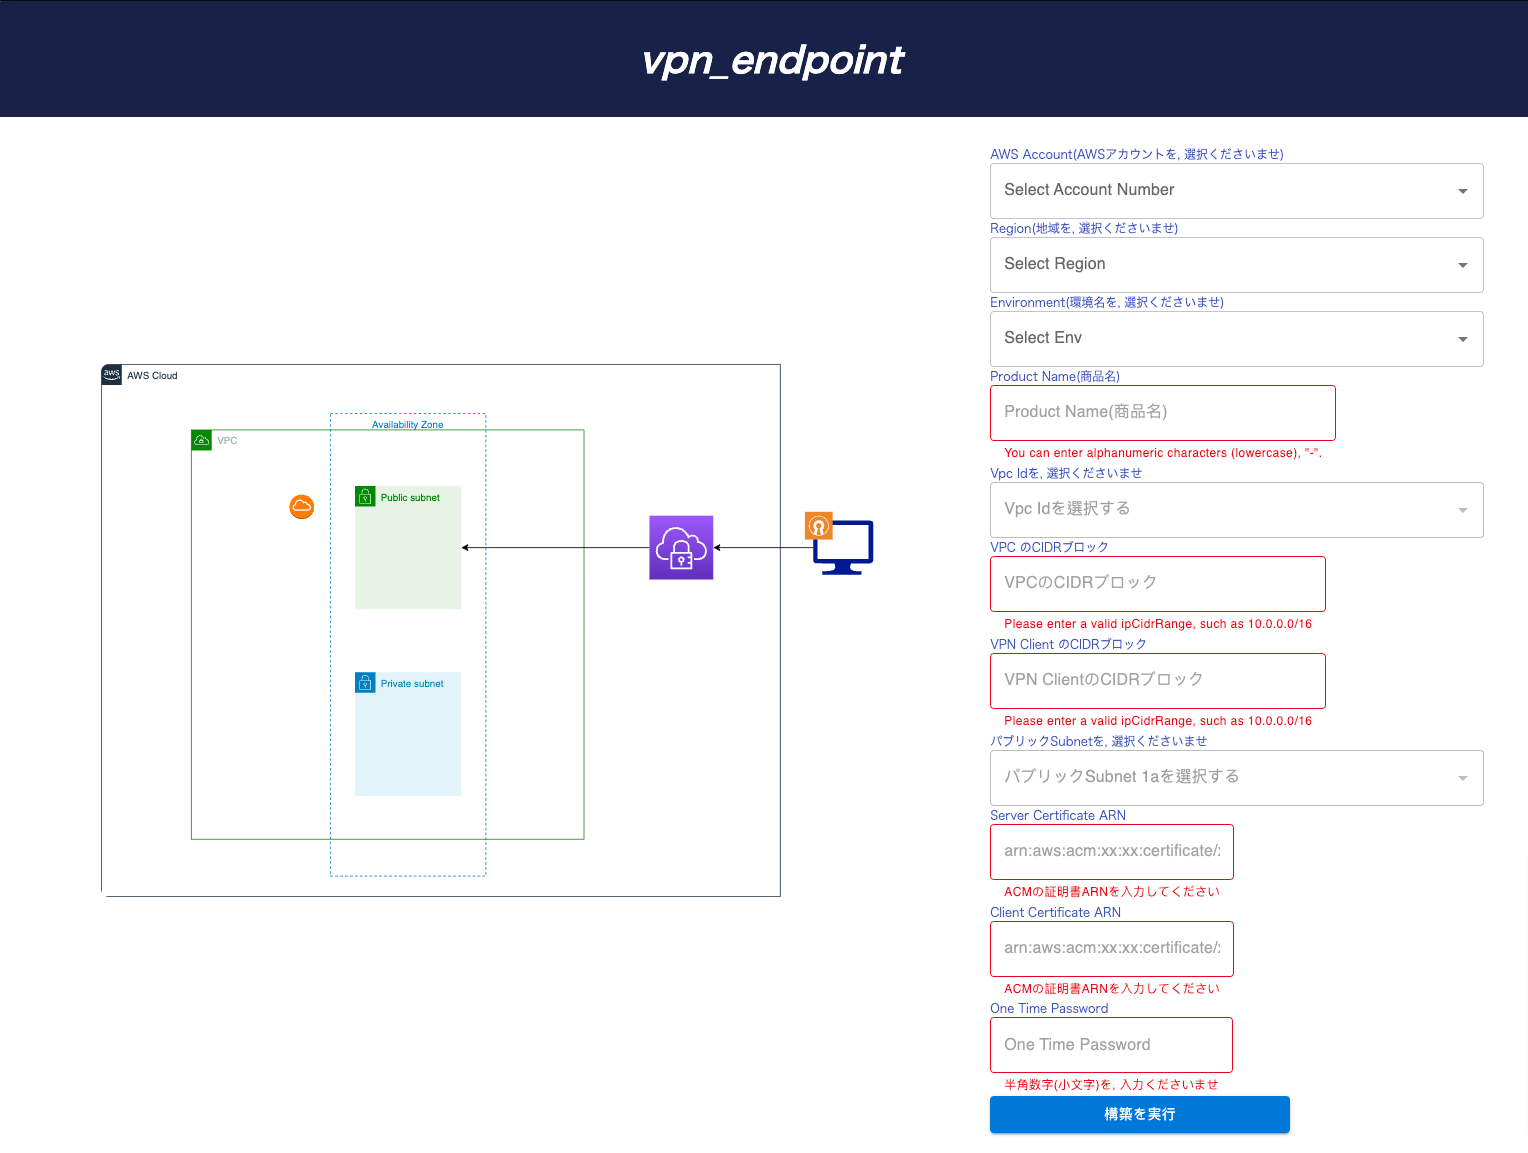 Create VPN endpoints automatically:
・ Connect the VPN endpoint to the private VPC.
・ To be able to connect the Internet to the VPN endpoint.
Estimated Time
5-15 minutes (without DevOps knowledge)
Create VPN endpoints automatically:
・ Connect the VPN endpoint to the private VPC.
・ To be able to connect the Internet to the VPN endpoint.
Estimated Time
5-15 minutes (without DevOps knowledge)
Create VPN endpoints automatically:
・ Connect the VPN endpoint to the private VPC.
・ To be able to connect the Internet to the VPN endpoint.
Estimated Time
5-15 minutes (without DevOps knowledge) 7. Introduce AWS VPN Client tool
Some common VPN client software that can be used to connect to AWS VPNs include:
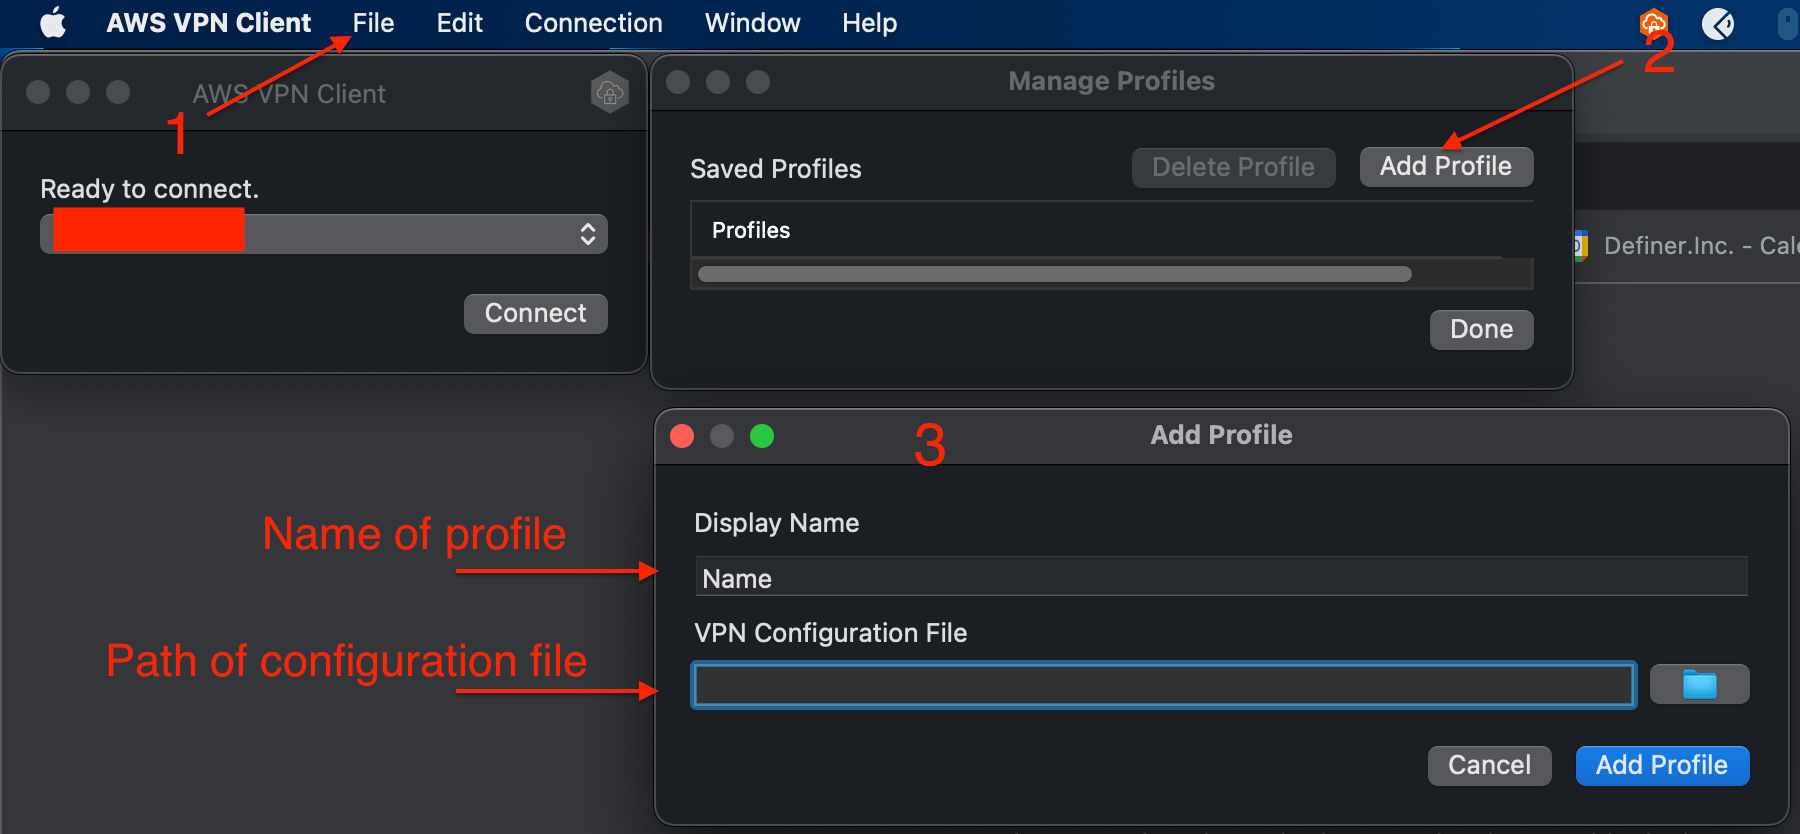 Then choose that profile and click to Connect.
- OpenVPN: OpenVPN is an open-source VPN solution that is commonly used to connect to AWS VPNs. It's known for its flexibility and support for various platforms. You can configure OpenVPN to work with AWS VPNs using OpenVPN client software.
- Cisco AnyConnect: Some organizations use Cisco AnyConnect as their VPN client of choice. It can be configured to connect to AWS VPNs, especially if your organization uses Cisco hardware.
- AWS Client VPN: AWS offers its own VPN service called AWS Client VPN. AWS Client VPN provides its own client software for Windows and macOS, which can be used to connect to your AWS VPCs. This client is specifically designed for use with AWS services.
- Third-party VPN Clients: Depending on your specific use case and requirements, you can also use third-party VPN clients that support VPN protocols such as IPsec or SSL/TLS to connect to AWS VPNs.
Then choose that profile and click to Connect.
8. Reference
The reference section lists the sources or external materials used in the article, allowing readers to explore further or verify the information provided.