1. Introduction
Hello! We are a writer team from Definer Inc.
In this issue, you are wondering about the use of Go and CloudRun.
Let's take a look at the actual screens and resources to explain in detail.
2. Purpose/Use Cases
In this article, we will utilize the Cloud Run technology to achieve our goal of running Go serverless.
This is a collection of information and practices that you may find useful when you want to run Go containers using Cloud Run in an IT setting.
3. What is Cloud Run?
Google Cloud Run is a serverless container execution environment that can be written in any language.
Users simply prepare container images and run their applications without having to manage clusters or servers.
Hosts running containers automatically scale out based on load and scale in to zero when there are no requests.
Cloud Run is created in a redundant configuration across multiple zones, ensuring proper load balancing and redundancy.
As a reminder, the container used by Cloud Run has the following requirements
・Files in the container image must be compiled for Linux 64-bit.
・All requests must be listened on the destination port (default is 8080).
・Must respond to requests before the request times out.
4. Docker setup
Ensure that your computer meets the minimum system requirements for Docker. Check the Docker documentation for the specific requirements based on your operating system.
(1) Visit the Docker website (https://www.docker.com/get-started) and download the Docker installer for your operating system. Docker provides installers for Windows, macOS, and various Linux distributions. Choose the appropriate installer and download it to your computer.
(2) Install Docker. Once the Docker installer is downloaded, run the installer executable. The installation process may vary slightly depending on your operating system.
・On Windows: Double-click the installer file (e.g., Docker Desktop Installer.exe) and follow the on-screen instructions. The installer will guide you through the installation process, including accepting the license agreement and configuring Docker settings.
・On macOS: Open the downloaded Docker.dmg file and drag the Docker application to the Applications folder. Then, double-click Docker.app to start the installation process. You may need to provide your system password during the installation.
・On Linux: The installation steps for Linux can vary depending on the distribution. Consult the Docker documentation for detailed instructions on installing Docker for your specific Linux distribution.Install Docker Once the Docker installer is downloaded, run the installer executable. The installation process may vary slightly depending on your operating system.
(3) Start Docker. After the installation is complete, start Docker on your computer.
・On Windows: Look for the Docker Desktop application in the Start menu or on the desktop and open it.
・On macOS: Open the Launchpad and click on the Docker icon to start it.
・On Linux: Docker should start automatically after installation. You can verify it by running the command
docker version in a terminal.
(4) Verify Docker. Installation To ensure that Docker is installed correctly, open a terminal (Command Prompt or PowerShell on Windows) and run the command docker version. This command should display the Docker version information if it is installed correctly. 5. What is Go language?
Go, also known as Golang, is a programming language developed by Google. It was created to address the shortcomings of existing languages and to provide a simple, efficient, and reliable way to build software. Here are some important points about the Go language:
(1) Simplicity: Go emphasizes simplicity and readability. The language design aims to make code easy to understand and maintain. Go has a concise syntax with a small number of keywords and a minimalist approach to language features.
(2) Concurrency: Go has built-in support for concurrency through goroutines and channels. Goroutines are lightweight threads that allow concurrent execution of functions, while channels facilitate communication and synchronization between goroutines.
(3) Performance: Go is designed to be highly efficient and performant. It has a garbage collector that manages memory automatically, and the compiled code executes quickly. Go's focus on simplicity also contributes to its performance.
(4) Compiled Language: Go is a compiled language, which means that Go source code is compiled into machine code that can be executed directly by the computer's processor. This compilation process results in a standalone binary executable.
(5) Package Management: Go has a built-in package management system called "go modules." It allows developers to manage dependencies and versioning of external libraries easily. Go modules have become the standard approach for managing dependencies in Go projects.
(6) Tooling: Go provides a set of powerful command-line tools, including the go command, which handles various tasks like building, testing, and running Go programs. The Go toolchain also includes tools for profiling, benchmarking, and code formatting, among others.
6. Go container setup
First, we will create a Go container.
(1) Create a Dockerfile
Create a minimal Dockerfile like the following Dockerfile.
FROM golang:latest as builder
ENV GOOS=linux
ENV CGO_ENABLED=0
ENV GOARCH=amd64
WORKDIR ${work directry}
COPY . .
RUN go build main.go

# runtime image
FROM alpine
COPY --from=builder ${work directry} /app

CMD /app/main 8080
-
-
-
-
-
-
-
-
-
-
(2) Creating a program for Go
Success will be printed, we have prepared a simple
FROM golang:latest as builder: This line specifies the base image for the build stage of the Docker image. It uses the latest version of the official Go Docker image as the base image.-
ENV GOOS=linux: This line sets the environment variable GOOS to linux, indicating that the resulting binary will be compiled for a Linux operating system.-
ENV CGO_ENABLED=0: This line sets the environment variable CGO_ENABLED to 0, disabling the use of CGO (C Go) for cross-compiling.-
ENV GOARCH=amd64: This line sets the environment variable GOARCH to amd64, specifying the target architecture for the compiled binary.-
WORKDIR ${work directory}: This line sets the working directory inside the container where subsequent commands will be executed. You should replace ${work directory} with the desired working directory path.-
COPY . .: This line copies the entire current directory (including the Go source code) into the working directory of the container.-
RUN go build main.go: This line runs the go build command to compile the main.go file and generate an executable binary.-
FROM alpine: This line specifies the base image for the runtime stage of the Docker image. It uses an Alpine Linux base image, which is a lightweight distribution.-
COPY --from=builder ${work directory} /app: This line copies the compiled binary from the build stage (specified by --from=builder) into the /app directory of the runtime stage.-
CMD /app/main 8080: This line specifies the command to be executed when a container is started from the image. It runs the /app/main binary with the argument 8080, indicating that the application should listen on port 8080.(2) Creating a program for Go
Success will be printed, we have prepared a simple
package main
import (
    "fmt"
    "os"
    "net/http"
    "strconv"
)
func handler(w http.ResponseWriter, r *http.Request) {
    fmt.Fprintf(w, "Suceess\n")
}
func main() {
    http.HandleFunc("/", handler)
    http.ListenAndServe(fmt.Sprintf(":%d", 8080), nil)
}
7. Running Go with Cloud Run
Now, let's try to run a Go container using Cloud Run.
(1) Create Container Registry
Create a repository to store Docker images.
Go to the Container Registry screen of GCP and click Create New.
Create a repository with an arbitrary name.
(2) Push Go image to Container Registry
The following command builds and pushes the image.
## Container Build
sudo docker build -t test .

## Tagging Container Images
sudo docker tag test gcr.io/${Repository Name}:latest

## Push to GCR
sudo docker push gcr.io/${Repository Name}:latest
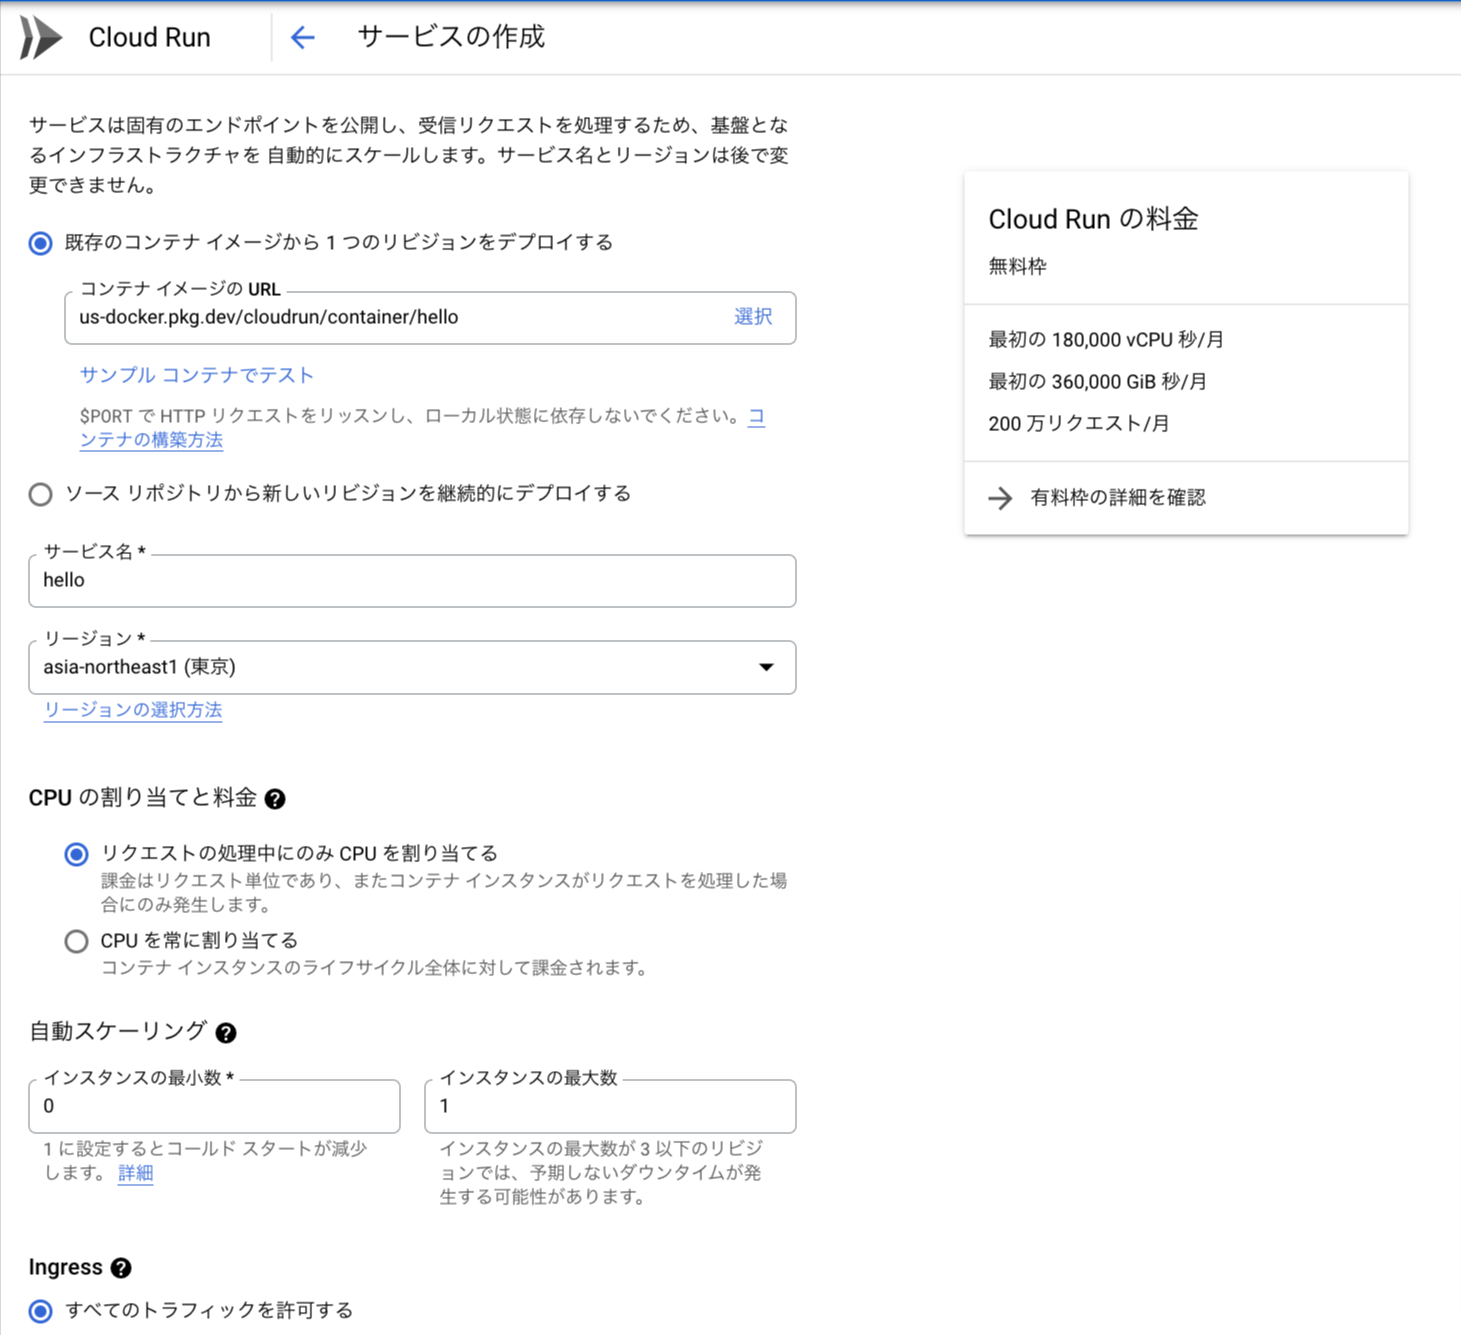
(3) Start Cloud Run
Access the Google Cloud console and click "Cloud Run" > "Create Service".
Specify the Google Container Registry image in the "Container Image URL" field.
Enter the service name and region.
This time, the "Maximum number of instances" for auto-scaling is set to 1.
For authentication, set "Allow unauthorized calls".
(2) Confirmation of container startup
Go to the Cloud Run details screen, click on the URL and Success is displayed!
8. Cited/Referenced Articles
Google Cloud is a great tool for building and operating new services with Cloud Run.
How to build and run a new service with Cloud Run as an SRE
Google Cloud Run
Cloud Run: Deploy a Container to Production in Seconds | Google Cloud
Service account for Google API with Go library ...
Streamline your Cloud Run development with Cloud Code | Google Cloud Blog
9. About the proprietary solution "PrismScaler"
・PrismScaler is a web service that enables the construction of multi-cloud infrastructures such as AWS, Azure, and GCP in just three steps, without requiring development and operation.
・PrismScaler is a web service that enables multi-cloud infrastructure construction such as AWS, Azure, GCP, etc. in just 3 steps without development and operation.
・The solution is designed for a wide range of usage scenarios such as cloud infrastructure construction/cloud migration, cloud maintenance and operation, and cost optimization, and can easily realize more than several hundred high-quality general-purpose cloud infrastructures by appropriately combining IaaS and PaaS.

10. Contact us
This article provides useful introductory information free of charge. For consultation and inquiries, please contact "Definer Inc".
11. Regarding Definer
・Definer Inc. provides one-stop solutions from upstream to downstream of IT.
・We are committed to providing integrated support for advanced IT technologies such as AI and cloud IT infrastructure, from consulting to requirement definition/design development/implementation, and maintenance and operation.
・We are committed to providing integrated support for advanced IT technologies such as AI and cloud IT infrastructure, from consulting to requirement definition, design development, implementation, maintenance, and operation.
・PrismScaler is a high-quality, rapid, "auto-configuration," "auto-monitoring," "problem detection," and "configuration visualization" for multi-cloud/IT infrastructure such as AWS, Azure, and GCP.